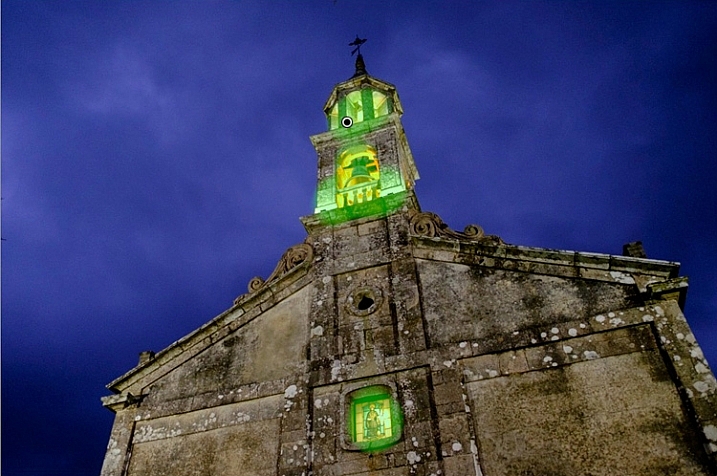
Whenever you take a photo, no matter what the subject, it would be extremely unusual if it couldn’t be improved in some way by making local adjustments in Lightroom.
Local adjustments affect part of the image. Whenever you carry out any processing action in Lightroom you are either making a local adjustment (only affects part of the image) or a global adjustment (affects the entire image).
If you have been following this series and trying out some of the techniques I wrote about in my earlier Lightroom articles that you have been mainly making global adjustments. There is an exception. Adding a vignette in the Effects panel is a local adjustment because it affects the edges of the image but not the centre.
Lightroom gives you three powerful tools for making local adjustments. They are the Adjustment Brush, the Graduated filter, and Radial filter.
The Adjustment Brush
The Adjustment Brush is for creating an odd shaped mask – one that can’t be made easily with the Graduated or Radial filters.
 Note that masks work differently in Lightroom than in Photoshop. In Photoshop, the adjustment is applied to the area that isn’t covered by the mask. In Lightroom, the adjustment is applied to the area covered by the mask.
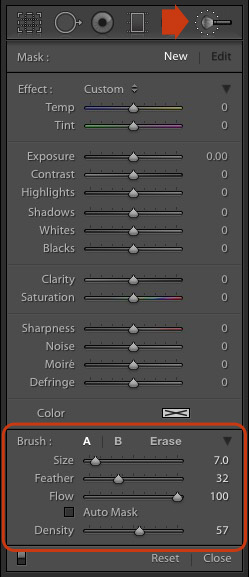
Creating a mask in Lightroom is the same as making a selection in Photoshop. Go to the Develop module and click the Adjustment Brush icon (marked on the right) or use the keyboard shortcut K.
The Adjustment Brush panel opens up underneath the icon. The first 14 sliders show the adjustments you can make with this tool. The Effect menu contains a number of presets that you can use (click the word “Custom” to see the pull-down menu).
At the bottom (circled) are sliders for setting the size, softness and strength of the Adjustment Brush.
To start, select Brush A (if not already selected) and use the [ and ] keys to make the brush smaller or larger respectively, until it is the right size to create the mask you need. You can also use the Size slider, but the keyboard shortcuts are easiest.
Hold down the Shift key and use the [ or ] to adjust the amount of feathering. Again, you can use the Feather slider but the keyboard shortcuts are faster once you get to know them.
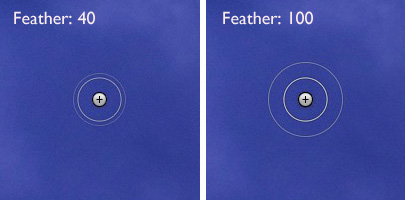
The size of the Adjustment Brush is shown by two concentric circles on the screen. The inner circle shows the area fully covered by the brush. The outer circle shows more or less where the effect of feathering ends. The distance between the circles increases when you increase the feathering amount. This diagram shows how it looks on screen.
You can create another Adjustment Brush by clicking on B and changing the parameters. You can switch between the A and B brushes whenever you like, useful for complex retouching.
Select Erase to delete part of the mask that you have created. You can adjust the size and feathering of the Erase brush as well.
Flow controls the opacity of the mask. 100 is full strength. Set it here unless you have a reason to do otherwise.
Density sets the maximum strength of the effect.
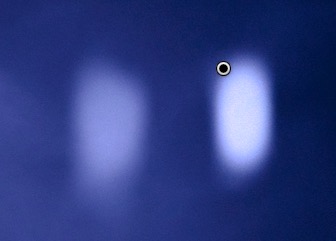
The difference between Density and Flow is this. If you set Flow to 25% and repeatedly brush over part of the image, each brush mark builds on the one below it, increasing the strength of the effect until you reach 100%. If you set Density to 50%, and flow to 25%, then repeatedly brush, the maximum strength you can reach is 50%.
This diagram shows the difference. On the left I set the Exposure slider to +4.00, Flow to 25%, Density to 50% and brushed repeatedly. On the right I did the same with Density set to 100%.
Tick the Auto Mask box to limit the edges of the mask to any edges in the photo. Sometimes this tool works well, but other times it reacts to textures and creates a patchy mask that doesn’t cover the area you want. I leave this unticked most of the time.
You can add as many Adjustment Brushes to an image as you like. Each one is represented by a grey dot that is revealed when you select the Adjustment brush tool and move the mouse over the photo. The current Adjustment Brush is marked by a black circle within the grey pin. Click on a grey dot to activate that adjustment and make changes to it, or delete it (press the Backspace key).
Now, let’s put that into practice. I’d like to do two things to the photo below. One is reduce the intensity of the highlights created by the lights inside the church; the second is emphasize the texture of the stone. We can do both with the Adjustment Brush.

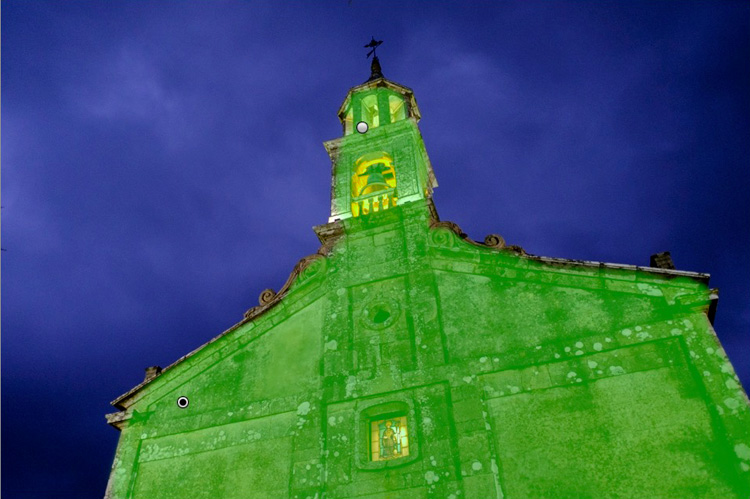
First, I brushed in the areas affected by the bright highlights (shown in green below).

You can see the area covered by the Adjustment Brush at any time by pressing the O key.
This is called the Mask Overlay and is coloured green in my screen shots. The default colour is red. Press the Shift and O keys together to change it. Press O again to hide the Mask Overlay.
Then I moved the Highlights slider left (to -67) to reduce the intensity of the highlights. These screen shots show the difference.
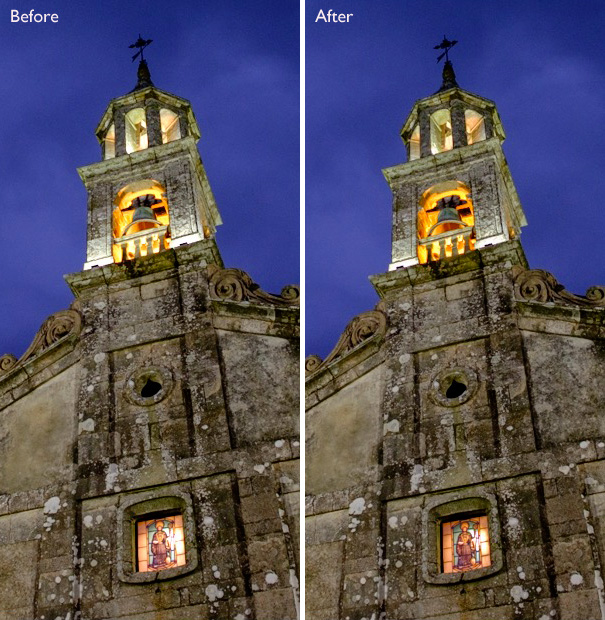
Next, I created a new mask covering the stonework.
Then I increased Clarity to +58 to bring out the texture of the stone wall.
Here’s the final result, compared to the original.
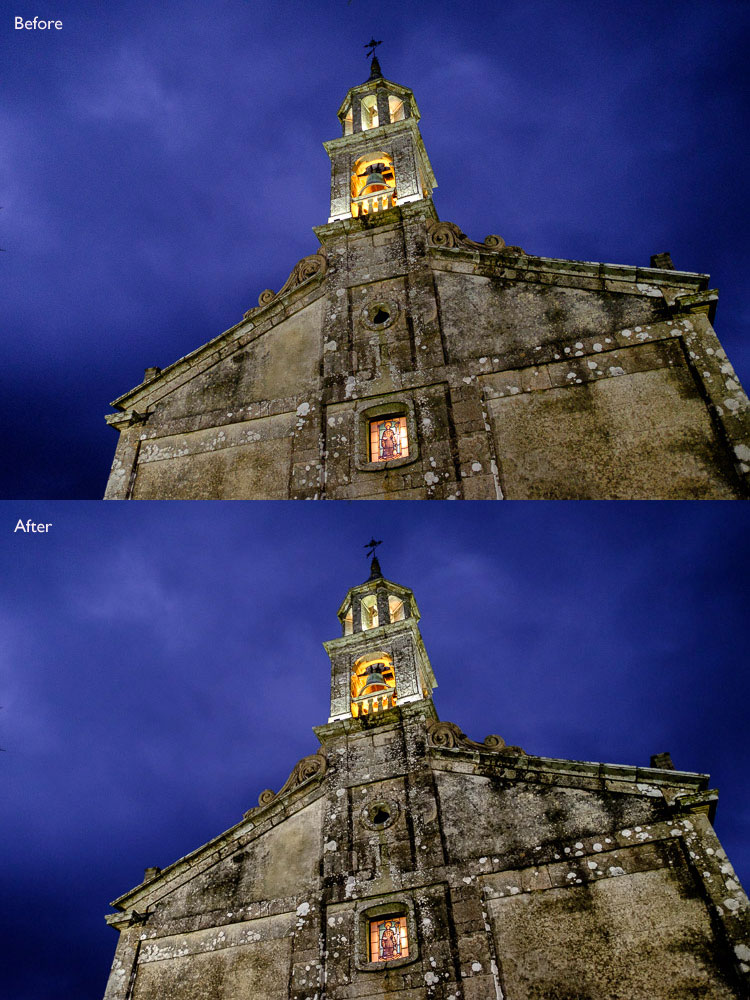
Here are some more uses for the Adjustment Brush:
- Portrait retouching. Use the Adjustment Brush to select the model’s skin and apply the Soften Skin preset. You can also enhance eyes by increasing exposure and Clarity.
- Enhancing black and white photos. Many black and white images rely heavily on texture for impact. Use the Adjustment Brush to select the textured areas you would like to have the most impact, and increase Clarity to enhance them.
- Selectively desaturating the background to add impact to portraits.
My article, Four Ways to Improve your Photos with the Clarity Slider in Lightroom, shows you how to do it.
The Graduated filter
Lightroom’s Graduated filter is named after the type of filter used by landscape photographers to make skies darker.
This is also the most obvious use for Lightroom’s Graduated filter. However, it only works if detail was recorded in the sky. it doesn’t replace a physical graduated neutral density filter.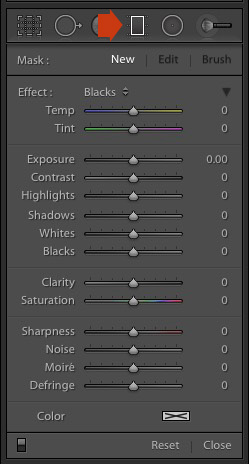
Go to the Develop module and click the Graduated filter icon (marked right), or click the keyboard shortcut – M. The Graduated filter panel opens, revealing the same sliders as the Adjustment Brush.
Click and hold the left mouse button down, and pull the mouse down over the image. Lightroom adds a Graduated filter to the photo.
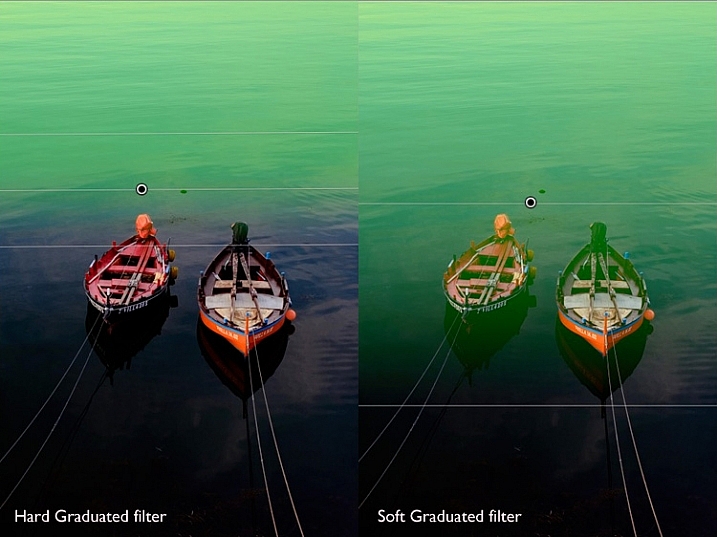
The Graduated filter is marked by three lines that move further apart as you move the mouse across the photo. The lines represent the softness of the filter – the further they are apart, the more graduation you get.
Let go of the mouse button to place the filter. If you do so close to the edge of the photo, you will create a filter with three lines close together. This is a hard filter, with a rapid graduation between full effect and no effect.
If you hold the mouse button down for longer, you get a filter with three lines spaced far apart. This is a soft filter, with a gentle graduation between full effect and no effect.
The two types of filter are shown below. I pressed the O key to show the Mask Overlay (you can only do this in Lightroom 6 and Lightroom CC).
After creating the filter, you can move it by clicking and dragging the central pin.
If you hold the Shift key down while creating the filter, it is placed parallel to the edge that you started from.
To rotate the filter, hold the mouse over the central line (the one with the pin) until the cursor changes from a plus sign to a curly double arrow. Hold the left mouse button down and move the mouse to rotate the filter.
To change the softness of the filter, hold the mouse over the outer line until the cursor changes to a hand. Click and drag to move the line closer to, or further from, the central line. If you hold the Alt key down while you do so, the central line stays in position.
The best way to come to grips with this is to try it out. It may sound complex, but it’s quite simple, and you’ll quickly get the hang of it.
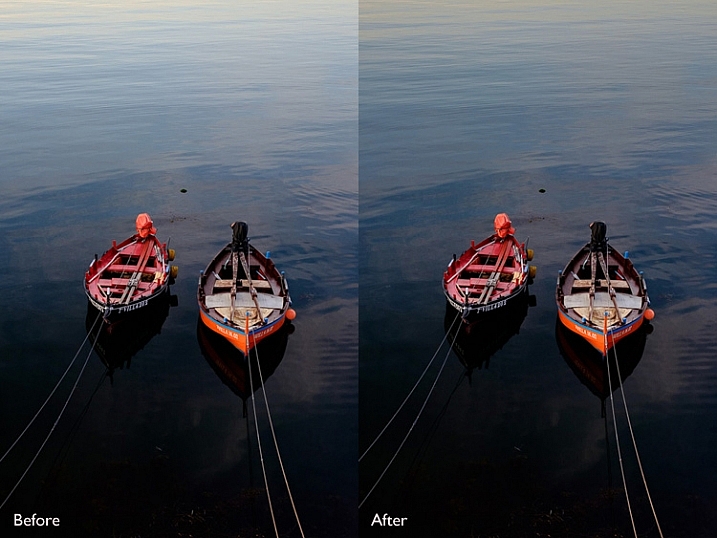
Here’s an example of how you can use the Graduated filter to improve an image. The water behind these boats is very bright, and I wanted to make it darker to fit in with the foreground. The Graduated filter is the perfect tool for this. Before and After photos shown below.
In Lightroom 6 and Lightroom CC you can combine the Graduated filter with the Adjustment Brush. The Adjustment Brush is used to alter the shape of the mask created by the Graduated filter.
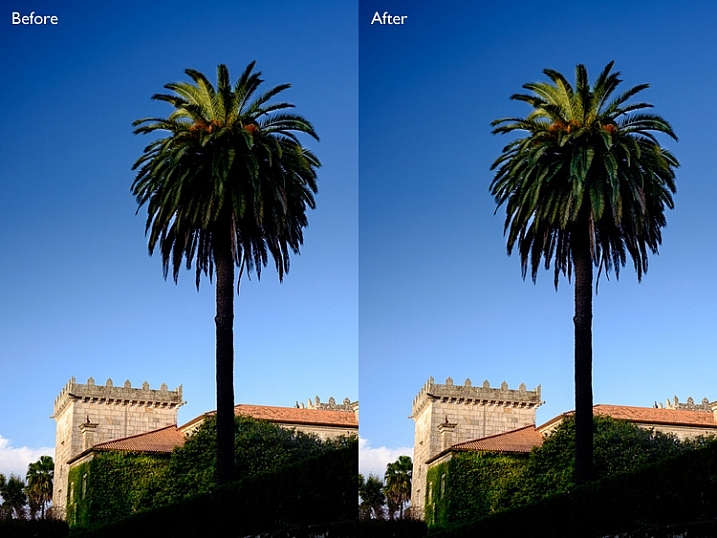
In this example, I used the Graduated filter to darken the sky. The only problem is that the Graduated Filter also makes the palm tree darker, which I don’t want. Here’s the Mask Overlay (shown in red).
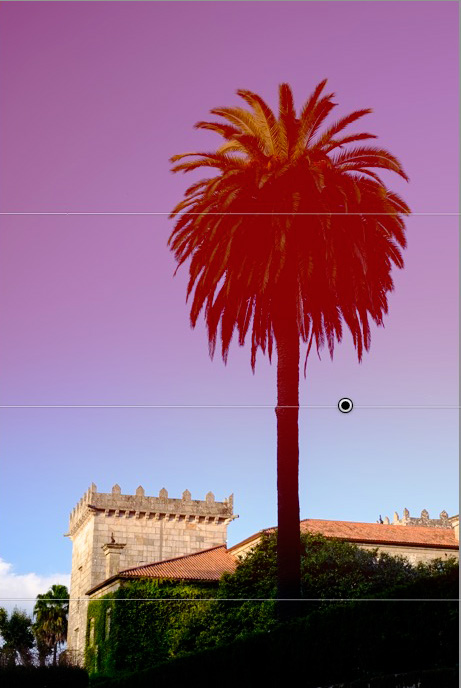
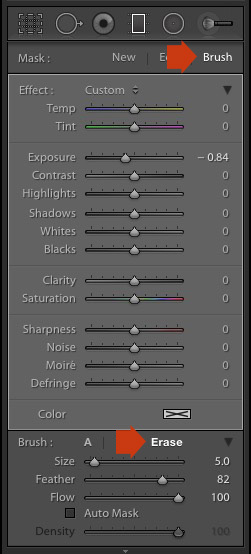
Press O to show the Mask Overlay, then click on the word Brush in the Graduated filter panel (marked below). The Brush options open up below the panel. Click Erase (also marked below) and adjust the size (and other settings) to suit.
Here’s what the Mask Overlay looks like with the part that covers the palm tree erased.
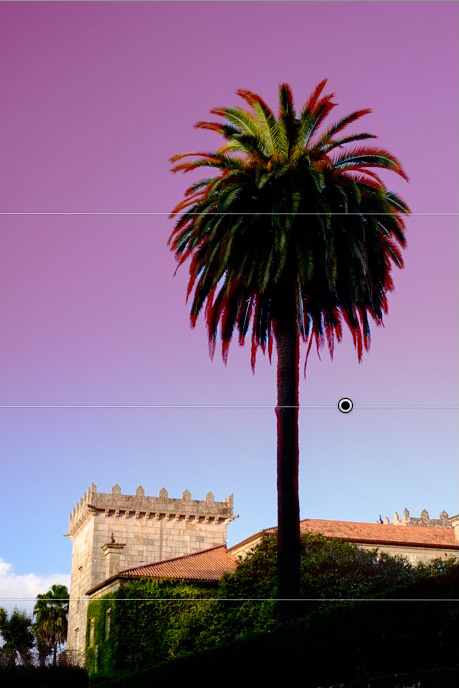
Here are the before and after versions.
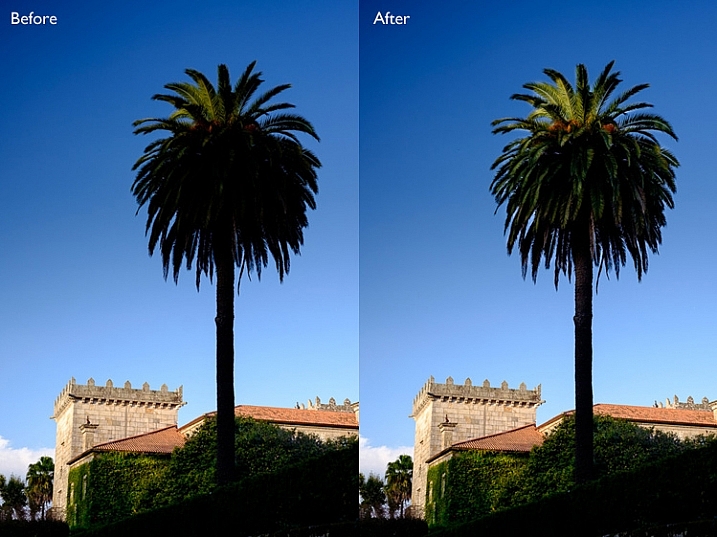
Before (left) showing the graduated filter to darken the sky. After (right) showing the tree portion having been erased or masked out from being darkened by the graduated filter.
My article Improve Your Images with the Lightroom Graduated Filter Tool shows you six ways you can use the Graduated filter to improve your photos.
The Radial filter
The Radial filter (new in Lightroom 5) is for creating circle or oval shaped masks. If you have Lightroom 6 or Lightroom CC you can press O to show the Mask Overlay. You can also combine the Radial filter with the Adjustment Brush.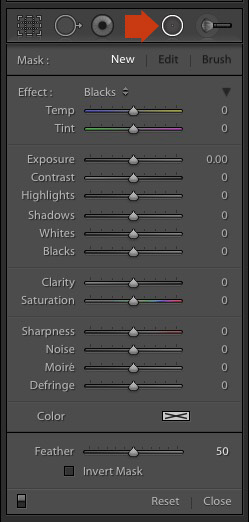
Go to the Develop module and click the Radial filter icon (marked right). The Radial filter panel opens. The sliders are the same as those used by the Graduated filter and the Adjustment Brush.
Hold the left mouse button down and drag the mouse across the photo. Let the mouse button go when you are done.
Change the size and shape of the Radial filter by clicking and dragging the four white squares at the compass points of the filter.
Rotate the Radial filter by moving the cursor to the edge of the filter until it changes from a hand or plus icon to a double curly arrow. Click and drag to rotate.
Use the Feather slider to set the softness of the gradient at the edges of the Radial filter. The default setting of 50 seems to work well for most masks, but you can change it if you need to.
By default Lightroom applies the adjustments to the area outside the Radial filter. Tick the Invert Mask box to apply the adjustments to the area inside it instead.
The screenshot below shows a Radial filter that I placed on photo used in the previous demonstration. I ticked the Invert Mask box to apply the adjustment to the area inside the Radial filter. The Mask Overlay is on to show you the affected area (in red).
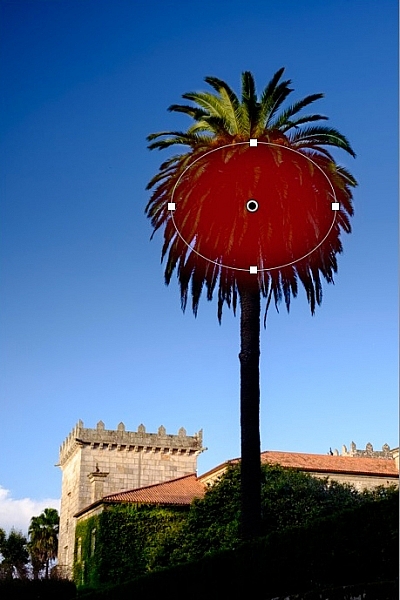
Then I increased Exposure to bring out some detail in the palm tree. Before and after versions below.
Here are some uses for the Radial filter:
- Portrait retouching. Select eyes or lips and enhance using exposure and Clarity sliders.
- Making portrait backgrounds darker. Place a Radial filter over the model’s face and make the background darker.
- Add a vignette to off-centre subjects. When you create a vignette in the Effects panel, it is always centred. With the Radial filter, you can place it wherever you need.
In my next article I’ll show you how to harness the power of Lightroom using Virtual Copies. Until then, if you have any questions about the techniques in this article, or you would like to share how you use local adjustments in Lightroom, please let us know in the comments.
The Mastering Lightroom Collection
My Mastering Lightroom ebooks will help you get the most out of Lightroom. They cover every aspect of the software from the Library module through to creating beautiful images in the Develop module. Click the link to learn more or buy.
The post How to Use the Local Adjustments Tools Inside Lightroom by Andrew S. Gibson appeared first on Digital Photography School.