Have you ever come across a situation where the colors in your images look different once you upload them to the web? This issue arises because of something called color space. A basic understanding of how color space works can save you serious time and headaches. Aaron Nace discusses the differences between various color spaces and offers some tips on choosing the correct color space when exporting your images:
Background Information on Color Spaces
The human eye has the ability to see a ton of colors. According to modern estimates, we can see from 2 million to 8 million colors. There is a mathematical equation to represent the possible colors that we can see known as the Lab model.
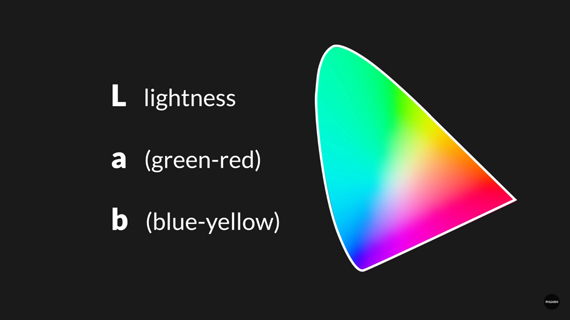
Consider the Lab model as the universe. From this model, we can derive smaller color profiles suitable for different devices. The most common color profiles used by photographers are sRGB, Adobe RGB (1998), and ProPhoto RGB. Have a look at the illustration below to understand how they cover the spectrum of the Lab model.
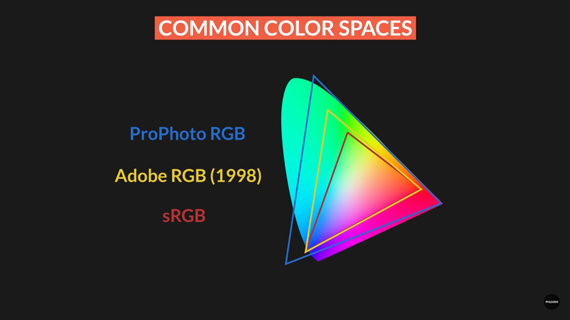
The sRGB color profile contains the least amount of colors and is used by most applications, web browsers, and devices. Now you must be wondering why the smallest spectrum is the most widely used one. Here’s why:
“The whole reason is because there are limitations within different devices. Your phone versus a tablet that was made 10 years ago versus a computer screen, they all can display different amounts of color. So, if you want them to able able to display colors consistently, you have to choose a color profile that’s smaller, using less colors so that all those different devices can properly display all of those different colors.”
And this is the reason why sRGB is in use as a standard color profile for exporting images. So if you plan to upload your images to the web, use the sRGB color profile because that’s the one the web uses.
Color Space Uses
Now you know that there are a few different color profiles and that sRGB is the one that is widely supported. So, what about the other color profiles? Should you only use sRGB? The answer is a bit complicated.
The choice of color profiles is most important when you’re editing your images. You want to edit your images using the color profile that has more color information. This is especially true if the photo you’re working with has a lot of saturated colors. If you compare the sRGB, Adobe RGB (1998), and ProPhoto RGB color profiles, you will notice that they have the greatest amount of difference when it comes to saturated colors.
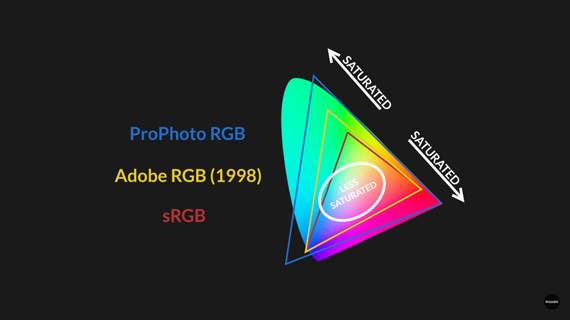
“If you’re working on a very saturated image or if you plan on doing a lot of editing, I highly recommend starting in ProPhoto RGB.”
But as we discussed earlier, the web only supports sRGB. So, what if you want to export the image that you edited using ProPhoto RGB color profile to the web? To overcome the issue, simply export the image using the sRGB profile once you’re done editing with the ProPhoto RGB color profile. More on this below.
Color Settings in Photoshop
In this section, Nace demonstrates how you can set up your color preferences, and he also dispels some myths when it comes to setting up your colors in Photoshop.
Start by clicking on Edit > Color Settings in Photoshop and it will open your Color Settings dialog box. Here’s what Nace recommends you use for your color settings:
- For your working space RGB, set it to sRGB.
- Set the color management policy to “Preserve Embedded Profiles”. This will allow you to edit the image in whatever color profile it is assigned to. If the image is assigned to ProPhoto RGB, Photoshop will edit the image in the ProPhoto RGB color profile.
- Check the two boxes corresponding to “Profile mismatches” and Photoshop will ask you what to do when there is a profile mismatch. For instance, it will ask you which profile to use if you import or paste an image with the sRGB color profile within an image with an Adobe RGB profile.
- Check the box corresponding to “Missing profiles” and Photoshop will ask you which color profile you’d like to use when you open an image with no color profile assigned.
- Use Adobe (ACE) for the conversion engine and set the intent to “Relative colorimetric”.
- Leave the rest of the settings untouched.
Here’s Nace’s recommended settings for convenience:
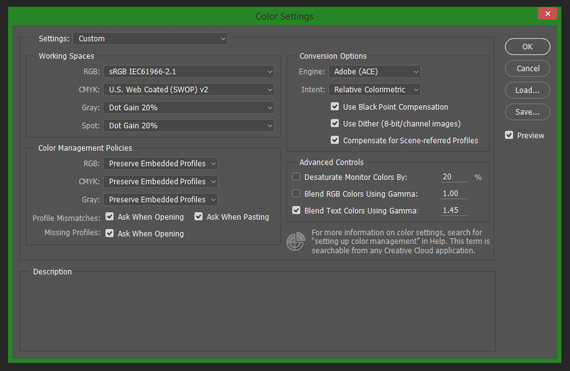
Photoshop Color Settings
Assigning Color Profiles to RAW
If you’ve fiddled around with your camera settings, you might have come across the color profile setting for your images. Cameras allow you to save images using either the sRGB or Adobe RGB 1998 color profile. However, you should keep in mind that this setting affects only JPEG images. If you shoot RAW (which you should), you can select the color profile later. Nace demonstrates how you can do that using Adobe Camera RAW:
- Open the RAW image using Photoshop and it will automatically load up in Camera RAW.
- Click on the settings at the very bottom of the Camera RAW window to launch the “Workflow options” window.
- In the “Space” drop-down menu, you can select the color profile of your liking and assign it to the image. For demonstration, Nace assigns the ProPhoto RGB color profile to the RAW image.
- For depth, choose 16 bits/channel.
- In the Photoshop section, check the box that says “Open in Photoshop as smart objects”.
- Click on “OK” and then “Open Image”. Photoshop will now prompt you that the image you are trying to open has a different color profile embedded (ProPhoto RGB) than the default working profile (sRGB). You want to use the embedded color profile in this case.
If you want to check your color space, simply go to Edit > Convert to Profile. In the source space, you can see the current profile that your image is assigned to.
Exporting Images for the Web
As we discussed earlier, the web only supports sRGB color profile. So what can you do if you edit your images using some other color profile? Simply go to File > Export > Save for web. In this dialog, make sure that the “Convert to sRGB” box is checked, and click on “Save”. Once the file is saved, you’re good to go.
Lightroom to Photoshop Color Settings
If you like to jump from Lightroom to Photoshop for editing, you can easily make sure that you are using the proper color space.
- Go to the Lightroom menu and down to “Preferences”.
- In the “External editing” tab, choose the color profile that you want to use in Photoshop.
- Set the bit depth to 16 bits/component.
Now if you jump from Lightroom to Photoshop, you can choose to keep the embedded color profile from Lightroom in Photoshop.
Color Settings for Export from Lightroom
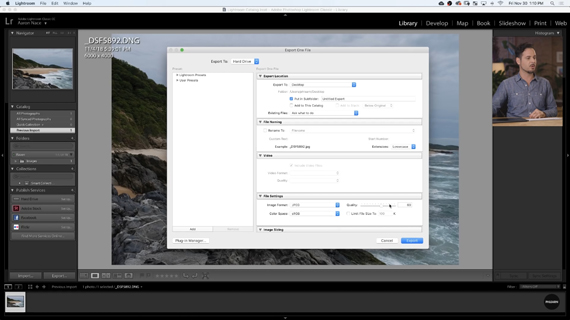
When exporting images directly from Lightroom, choose the color profile in the export dialog as follows:
- Right click on the image or set of images to export and select Export.
- In “File settings” choose your “Image settings” as JPEG and your color source as sRGB (for web or to display in most of the devices).
- Click on export.
To conclude, think of the Lab color model as the universe of colors and the other color profiles as its subsets. Different devices can handle different color profiles but most of them support sRGB. When editing images, it is highly recommended that you use the ProPhoto RGB color space. But when exporting them, be sure to use the sRGB color space for maximum compatibility.
Go to full article: Tutorial: Color Spaces in Photography
What are your thoughts on this article? Join the discussion on Facebook
PictureCorrect subscribers can also learn more today with our #1 bestseller: The Photography Tutorial eBook
The post Tutorial: Color Spaces in Photography appeared first on PictureCorrect.