This image by Karl Taylor, actually a composite of two images, uses a complex four light arrangement. It involves one beauty dish, two large softboxes, a background light and a tri-reflector. Although the word complex was used to describe it, the setup is actually very easy to replicate. The diagrams below are a rough breakdown of Taylor’s lighting setup:
If you look closely at the image below, you’ll notice the shiny highlight on the model’s forehead. Notice similar highlights on the model’s nose and chin. The same light seems to be lighting the middle portion of the torso, going down toward the belly. Thereafter the light seem to fall off dramatically. Also notice the light on the model’s knuckles.
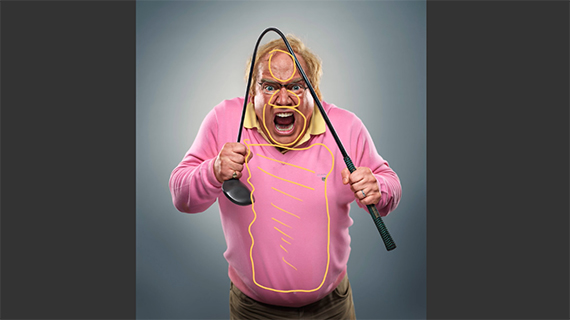
All of this was created using a 70cm Beauty Dish mounted on a Giraffe Boom. The light was angled down toward the model’s forehead. The camera was placed at eye level with the model, carefully placed away from the sweep of the light. However, the front illumination of the model was not complete there. A tri-reflector was placed on a stand aiming upward, throwing some light back up to the model. A tri-reflector is a panel of three reflectors. You can angle each one of them individually.
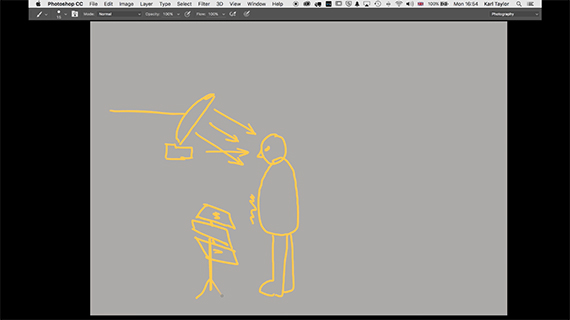
Front Lighting
Again, notice how the model seems to appear separated from the background with an edge light. The edge light is clearly visible on both sides of the model’s torso as well as on his arms, and around the model’s head and shoulders. Also notice the light on both sides of the model’s face. This was created by two large 30 x 120 softboxes positioned at the back of the subject and at a 45 degree angle.
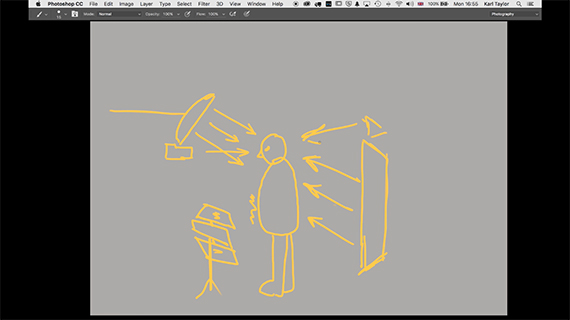
Edge Light
Finally, you will no doubt also have noticed a soft glowing light emanating from the background. The background itself is a gray paper roll coming down from the top. This was created using a standard Broncolor studio light with a standard reflector. The light was aimed directly at the background, creating the soft glow that you can see in the image. Taylor recommends tracing the light so as to make it softer than usual. The light should be hidden from the camera, placed directly behind the subject.
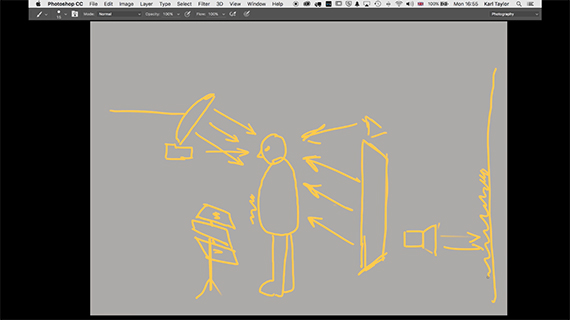
Background Light
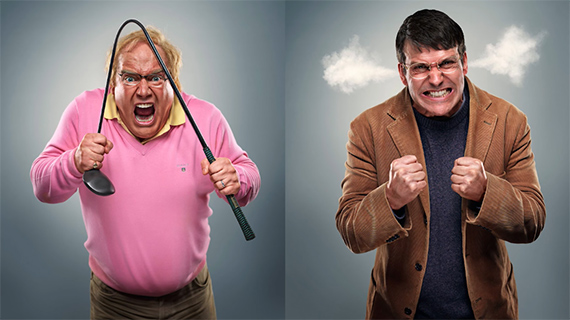
The final image(s)
A bit of retouching, and the final result is fantastic!
Go to full article: Angry Man Portrait Lighting Tutorial
What are your thoughts on this article? Join the discussion on Facebook
Article from: PictureCorrect
The post Angry Man Portrait Lighting Tutorial appeared first on PictureCorrect.