Sure, AMD is doing amazing right now – but don’t count out Intel just yet

AMD has had one hell of a 2019 so far – at least when it comes to its processor business – with great reviews and stellar sales that have seen it gobble up more market share than it has done in over a decade.

While it’s undoubtedly been thrilling to see AMD claw its way back out of obscurity and become a real force to be reckoned with in the CPU industry again, it feels like a few too many of us have been overly hasty in writing off Intel.

Sure, AMD’s been on a hot streak right now, and you’d be crazy if you didn’t think that has caused some rather worried discussions over at Intel, but you’d also be equally loopy if you thought that Intel’s vast dominance over the CPU market would be under any serious threat… for now.

Under the spotlight

What AMD’s recent successes has done is put every move Intel makes under the spotlight, leading people to question everything it does – and wonder whether or not it is in response to AMD’s resurgence.

Take Intel’s recent price cuts for its Cascade Lake-X processors, and its budget Core i5-9400F CPU. Now, this could be framed as Intel getting spooked by AMD, and cutting its prices in response. Considering the new threat AMD now poses, that’s a theory that’s not without merit – but of course it doesn’t tell the whole story.

First of all, making drastic price cuts to your products is not something a company – especially one as successful as Intel – does on a whim. This can take months of planning – if not longer – while taking into consideration all kinds of impacts the price cut will have. I’m not just talking about the impact to profits either – cutting prices on products can alter the perception customers have of them. Make a once premium product too cheap, and it can lose a lot of appeal – especially if it’s then competing against products from competing companies who have much more experience and success at producing budget products… like AMD.

So, while it’s tempting to picture Intel cutting prices all over the place in a bid to halt AMD’s rise, it’s unlikely that’s what’s happening.

A more generous reading of the situation – for Intel, at least – is that the company has finally decided to make its products more affordable – the perceived Intel premium, which leads to its products being more expensive than the competition, has often been criticized by customers. Cutting prices could also lead to bigger sales – after all, getting your products into the hands (and PC cases) of more people is always a good thing.

Releasing more wallet-friendly devices could also be a nice PR win for Intel – though at the moment AMD seems to be stealing all the limelight.

18-core Cascade Lake-X chip

Tricks of the trade

It’s also worth remembering that while AMD is certainly doing well with its new processors, Intel isn’t resting on its laurels – something the company has certainly been guilty of in the past. Instead, the company has some innovative and exciting new tech coming out.

One of the best side effects of AMD’s recent successes seems to be Intel no longer taking its market lead for granted. Now, this could me doing exactly what I was cautioning against only a few paragraphs earlier – reading anti-AMD motives in Intel’s behaviour when none exist – but it certainly feels like Intel is coming up with some of its most exciting products in years. From consumer processors with huge core counts, to upcoming CPUs that look like they could be beasts when it comes to overclocking, there’s some great stuff coming out of Intel’s corner.

Of course, there’s also the fact that it’s coming out with its own Intel Xe graphics card to compete with AMD and Nvidia – and we should be seeing it by mid-2020.

Intel Project Athena

Athena? Nice!

There’s also one area that Intel’s dominance remains unchallenged: laptop processors. Again, we have seen an increase in AMD-toting laptops recently – and Microsoft releasing a Surface Laptop 3 with an AMD variant was a huge coup for the company – but Intel easily remains king in this regard – not just in sheer number of products available, but in performance as well.

And, while news of Microsoft no longer using Intel hardware exclusively in its Surface devices got a lot of people excited, it’s worth remembering that Microsoft is still releasing Surface devices with Intel CPUs. Those are the versions that will likely sell the most and (this is me making a slightly controversial prediction before our full review of the products are finalised) will perform better as well.

We’ve also had time with a number of upcoming Project Athena laptops. These are devices from some of the largest manufacturers in the world who have worked closely with Intel to produce laptops that are incredibly powerful, and yet also offer hugely improved battery lives and always-on connectivity. From what I’ve seen of these laptops already, they could be real game changers.

Intel has also made huge strides in improving the integrated graphics of its processors. I met up with Intel last week for its Open House event at the Science Museum in London, UK (an absolutely brilliant choice of venue, by the way), and got to see first hand some very thin and light laptops running games at impressive visual quality and at high frame rates – all using the integrated graphics of Intel’s 10th generation Core processors. Again, this is seriously impressive – and exciting – innovations from Intel, and something I don’t see AMD matching any time soon.

So, yes, AMD is doing amazingly well, and that is great to see. No one likes a monopoly. But don’t count out Intel just yet – the company has a lot of tricks up its sleeve to keep us consumers on its side – and in the end, that’s great news for us.


TechRadar: Cameras and camcorder reviews

Posted in Camera Reviews | Tagged , , , , , , , | Leave a comment

Tokina Announces the atx-i 11-16mm f/2.8 CF Lens

Oct 17, 2019 Kenko Tokina Co., Ltd. – is pleased to announce the sales release of Tokina atx-i 11-16mm F2.8 CF. The Tokina atx-i 11-16mm F2.8 CF is the first renewed long seller AT-X 116 PRO DX II model to fit contemporary DSLR cameras in newly launched atx-i series.
 
Sales will commence on November 8, 2019.
 
Based on widely popular AT-X 116 PRO DX II model atx-i 11-16mm F2.8 CF is designed and optimized for contemporary APS-C sensor DSLR cameras in terms of improved specifications and renovated design with still photographers and video content creators’ demands in mind.
 
The Tokina atx-i 11-16mm F2.8 CF features two models to fit Nikon F and Canon EF mounts.
 
Highlighted Features
 

  • Ultra-wide 11-16mm focal length
  • Constant maximum aperture of f/2.8
  • Excellent optical performance
  • Internal Focus
  • Water-repellent coating
  • One-touch Focus Clutch mechanism

Preorder: Tokina atx-i 11-16mm f/2.8 CF Lens – B&H | Adorama

Canon, Nikon, and Sony News, Deals and What’s New at The-Digital-Picture.com

Posted in Photo Equipment | Tagged , , , , , | Leave a comment

How to Copyright Your Photography and Why You Really Should

The post How to Copyright Your Photography and Why You Really Should appeared first on Digital Photography School. It was authored by Darina Kopcok.

How-to-Copyright-Your-Photography


In today’s digital world, it has become crucial to register copyright for your images. Theft online is rampant, so you need to protect yourself and your work. Read on to find out why you should and how to copyright your photography.

How-to-Copyright-Your-Photography

What is Copyright?

Copyright protects the legal rights of the owner of intellectual property or work of art. In simple terms, copyright is the right to copy. As photographers, this means that only we as the original creators of our images, and anyone we give authorization to, are the only ones with the exclusive right to publish or otherwise reproduce our images.

The moment you click the shutter on your camera, you own the copyright to your images. No matter your level of skill, or whether you’re an amateur or a pro, your images are protected by law.

Keep in mind that copyright laws do vary from country to country, therefore the information in this article is general. It’s also meant for educational purposes since I’m not a lawyer and not qualified to give legal advice.

The lack of knowledge or education about copyright has caused a lot of problems in the photographic industry. Many new or emerging photographers are not educating their clients on copyright and usage, so clients assume they own their images and can do with them whatever they wish. To compound this problem, lawyers often advise their clients to always obtain copyright from the photographer, but in most cases, this is completely unnecessary, unless the client wants to sell the images and make a profit from them.

All of the big companies like Coca-Cola and McDonald’s never ask for copyright. They don’t need it. They license images for a specific use and time frame.

Any discussion about buying out copyright should include very large numbers.

How-to-Copyright-Your-Photography

What is published versus unpublished work?

There are two types of work that fall under Copyright: published and unpublished.

Digital media falls under copyright protection, but it has not been updated to be clear. Published works, in this case, are different from a patent, which covers inventions or discoveries, or trademarks, which covers designs, symbols, logos, and words.

To qualify as published, the work must be distributed to the public in some form, whether digital or print. There has to be some form of copies or multiples. A website or blog doesn’t qualify as published because your photos are not getting distributed. Social media is also considered unpublished. It is not distributed to the public in copies the way stock photos are, for example.

How to Copyright Your Photography and Why You Really Should

Why you should register your copyright

It’s an unfortunate by-product of living in today’s world that your images will get stolen. If you post any of your photography online, chances are that some will get stolen at one time or another. Some of this theft is due to the ignorance of the public, while others knowingly take your images without your permission, without paying for usage licensing.

Unfortunately, a lot of large companies do this, and there have been numerous high profile lawsuits where photographers have won hundreds of thousands of dollars for copyright infringement.

Filing copyright on your photos will protect you in the case you need to go to court to sue for statutory damages and lawyers fees. In a copyright infringement suit, a judge or jury can award you statutory damages as defined by the Copyright Act – thousands, if not tens of thousands of dollars, if you can prove that your image was stolen with willful intent.

Photography is becoming more commoditized, but there is still immense value in it because it allows companies to make a profit by advertising their products. If someone is trying to gain financially by selling a product with stolen images, that is a big problem. Think of it this way: it’s not just the images that are stolen; it’s also the profit of the photographer.

When you don’t charge for usage, or go after those who are using your images unlawfully, that’s money out of your pocket. And what’s worse, you may actually be struggling to pay your overhead and make a profit in the first place.

How-to-Copyright-Your-Photography

How to file for Copyright

Filing for copyright can be a bit tedious, but it can be done online fairly simply. For example, as I’m based in Canada, I Googled “Canadian Copyright Office” and easily found the website for the intellectual property office. I have registered photographs and even a photography eBook I sell on my blog online very easily.

Some countries have agreements with the U.S. to enforce U.S. copyright laws. It’s often useful to register your copyright in the U.S. even if you’re not a U.S. citizen, to obtain the statutory benefits of registration in the United States.

Ideally, you should copyright any images before they are published, but you can copyright them at any time. You can even copyright them after you’ve discovered an unlawful use of one of your images. It will just be a bit more complicated from a documentation standpoint.

The cost of registering copyright varies from country to country. In Canada, it’s $ 50, and in the U.S., it’s currently $ 55 for a group of images. You can copyright your images as a group, to a maximum of 750.

For more information about registering photographs with the U.S. Copyright Office, go here.

The portal is fairly simple to use, but this resource will give you more information. You have to upload a .jpeg for each image you’re copyrighting, and submit a title list in an Excel spreadsheet. The preference is that these items be submitted in a .zip file.

Research the copyright laws in your country. Although in many countries like Canada and the U.S. copyright is immediate upon creation of a work, you still have to register copyright before you can sue.

Conversely, in Australia, there is no formal copyright registration system. The law ensures that certain forms of expression are automatically covered under the Copyright Act.

How-to-Copyright-Your-Photography

To sum up

Copyright is something that a lot of people don’t understand – even clients. It’s important to educate yourself and those you work with on the ins-and-outs of copyright. As I mentioned, laws vary from country to country, but you can find a lot of this information online. It’s crucial to protect yourself and your work.

Do you have any other tips on how to copyright your photography? Have you had your images stolen? If so, share with us in the comments below.

The post How to Copyright Your Photography and Why You Really Should appeared first on Digital Photography School. It was authored by Darina Kopcok.


Digital Photography School

Posted in Digital Photography | Tagged , , , | Leave a comment

New Zealand vs Ireland live stream: how to watch Rugby World Cup 2019 quarter-final from anywhere

Ireland's shock defeat to Japan placed them on a path they would never have wanted. Their runners-up status in Pool A has lead them to an unenviable 2019 Rugby World Cup face-off with heavy pre-tournament favourites, the All Blacks. And you can watch the action as it happens -from basicaly anywhere in the world – with our New Zealand vs Ireland live stream guide.

The All Blacks have been in imperious form in the Pool stages of the tournament, and look in good shape to win their third title on the trot. 

Nevertheless, the Irish famously won the last encounter between the two sides in a victory that caused many pundits to tip them for glory in Japan.

New Zealand head coach Steve Hansen has been somewhat ruthless with his team selection, with the experienced Ben Smith and Ryan Crotty both missing out of the match-day VX. In comes the in-from Anton Lienert-Brown, while lock Brodie Retallick has been deemed fit enough to start.

Joe Schmidt's Ireland side will feel like they are due a big performance and know that the seemingly invincible All Blacks do have a vulnerability when faced with their rush defence. 

It's likely to be the tie of the round, and you won't need to miss a moment of the action no matter where you are on Earth, by following our Rugby World Cup New Zealand vs Ireland live stream guide below.

How to watch the 2019 Rugby World Cup from outside your country

If you're abroad this weekend and try to watch your domestic Rugby World Cup coverage, you'll be metaphorically rucked off the ball due to geo-blocking. That stops you watching your home feed online wile in a foreign country.

That's where the use of a VPN comes in, as it helps you tune into those fixtures no matter where you are in the world without resorting to some dodgy feed on Reddit. And best of all, it's really easy to do (or read on for details on how to stream coverage from Ireland, the UK, New Zealand, Australia, South Africa, Canada and the USA).

How to stream the RWC quarter-final in Ireland for FREE

How to watch the All Blacks in New Zealand

How to stream Ireland vs New Zealand live in the UK for FREE

How to live stream New Zealand vs Ireland in Australia

Live stream New Zealand vs Ireland match in South Africa

How to live stream New Zealand vs Ireland in the US

  • Hulu with Live TV $ 40 per month – Hulu with Live TV includes CBS, Fox, NBC and ESPN.
  • FuboTV $ 35 for the first month – FuboTV gives you the first month at a discounted rate but after that the price increases to $ 45 a month. The service includes CBS, Fox, NBC and the NFL Network but does not come with ESPN.
  • DirecTV Now $ 50 per month – DirecTV Now includes CBS, Fox, NBC, ESPN and for $ 5 extra you can add the NFL Network.
  • YouTubeTV $ 40 per month – YouTubeTV gives you access to CBS, Fox, NBC and ESPN.

Divider

Live stream Rugby World Cup 2019 match in Canada


TechRadar: Photography & video capture news

Posted in Photography | Tagged , , , , , , , , , , | Leave a comment

Weekly Photography Challenge – Mountains

The post Weekly Photography Challenge – Mountains appeared first on Digital Photography School. It was authored by Caz Nowaczyk.

This week’s photography challenge topic is MOUNTAINS!

Image: Cathedral Rock and the Hump Mt Buffalo in Winter  by Caz Nowaczyk

Cathedral Rock and the Hump Mt Buffalo in Winter  by Caz Nowaczyk

I have a big fascination with mountains and have recently been visiting Mount Buffalo in Victoria, Australia again (I visit here a lot because it is such an incredible landscape!). This has inspired this week’s challenge!

So go out and capture mountains. They can be color, black and white, moody or bright. Just so long as they have mountains! You can also manipulate them in your favorite post-processing software. You get the picture! Have fun, and I look forward to seeing what you come up with!

Image: The Cathedral and the Hump at Mt Buffalo National Park, Victoria in Winter by Caz Nowaczyk

The Cathedral and the Hump at Mt Buffalo National Park, Victoria in Winter by Caz Nowaczyk

Image: View from The Horn to The Cathedral and the Hump in Mount Buffalo National Park by Caz Nowacz...

View from The Horn to The Cathedral and the Hump in Mount Buffalo National Park by Caz Nowaczyk


Check out some of the articles below that give you tips on this week’s challenge.

Tips for Shooting MOUNTAINS


5 Tips for Avoiding Boring Photos of Mountains

Simple Tips to Improve Your Travel Photography – Photographing Mountains, Hills and Valleys

9 Tips for Photographing Mountain Lake Reflections

A Set of Awe Inspiring Majestic Mountain Images

How to Photograph a Minimalist Landscape

These Inspiring Landscape Photographers will Make You Want to Take Better Photos

The dPS Top Landscape Photography Tips of 2018

Weekly Photography Challenge – MOUNTAINS

Simply upload your shot into the comment field (look for the little camera icon in the Disqus comments section) and they’ll get embedded for us all to see or if you’d prefer, upload them to your favorite photo-sharing site and leave the link to them. Show me your best images in this week’s challenge.

Share in the dPS Facebook Group

You can also share your images in the dPS Facebook group as the challenge is posted there each week as well.

If you tag your photos on Flickr, Instagram, Twitter or other sites – tag them as #DPSmountains to help others find them. Linking back to this page might also help others know what you’re doing so that they can share in the fun.

The post Weekly Photography Challenge – Mountains appeared first on Digital Photography School. It was authored by Caz Nowaczyk.


Digital Photography School

Posted in Digital Photography | Tagged , , , | Leave a comment

Apple AirPods Pro could be about to launch – with active noise cancelling too

A new report claims that an upgraded AirPods model – called the AirPods Pro, in the manner of the iPhone 11 Pro – may be about to release to market.

An incoming AirPods Pro release was cited in a report by China Economic Daily, which said the new AirPods were expected to launch before the end of October, meaning the claim could be proved (or dismissed) very soon.

We've heard a lot of speculation and rumors around the AirPods 3, though the Pro model would likely sit alongside the base model for those seeking more premium features. China Economic Daily says that the AirPods Pro will come with active noise-canceling, which is lent credence by the mention of "with or without noise-canceling" audio settings in code for the iOS 13.2 beta.

A previous story by the outlet says that the next AirPods model could feature a new metal design to help with heat dissipation – so there could be a new feel and and form to the AirPods beyond the tech hidden inside.

it's worth noting, too, that the current-generation AirPods got a price cut across retailers this week, which could signal a new model on its way shortly.

Take a (price) hike

The AirPods Pro will reportedly cost $ 260, which converts to around £200 / AU$ 380 – though UK pricing is likely to match the US figure, so it could cost £260 too. 

That's a decent step up from the 2019 AirPods' $ 159 / £159 / AU$ 249, which is already pretty expensive for true wireless earbuds, when there are certainly cheaper options available – some with similar performance. But if you're after an Apple model, or active noise-canceling is what you're after, the upgraded AirPods Pro may get your bet in the coming weeks.

Via MacRumors


TechRadar: Cameras and camcorder reviews

Posted in Camera Reviews | Tagged , , , , , , , | Leave a comment

5 Questions to Ask Before Buying Used Camera Gear

The post 5 Questions to Ask Before Buying Used Camera Gear appeared first on Digital Photography School. It was authored by Jaymes Dempsey.

Questions to Ask Before Buying Used Camera Gear

I’ve bought a lot of used gear over the last decade.

Cameras.

Lenses.

Batteries.

And more.

Questions-to-Ask-Before-Buying-Used-Camera-Gear

A lot of those purchases turned out great. Some of them I still use to this day.

But a large chunk of the used purchases I made?

Trash.

In fact, in my more naive years, I was forced to return over 50% of the gear that I purchased. There were just so many problems: sand in focusing rings, stains on the front element, shutter buttons that couldn’t communicate with the shutter. (Oh, and my least favorite: Fungus inside the lens. Doesn’t that just make you shiver?)

And here’s the kicker:

I bought all of this gear through respectable buyers, who described the equipment as in “excellent condition,” “flawless,” “perfect,” “like new,” – you name it.

It got so bad that I considered leaving the used market entirely and just buying new. But I resisted.

Why?

Used camera gear is a real bargain – if you buy carefully. This is why I took all of my negative gear-buying experiences and turned them into a process for making sure I purchased good used gear.

At the core of that process is a series of questions. Questions that I’m going to share with you today. Some of the questions are for you, the buyer. Others should be posed to the seller before you put any cash down.

Are you ready to discover how to buy used gear effectively?

Let’s get started!

Questions-to-Ask-Before-Buying-Used-Camera-Gear

Question 1: Are you buying from a reputable seller with a money-back guarantee?

This is the number one most important thing that you should do when buying used gear.

Purchase from a seller that you trust – and that gives you an enforceable money-back guarantee. You don’t want to purchase a camera online, only to find that it’s full of water damage and sports a cracked LCD.

This means that buying used through Amazon is fine. All of their products are backed by Amazon month-long guarantees.

Buying used through eBay is also fine. Ebay’s buyer protection ensures that you’re not going to get ripped off in such an obvious fashion.

5 Questions to Ask Before Buying Used Camera Gear

But this makes most forums (if not all forums) off-limits. If the forum doesn’t have a serious money-back guarantee that’s honored by the site itself, then stay away.

This also makes in-person sales off-limits, such as those done through Craigslist. Sure, you can inspect the item upon receipt, but what are you going to do when you get home, put that lens under a light, and realize it’s filled with an army of fungus?

It’ll be too late, and your seller may not be so receptive to a return.

So just don’t do it. Instead, use sites like Amazon, eBay, B&H, or KEH, which all have clear money-back guarantees.

Question 2: Does the seller include actual pictures of the gear?

Sellers not including pictures is a big warning sign, especially on a website like eBay, where pictures are the norm. It should make you ask: Why doesn’t the seller want to show off their “excellent condition” item? Is there something they’re trying to hide?

Another red flag is only showing a stock photo. These are easy to spot; they look way better than anything that a casual, eBay-selling photographer would have taken, and there tends to be only one or two of them.

5 Questions to Ask Before Buying Used Camera Gear

If you like the price and everything else checks out, then go ahead and shoot the seller an email, asking for in-depth pictures of the item. If the seller refuses, then it’s time to look elsewhere.

You might come across some sellers who are offering many units of the same item (e.g., five Canon 7D Mark II’s). In this case, they likely have shown a stock photo, or a photo of one item, because they don’t want to go through the effort of photographing each piece of kit.

In such cases, you should message the seller and ask for pictures of the exact item that you’ll be purchasing. It’s too easy, especially with these big sellers, to end up with an item that you’ll have to send back.

Question 3: How many shutter actuations has the camera fired?

(Note: This section is for buying cameras.)

First things first: A shutter actuation refers to a single shot taken with a camera.

Every camera has a number of actuations its shutter is rated for. Once the shutter has reached around that point, it just…fails. While you can get the shutter replaced, it generally costs enough that you’re probably better off buying a new camera body.

5 Questions to Ask Before Buying Used Camera Gear

If you want to know the shutter actuation rating of any particular camera, you can look it up through a quick Google search.

Of course, the shutter rating isn’t a hard and fast rule. There are some cameras that go far beyond their predicted shutter count, and there are some cameras that fail far sooner. The shutter count is just an average.

Now, when you look at camera listings online, you’ll see that shutter actuations are reported about fifty percent of the time.

But the other fifty percent of the time, there will be no mention of them.

This is for three possible reasons:

  1. The seller doesn’t know about the importance of shutter actuations.
  2. The seller can’t figure out how to determine the shutter actuations for their camera.
  3. The seller doesn’t wish to share the shutter count because it won’t help the sale.

I would never buy a camera without knowing its shutter count. Therefore, I recommend reaching out to the seller and asking.

If the seller refuses to share the count, then let the camera go. If the seller claims they don’t know how to view the shutter count, explain that they should be able to find it easily, either within the camera itself or through a website such as https://www.camerashuttercount.com/.

If they still won’t give you the count, then don’t buy. It’s not worth risking it.

Question Four: Does the lens have any blemishes on the glass, fungus, scratches, haze, or problems with the focusing ring?

(Note that this is for purchasing lenses.)

This is a question to ask the seller, and I suggest you do it every single time you make a purchase.

5 Questions to Ask Before Buying Used Camera Gear

Yes, the seller may be annoyed by your specific question. But this is a transaction; it’s not about being nice to the seller! And I’ve never had someone refuse to sell to me because I annoyed them with questions.

In fact, what makes this question so valuable is that it often forces sellers to actually consider the equipment they’re selling. Up until this point, the seller may not have really thought about some of these things. So it can act as a bit of a wake-up call and make the seller describe the item beyond “excellent condition.”

When you ask this question, make it clear that you want a detailed description. You genuinely want the seller to check for scratches on the glass, fungus in the lens, problems with the focusing ring, and more. You don’t want a perfunctory examination.

Unfortunately, there will still be some people who don’t do a serious examination, or who lie in the hopes that you won’t notice the issues (or be bothered enough to make a return). But asking the question is the best you can do.

Question Five: Has the seller noticed any issues with the item in the past?

This is another question to ask the seller before you hit the Buy button. It’s meant as a final attempt to determine whether the item has any issues.

In this case, by asking about the item’s past.

5 Questions to Ask Before Buying Used Camera Gear

Unfortunately, there will be sellers who have had an item break repeatedly – but, as long as it’s working at the moment they take the photos, they’ll give it the “perfect condition” label. Fortunately, many sellers will still be honest with you. If they’ve had a problem with the item, they’ll say.

So it’s definitely worth asking – just to be safe.

5 Questions to ask before buying used camera gear: Conclusion

Now that you know the five most important questions to ask before buying used camera gear, you’re well equipped to start buying gear online.

Questions-to-Ask-Before-Buying-Used-Camera-Gear

Yes, you’re still going to run into the occasional issue, but if you’re careful, and you think about these crucial questions to ask before buying used camera gear…

…the number of issues will be far, far lower.

And you’ll be able to effectively take advantage of used camera equipment!

Questions-to-Ask-Before-Buying-Used-Camera-Gear

The post 5 Questions to Ask Before Buying Used Camera Gear appeared first on Digital Photography School. It was authored by Jaymes Dempsey.


Digital Photography School

Posted in Digital Photography | Tagged , , , , , | Leave a comment

Neobanking – a security minefield?

Neobanking refers to a growing wave of 100% digital banks, which are customer-driven by nature and with a special focus on delivering frictionless money management and payment experience. 

Of course, internet security remains a key concern, from everything to monitoring by the banks themselves, to ordinary consumers sensibly using the best antivirus.

Globally, it is estimated that 73% of all consumer interactions with banks are done via digital channels and, in the UK, 13% of consumers have already taken the plunge with Neobanking.

Neobanks challenge incumbents in the financial services industry by relying on technological breakthroughs and constant updates to provide features and services that rival, and often surpass, those offered by the bricks and mortar banks. 

And whilst Android apps and iPhone apps for banking are still not up to par compared with those offered by traditional banks when it comes to payments, they are quickly catching up. Beyond that, they beat their traditional counterparts in other areas such as money management, customer interaction and account management.

Most don't have to rely on the same legacy systems therefore Neobanks can enjoy operating costs as much as 40 — 70% lower than those of traditional banking. And product development in Neobanking is significantly faster by relying on cross-platform-ready technology such as JavaScript. 

They can also rely on third-party integrations to save time and money, while also keeping the flexibility to iterate according to customer demand. With the bigger focus on user experience, it’s no surprise that generally neobanks’ satisfaction ratings exceed that of the top global banks. 

Importantly, however, customers state that ensuring that their transactions are secure remains a number one priority when they choose a bank. Even though Neobanks are usually less risk-averse than traditional banks, they must still address customer security as a priority.

The Javascript “Paradox”

And herein lies a paradox of sorts. As competition between Neobanks rises and in order to overcome the great market share and investment power of incumbents, they turn to rapid, iterative software and mobile app development to quickly release features and surpass customer expectations. 

And it’s JavaScript that presents this opportunity for low cost and quick website development, especially thanks to frameworks such as React Native, which enable reusing the same codebase to deploy to the Web and different mobile operating systems. However, despite its numerous advantages, JavaScript raises considerable security concerns which become increasingly relevant when used to create banking platforms. 

When we talk about JavaScript security, the first thing that springs to mind are security testing tools such as SAST and DAST. These are widely used to inspect the application’s source code, then check for any vulnerabilities and then attempt to fix them. Development teams need SAST and DAST to gain visibility over potentially insecure code. 

However, even if they find and fix every single vulnerability in their JavaScript code, that JavaScript is still plain and easy to understand code. In the same way that a development team can look at their code and understand how the application works — so can an attacker!

And so Neobanks must ask themselves: do we have any proprietary logic running on the client-side? What would the cost be to us if somebody was able to retrieve an important part of our code? Or even to tamper with our code to insert malware software to exfiltrate user data? Such questions ultimately highlight the real threats posed by having JavaScript code completely exposed. 

For Neobanks, the attack surface is considerably higher, with the main threats including automated abuse, intellectual property theft, and data exfiltration (namely via web supply chain attacks and banking trojans).

Minimise the attack surface area and build customer trust

The OWASP Mobile Top 10 (which details the 10 biggest application security risks for mobile apps) raises the concerns of code tampering and reverse engineering. For the former, OWASP points out that, “The mobile app must be able to detect at runtime that code has been added or changed (…) The app must be able to react appropriately at runtime to a code integrity violation”; for the latter, the takeaway is quite clear — in order to prevent effective reverse engineering, you must use an obfuscation tool. 

By preventing code reverse engineering and ensuring that the application is able to automatically react to attacks in runtime, Neobanks can ensure that they are prepared to meet any attackers head-on and prevent automated abuse and intellectual property theft. JavaScript protection becomes key to business success.

Data breaches are another massive concern. Current research shows that consumers tend to trust Neobanks less than traditional banks. For Neobanks, building trust is a complicated and long road, and so the chances of incurring a data breach must be mitigated to a maximum. Attacks such as web supply chain attacks are especially more prevalent for Neobanks as they rely much more on third-party code as compared to traditional banks. 

Whilst a first-party data breach most often requires attackers to infiltrate a database, third-party data breaches originate from attackers going after the enterprise's smaller, less secure providers which are the weakest link in the supply chain — hence the term Supply Chain Attack. Web-based Supply Chain Attacks thrive because it's easy for attackers to find a poorly secured third-party that is used by one or several enterprise businesses. 

Current security approaches, such as using a Web Application Firewall, CSP, and SRI, still fall short in providing a holistic solution to mitigate web supply chain attacks. A more robust approach is to monitor webpages in real-time to detect any malicious changes to the code and block them at their inception.

Neobanks will surely leverage the opportunity of technological advancements — lower operational costs and overall customer satisfaction; but they can’t escape the paradigm of banking: trust. With Neobanks inheriting such a vast attack surface — due both to the exposed nature of JavaScript and growing client-side threats such as web supply chain attacks — it is crucial that they adopt holistic security solutions for JavaScript protection and webpage monitoring.


Pedro Fortuna is the CTO at Jscrambler.


TechRadar: Photography & video capture news

Posted in Photography | Tagged , , | Leave a comment

Creative Travel Portrait Photography Tips

In travel photography, and mostly in Asia, we tend to focus our photography a lot on people. But portraits can look very similar if taken with the same angle. It works fine of course, but I personally feel the need to go beyond the traditional close up portrait and produce some more original work.

While environmental portraiture allows us to be more creative using elements of the surrounding, the options for close up portraits are more narrow. Plus, they do lack originality. After all, close up portraits of cute kids or old people in Asia are already all over the web.

First, let’s have a look at the “usual” portrait composition rules with this video:

But doing something different for the sake of doing something different will not bring you anywhere. You need to apply your vision, analyze the scene, and learn from it to find the inspiration.

Let’s see what tools we could use to create more original and dramatic portraits:

Use the elements of your subject itself

A hat, an earring, a necklace, some lines of the neck, etc… may lead you to compose your portrait an original way. Including these elements, or deciding to exclude them, will help reinforce the story you’re trying to tell. Remember? Show less to tell more.

more creative portraits

Use elements from your subject.

These other elements on your subject will help you frame it a different way. Focusing on them, placing some of these elements as “main” subjects instead of your subject’s face, will eventually lead to different framing. Also, while doing portraits we tend to be very close to our subjects. I recommend everyone traveling in the area drop their long lens and get closer (I shoot mostly with my 50mm lens) for more creativity and better results. That means that our depth of field will be much more shallow (mostly when using primes), and this can help us isolate certain elements around the subject, telling a different story.

By looking for and finding these other elements, placing them in strategic locations (mostly using the rule of thirds to keep a balance), you will create more striking and original portraits.

framing in creative portraits

Use creative cropping to highlight features.

black and white portrait

Find interesting aspects of the person’s clothing.

Use your background / foreground

A very beautiful background or foreground will help you to think outside the box. If you want to include some of this background or foreground, it may not always allow you to follow the “rules”. Then don’t! These rules are meant to be broken, so give it a try and see what you get. Also, the background will help you to change your angle of approach. Because the floor is very interesting, or because the rest is very messy, you may shoot looking down at your subject.

travel street portraits

Change your angle to eliminate distractions.

In this example, the green plastic chair of this Burmese train did not extend to the right side of the image. Because I only wanted to keep this simple green background, as a good contrast to the red color of the girl’s clothes, it forced me to place the girl in the top right corner, looking into the frame. I did receive a negative notification from the photography rules police, but I think I will be all right for this time.

child portrait while traveling

Include colorful backgrounds.

Use your subject’s body language

When being so close to your subject for a portrait, it is more difficult to find elements that will create a direction to lead the eyes. Portraits tend to be centered and very symmetrical, and being so close there are no elements of the background / foreground we could use.

To recreate a dynamic line or shape, it is useful to use the subject’s body language. The eyes looking on the side, some hair falling on one corner, an angled hat, will help re create dynamic and directional lines. Sometimes, tilting the camera a little bit will help to give more dynamism into straight lines, making them diagonals.

But be aware of one thing: these little body movements are often not predictable and can happen very fast (sometimes only 1/10 of a second). That means that when shooting close up portraits, you do have to shoot, quite a lot. It is not rare that for a close up portraits I shoot 25 frames using the same (or almost) composition, waiting for the time my subject will look away or tilt their head (on top of trying to have my main element in focus… damn manual focus lens!).

bw travel photos

Capture your subject’s body language.

Don’t be shy about using a macro lens

As I often say, the best and easiest way to keep a photo simple and to fill the frame is to get closer. The macro lens is simply the best tool to do that. As it can create an extremely shallow depth of field, you can isolate very small elements of your subject and also tell a different story. Also, don’t be scared to shoot using wide apertures, it will simplify everything and can sometimes help getting rid of a messy background.

portrait wtih a macro lens

Use a macro lens.

Remember: a portrait is not necessarily a face

It is very interesting to tell stories capturing only parts of your subject: hands, feet, etc… as long as they have elements of interest.

portrait of hands

You don’t always have to include a face.

And of course, do not forget to shoot the light

Shooting the light, and only the light, will force you to look at things a different way, only including the elements in the light and removing the rest. So if the light only cover half of your subject’s face, why not only shooting this half?

portrait lighting

The soft light bouncing on the floor gave her face a beautiful glow.

So get your camera, go outside and shoot. Or no, better: sell your big long lens, and buy yourself a plane ticket to South East Asia. Then, shoot. I am here waiting for you.

About the Author:
I am Etienne Bossot and I am delighted to take you on an amazing journey through stunning locations in Southeast Asia while sharing my passion for photography. For the past four years I have been teaching thousands of people at all photographic levels. I am also a commercial and wedding photographer in Southeast Asia.

Go to full article: Creative Travel Portrait Photography Tips

What are your thoughts on this article? Join the discussion on Facebook

PictureCorrect subscribers can also learn more today with our #1 bestseller: The Photography Tutorial eBook

The post Creative Travel Portrait Photography Tips appeared first on PictureCorrect.

PictureCorrect

Posted in Photo Techniques | Tagged , , , , | Leave a comment

First Responders to be Immortalized Through Pelican Products’ “Portraits of Protection”

From Pelican:
 
Photo Competition Challenges Photographers to Provide “Images of Heroism” for a Chance to Win Pelican Gear
 
Torrance, CA, – October 15, 2019 – With a long history of providing protective cases for both photographers and first responders, Pelican Products today announced its Portraits of Protection photo competition. This program brings these two communities together to immortalize heroes who’ve stepped forward in the face of danger.
 
Pelican invites photographers to submit photos of either heroism in action, or the faces of heroes, and post on Instagram tagging @pelicanprofessional, #PortraitsofProtection, and #PelicanPhotoContest for a chance to win. Each month, the most moving and visually interesting photos will be selected as winners and featured on Pelican Products’ social media channels. The winning photographers and heroes photographed will each receive their choice of $ 500 in Pelican gear. “At Pelican, we recognize our products are put in critical situations with first responders that require them to perform every time. There is a sense of responsibility that goes into every product we make,” said Lyndon Faulkner, CEO of Pelican Products. “Our hope is that we receive images from these skilled photographers that serve as a daily reminder to our team, of the responsibility they accept every time they walk through the door, and to honor these real-life heroes.”
 
Portraits of Protection corresponds with Pelican’s charitable giving program, ‘PELICAN PROTECTS – Supporting the Heroes Who Protect Us’, in alignment with its continued support of first responders and related causes.
 
Portraits of Protection contest details are available online here and entries will be accepted now through January 14, 2020.

Canon, Nikon, and Sony News, Deals and What’s New at The-Digital-Picture.com

Posted in Photo Equipment | Tagged , , , , , , , | Leave a comment

How to turn your DSLR into a Digital Pinhole Camera

The post How to turn your DSLR into a Digital Pinhole Camera appeared first on Digital Photography School. It was authored by Adam Welch.

how-to-turn-your-dslr-into-a-digital-pinhole-camera

For all the advances made over the last 190-some-odd years of photographic history, at its primordial core, a camera is a highly simplistic apparatus. Our cameras are just light-proof boxes except for an opening that allows a small amount of light to enter. Any photograph ever made owes its creation to the technology of the camera obscura, from the Latin words meaning “a dark box” or “a dark room.” These magical devices project images consisting of light rays which pass through a singular, relatively small opening (aperture), thus casting the inverted scene inside the darkened space. If you were to add an optical element (lens) and an image receptor (digital sensor, film, other material) then, my friends, you have yourself an essentially modern camera system.

how-to-turn-your-dslr-into-a-digital-pinhole-camera

Even today, some cameras operate without lenses, relying only on the raw essentials of image-making to produce a photograph. These are “pinhole cameras” and consist of the bare-bones of photo-making – a light-proof box with an aperture and an image receptor.

A pinhole camera is, in fact, so easy, so simple, that you can morph your current DSLR or mirrorless digital camera into a surprisingly efficient pinhole camera. You can do so, using only a few basic materials that you likely already have on hand.

Not only is making your own digital pinhole camera a great project for all ages, but it is also an excellent way to “reset” yourself if you’ve become a little burnt out with your current photography gear.

For lack of a better phrasing, using a pinhole camera is arguably the most “pure” form of photography you can practice, in terms of tools involved. Let me show you how to turn your DSLR into a pinhole camera.

What you’ll need

As with most things, you can make your digital pinhole camera as simple or as complicated as you would like. For this example, I’m going to show you the most basic construction method I have used thus far. Now, let’s get down to business.

Materials:

  • An interchangeable lens digital camera. Although there is little chance of damaging your camera, I still recommend using a camera that you don’t rely upon daily. The reason being that you will have a small opening in which dirt or moisture could enter your camera. For our example, I’m using the back-up for my back-up; a Canon 7D MK1.
  • Aluminum foil
  • A pin or thumbtack
  • Tape. Preferably opaque such as electrical or gaffers tape
  • Scissors

how-to-turn-your-dslr-into-a-digital-pinhole-camera

That’s it! Yes, really. This is the basic materials that you need to turn your camera into a digital pinhole camera.

A brief introduction to pinhole photography

Before we continue, let’s take a quick time-out to talk about a few of the basic principles of pinhole photography. First of all, this is not going to be a tutorial for making a perfect digital pinhole camera.

Believe it or not, although incredible lacking complication, pinhole photography is an extremely nuanced craft. There are formulas for figuring out the optimum aperture size (the pinhole), and how to determine the actual F-stop you will be shooting to calculate exposure.

Even though we’ll be forgoing the complexities, it’s still good to have grounded knowledge in the principles of pinhole photography before you start.

Focal length

For our purposes, the focal length of your pinhole camera will be practically equal to the focal flange distance (FFD) or your camera. The FFD is just a fancy way of saying how far it is from the lens mount of your camera to the image sensor plane. Most cameras will have a symbol that demonstrates the image plane location.

How to turn your DSLR into a Digital Pinhole Camera

Check out this handy database over on Wikipedia for finding the FFD for your particular camera. In our case, the FFD is 44mm, which is also our effective focal length. This will come into play when we learn about optimal aperture size for the pinhole camera; which we’re about to talk about right now.

Optimal aperture (pinhole) size

Believe it or not, there is a beautifully elegant equation derived by none other than Joseph Petzval which helps us to determine the best size for the opening of our pinhole camera based on the focal length. In our case the FFD, and the wavelength of light. The equation is as follows:

How to turn your DSLR into a Digital Pinhole Camera

In the formula “d” is the diameter of the pinhole, “f” is the focal length, and lambda (the “l” with a kickstand) is the wavelength of light. Unless your goal is to make an extremely precise pinhole camera, you can essentially forgo all of the information in this section. Still, if you’re a camera nerd like me, it’s cool to know.

So, based on our formula, my “optimum” pinhole diameter is about .011mm, which is TINY. In fact, if we were to manage it, our effective aperture at 44mm focal length would be about F/157. Again, this is all just food for thought, and it won’t actually play into our final pinhole. You won’t need to crunch any numbers to turn your DSLR into a digital pinhole camera. So let’s move on to the good stuff!

Putting it all together

Now, let’s get to making our pinhole camera. As we’ve said before, this will be an extremely simple construct. We’ll begin by cutting out our aluminum foil diaphragm. This is the operable component of the entire system, as it will be what we eventually use to form our pinhole aperture.

Keep in mind that aluminum foil has a shiny side and a matte side. This will come into play later. A piece of foil 3×4 inches (7.6×10.2cm) should be plenty for almost all cameras.

Image: Shiny side…

Shiny side…

Image: …matte side.

…matte side.

Creating the Aperture

I like to use the front cap for the camera to trace a rough outline for the diaphragm. Just flip the cap over and this will give a good approximation of the front surface of the camera flange. Feel free to trace the outline on either side of the foil. Don’t worry if you don’t have a front cap to use as a guide, cut the foil as best as you can, making sure to leave some overlap.

how-to-turn-your-dslr-into-a-digital-pinhole-camera

Remember to trace the cap (if you have one) face down.

How to turn your DSLR into a Digital Pinhole Camera

Throughout the cutting process, try to keep the foil as unwrinkled and flat as possible.
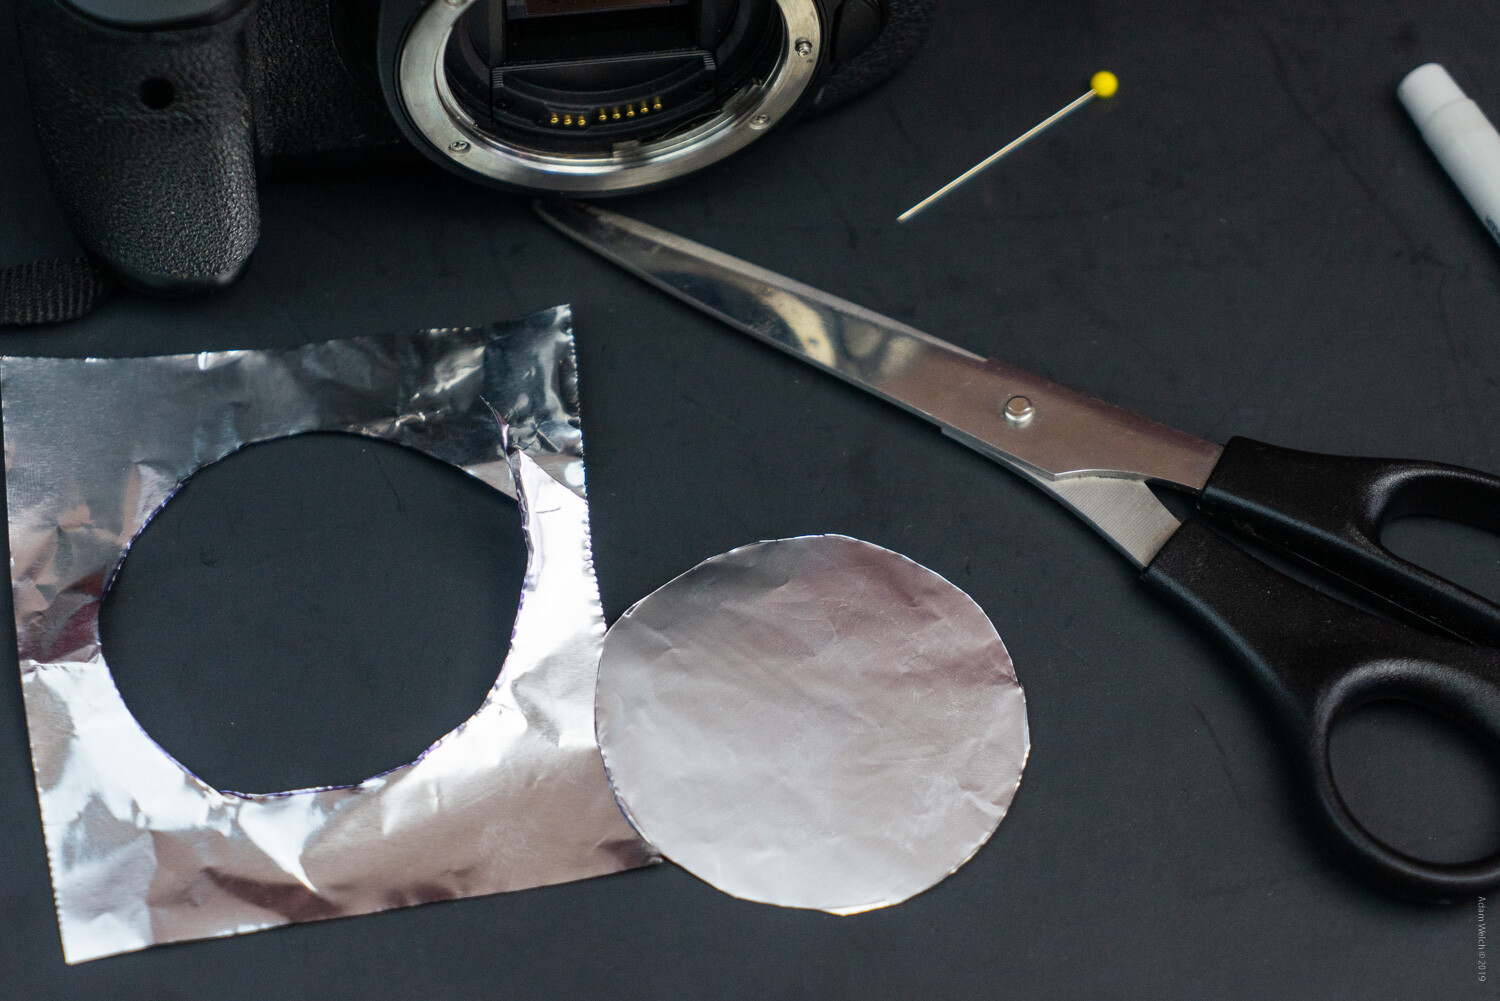
how-to-turn-your-dslr-into-a-digital-pinhole-camera

Next, it’s time for our bravery test. We need to make our pinhole now. If you remember from earlier, our “optimum” pinhole size is .011mm. Of course, we won’t be able to achieve this exactly, so the best we can hope for is to make the smallest hole with the tools we have on hand. The pin I’m using has an approximate diameter of .77mm, which is still much larger than our optimum calculated hole size. So we’ll try to make the opening as small as possible using just the tip of the pin.

Lay the foil shiny side up on a semi-firm surface like a cutting board, or in our example, a piece of poster board. Aim for the approximate center of the foil disk and lightly press down with the pin. Don’t attempt to press the pin completely through the disk. Just a small amount of pressure will likely be sufficient to puncture the foil.

How to turn your DSLR into a Digital Pinhole Camera

And there you have it; our freshly minted pinhole.

how-to-turn-your-dslr-into-a-digital-pinhole-camera

From here, it’s just a matter of fixing our new pinhole diaphragm to the front of the camera.

Mounting the pinhole

Center the pinhole diaphragm as close as possible to the lens mount of your camera. Then, carefully tape the foil to the lens flange. I’m using a few pieces of electrical tape. It’s a good idea to use tape that is as opaque as possible and one which won’t leave excessive residue on your camera once it’s removed. Again, keep the foil as flat as you can.

How to turn your DSLR into a Digital Pinhole Camera

how-to-turn-your-dslr-into-a-digital-pinhole-camera

Begin at the outsides of the foil and be sure that the tape seals the diaphragm as tightly as possible. After this, I like to add a few more pieces of tape to the front of the foil for added strength. A delicate touch is required here. Be mindful not to cover your pinhole!

how-to-turn-your-dslr-into-a-digital-pinhole-camera

I know it’s difficult to believe, but you’ve just made a pinhole camera!

Tips for shooting with your pinhole camera

As you have likely already assumed, pinhole cameras make use of relatively small apertures. As such, shooting with them will require longer exposure times. So, a tripod will always be a good idea to have on hand for your pinhole work. Furthermore, it will be complicated to compose your images visually. However, this doesn’t mean that you can’t shoot your pinhole camera handheld!

Here are some suggestions for getting the most out of your pinhole camera when shooting with and without a tripod:

  • Bump up that ISO. Use the highest ISO you are comfortable with in order to bring the required shutter speed into a manageable range for handheld shooting.
  • Forget the viewfinder. While it’s perfectly acceptable to keep the camera held to your eye, it won’t benefit you all that much. Try shooting with the camera in a “waist level” configuration, holding it close to your body for added stability.
  • Pinholes love long exposures! Try mounting your pinhole camera on a tripod and lowering your ISO for some great long exposure images. That small aperture is your friend when it comes to super long exposure photography.
  • Protect your camera. Remember, you are now shooting without the protection of a lens. Even though the pinhole is extremely small, dirt and moisture can still make their way into the internal components of your camera.
  • Be ready to observe any and all dirt present on your sensor. Seeing as you will be shooting at extremely narrow apertures, any specs of dust or dirt on your camera’s sensor will be readily apparent.
  • Try a few extra pinholes. There is no rule saying you have to limit yourself to a single aperture. A few additional pinholes can produce some amazing effects. Experiment with different numbers and configurations of pinholes.
  • Embrace the blur. By its very nature, pinhole photography is imperfect. Remember that the beauty of working with a pinhole camera stems from the simplistic nature of the method itself.
  • Pinhole photography works great in black and white. Converting your pinhole images to black and white can change the entire dynamic of the photo.

Here are a few examples of images I made with my converted pinhole DSLR:

How to turn your DSLR into a Digital Pinhole Camera


How to turn your DSLR into a Digital Pinhole Camera

How to turn your DSLR into a Digital Pinhole Camera

How to turn your DSLR into a Digital Pinhole Camera

How to turn your DSLR into a Digital Pinhole Camera

How to turn your DSLR into a Digital Pinhole Camera

How to turn your DSLR into a Digital Pinhole Camera

These last two images were made after I introduced three additional pinholes…

how-to-turn-your-dslr-into-a-digital-pinhole-camera

how-to-turn-your-dslr-into-a-digital-pinhole-camera

Ways to improve your pinhole camera

You can make more heavy-duty pinhole apertures using more sturdy materials and by more precisely measuring and cutting your pinholes. Of course, this means additional work and will likely require much more advanced tools. Still, we can make our pinhole camera perform much better through some simple ingenuity.

The best way to up-the-ante of your digital pinhole camera is by adding a bit of flocking to the inside surface of the diaphragm. Flocking is just a way of reducing reflections and glare inside of the camera by darkening the components that might produce these sorts of problems.

Even though we faced the matte side of the foil inward (told you this would come into play), we can still help further reduce the reflections by darkening the inside of the foil. The easiest way to do this is to use a black permanent marker to darken the inside surface of the diaphragm.

Image: Careful not to color over the pinhole. The aperture is extraordinarily delicate.

Careful not to color over the pinhole. The aperture is extraordinarily delicate.

This will help to reduce stray light rays that can degrade image quality. An even better solution is to add dark tape to the inside of the diaphragm. This will make for a much more efficient flocking material. If you plan to add tape flocking, it’s a good idea to apply it prior to making your pinhole. Again, leave a small amount of room around the aperture so that the diaphragm remains as thin as possible.

How to turn your DSLR into a Digital Pinhole Camera

Final thoughts on pinhole cameras

While I was making the images for this article, I realized what might be the greatest benefit of turning your DSLR or mirrorless camera into a pinhole camera; it makes you forget. What I mean by this is that when you use such a simple camera, most of your worries over composition and tack-sharp focus seem to fall away. It’s an odd feeling, really.

What’s more, given the fact that you’re shooting at such small apertures, it produces an enormous depth of field. This means that the entire scene will technically be “in focus.”

At the same time, you know that without the benefit of a lens, the entire photo will simultaneously be less sharp, even dreamlike. When operating under these conditions, it forces us to strip away our pretenses and focus (photo humor) on the core values of our images.

If you’ve never used a pinhole camera before, I hope that this tutorial has shown you that it is incredibly easy to turn your DSLR into a digital pinhole camera. Follow the steps shown here, and you can have a digital pinhole camera in your hands in less time required to read this article.

Have you ever used a pinhole camera? If so, be sure to share your thoughts and images in the comment section below!

Author’s note: While the method shown here poses little risk to your camera, I strongly urge you to only attempt projects such as these using equipment that you wouldn’t mind being damaged. As always, use good judgment and proceed at your own risk.

The post How to turn your DSLR into a Digital Pinhole Camera appeared first on Digital Photography School. It was authored by Adam Welch.


Digital Photography School

Posted in Digital Photography | Tagged , , , , , | Leave a comment

The Google Pixel 4’s face unlock isn’t as secure as you’d hope

Don't let someone get a hold of your Google Pixel 4. It has been confirmed that the Face Unlock feature for the Pixel 4 and Pixel 4 XL will still work even if your eyes are closed, the BBC reports.

TechRadar can confirm that even Google knows this might be an issue: in Security settings, a disclaimer warns users that their phone can be unlocked if someone holds the phone up to their face – even if their eyes are closed.

The issues with that are obvious. If Google's Face Unlock will grant access to your phone even when your eyes are closed, then all someone has to do is hold your Pixel 4 up to your face while you're asleep. Anyone could access your phone without even needing you to be awake – or, in theory, alive. 

This is a serious security concern, as forcing you to unlock your phone would be very easy this way. Worse still, Google has gotten rid of the fingerprint scanner on the Pixel 4, meaning there's no alternative biometric security option. You could go with a PIN or pattern, but those unlocking methods are less convenient for anyone who checks their phone frequently.

A history of biometric security issues

In all fairness to Google, this is far from the first major flaw with a biometric security system. It's not even the worst case in recent memory.

People have fooled facial scanners with photos of a user's face. In the case of the Pixel 4, Google told the BBC that the Face Unlock feature wouldn't be fooled by photos or masks.

Even if fingerprint unlocking were an alternative for the Pixel 4, it suffers from some vulnerabilities as well. If you're incapacitated or a heavy sleeper, someone could just as easily put your finger to the sensor and unlock your phone. Samsung is facing some embarrassment right now, as its Galaxy S10 has a flaw that lets any fingerprint work with the fingerprint scanner.

So, even if the Google Pixel 4 isn't perfectly secure with its biometric sensors, this isn't looking like the worst security flaw. And, there's still time for Google to fix the issue before it faces consumers.

The Pixel 4 will be available October 24, and Google is still working to improve the feature. And, earlier leaks of the Pixel 4 had shown a settings option to require open eyes for Face Unlock, so it may be a feature update that can roll out sooner than later.


TechRadar: Cameras and camcorder reviews

Posted in Camera Reviews | Tagged , , , , , , , | Leave a comment