The best upcoming TV shows and movies on Netflix

UPDATE: Michael Bay's bringing his signature 'Bayhem' to Netflix in December with the arrival of the Ryan Reynolds-starring action film 6 Underground. Details on the next slide!

Netflix has changed the way we engage with television shows and movies forever, giving us the most convenient way to experience both from the comfort of our living rooms, laptop screens or smartphones. 

With a rapidly growing library of shows on the service and a huge lineup of projects in the works, we've put together a list of the best upcoming TV shows and movies on Netflix for 2019 and beyond. 

The shows and films on this list have been hand-picked based on how excited we are for them, meaning that it's not intended to be a complete release schedule. Instead, consider it our curated list of the coolest looking Netflix Originals currently in the works. 

We've also included upcoming seasons of already established shows which we're really eager to see. So without further ado, these are the best TV shows and movies coming soon to Netflix.

Superstar Ryan Reynolds has teamed up with mega-director Michael Bay for what's sure to be Netflix's biggest action blockbuster to date! 6 Underground follows a group of elite soldiers with shady pasts who come together to carry out important operations for the benefit of mankind. Now, a trailer has arrived and we couldn't be more pumped for Bay's return to muscular action films like The Rock and Bad Boys. You can check out the 6 Underground's awesome-looking action set-pieces in the trailer below.

Release date: December 13, 2019

One of Netflix's best and most exciting reveals this year has to be the announcement of El Camino, a surprise movie-length continuation of the Breaking Bad story that will bring us up to speed on what Jesse Pinkman (Aaron Paul) has been up to since the end of the classic series. Not a lot has been revealed about writer-director Vince Gilligan's highly-anticipated Breaking Bad movie so far, though we can expect Jesse to (once again) get put through the ringer by an assortment of drug dealers and law enforcers. Check out the awesome teaser below, which features Jesse's old buddy Skinny Pete (Charles Baker) being interrogated about Jesse's whereabouts.

Release date: October 11, 2019

Fans of Blaxploitation cinema, rejoice! The story of legendary comedian, actor and unlikely filmmaker Rudy Ray Moore (played here by a back-in-form Eddie Murphy) is coming to Netflix in Dolemite Is My Name, a biopic which recounts the creation of the infamous kung fu-kickin' pimp known as Dolemite. Following in the footsteps of films like Ed Wood (Dolemite Is My Name shares the same screenwriters with Tim Burton's classic celebration of bad cinema) and The Disaster Artist, Dolemite Is My Name will show how a group of misfits without any real talent overcame all odds to create one of the most hilarious and memorable films of their era. If you crave satisfaction, Netflix is the place to find that action! Coming to this service as its next attraction… Is a picture that will put you in traction! Make sure you watch Dolemite Is My Name when it lands this October. You can check out its fantastic trailer below.

Release date: October 4, 2019

Exciting news for fans of Martin Scorsese's classic gangster films – the director is bringing The Irishman to Netflix in 2018, and Robert De Niro, Joe Pesci, Harvey Keitel and Al Pacino (working with the filmmaker for the very first time) are all along for the ride. The Irishman follows a mob hitman (De Niro) as he recalls his possible involvement in the murder of Jimmy Hoffa, and is based on the best-selling book by Charles Brandt. Because the story takes place over multiple decades, Scorsese will be employing cutting edge de-aging technology (the same tech used in numerous Marvel films) on several of its cast members. If you're a film buff and aren't excited about this, you may need to check your pulse. Check out the trailer for The Irishman below.

Release date: November 27, 2019

One of the most anticipated new shows arriving on Netflix this year is the first live-action adaptation of The Witcher, starring Henry Cavill as Geralt of Rivia. Said to be based more closely on Polish author Andrzej Sapkowski's books rather than the games that made the series internationally famous, the show still nails the look and feel of CD Projekt Red's beloved RPGs. With a huge budget, massive sets and terrific VFX, Netflix's The Witcher could be the streaming service's own Game of Thrones if it plays its cards right. You can check out the show's first official trailer below. 

Release date: 2019

From Shinji Aramaki (Appleseed) and Kenji Kamiyama (Ghost in the Shell: Stand Alone Complex) comes the brand new Netflix Original animated GitS series, Ghost in the Shell: SAC_2045. Not much else is known about the new series, other than it marks the return of Major Motoko Kusanagi (whose new look for the show can be seen above) and that it will debut sometime in 2020. 

Release date: 2020

The shows and films on this list have been hand-picked based on how excited we are for them, meaning that it's not intended to be a complete release schedule. Instead, consider it our curated list of the coolest looking Netflix Originals currently in the works. 

We've also included upcoming seasons of already established shows which we're really eager to see. So without further ado, these are the best TV shows and movies coming soon to Netflix.

Saddle up, space cowboys, because Spike Spiegel and crew will return in a brand new, live action Cowboy Bebop series from Netflix! We don't know much about it as yet, though it has been confirmed that series creator Shinichiro Watanabe will be involved as a consultant on the show, while John Cho (Star Trek) will play Spike. The original show followed a band of misfit bounty hunters, each haunted by their own past, as they travelled the galaxy trying to keep food in their bellies. Packed with incredibly action, amazing style and lovable characters, Cowboy Bebop is ripe for further adventures – provided Netflix can stick the landing. Christopher L. Yost (Thor: Ragnarok) will write the new series, while Josh Appelbaum, Andre Nemec, Jeff Pinkner and Scott Rosenberg will act as showrunners.

Release date: TBA


TechRadar: Photography & video capture news

Posted in Photography | Tagged , , , , | Leave a comment

How to Use Natural Light in Travel Photography

The post How to Use Natural Light in Travel Photography appeared first on Digital Photography School. It was authored by Karthika Gupta.

We all enjoy traveling and taking countless travel photos on our trips, don’t we? Why else are you reading this article! Travel photography is one of the most popular genres of photography today – especially with the advent of social media and the ‘share everything’ culture. People want to capture and post stunning photos of their travels to influence others, motivate others and in some cases also sell travel-related things.

Natural-Light-in-Travel-Photography

But travel photography is so much more than that. Travel photos have the potential to connect us to our beautiful world. Images of places, cultures, art, and even food take us away from our mundane everyday existence. They can transport us to magical places we can only dream of visiting someday. Perhaps they remind us of a time when we too took that trip and had similar experiences? It can become a walk down memory lane.

So how can we improve our travel photos?

Many elements go into creating an amazing travel photo, but for the purposes of this article, we will focus on light – specifically natural light in travel photography. This is my preferred way of using light in photos. In fact, I very rarely travel with an external flash because of the extra weight and because I don’t like the look of flash in my photos. I know many people who use flash with amazing results – and more power to them!

There are several reasons why I use natural light in travel photography:

  1. It is readily available and free
  2. It provides a range of light variations so I can get creative with my travel images
  3. It is a super-large light source, a.k.a the sun
  4. It constantly changes from day to day and season to season

In order to use effectively use natural light in travel photography, you have to become an expert at reading and understanding the light that is around you as you travel. Light is affected by many things and light affects many things too.

1. Location and light

For the most part, travel photography involves a lot of outdoor photography in natural light and primarily in the harsh mid-day sun. Of course, there are exceptions where you are indoors in places like museums and restaurants.

In such cases, you will likely be dealing with indoor lighting and may even use a flash. So before you take a single photo, look around and analyze your location. This will help you understand how you can harness the natural light around.

Consider whether you are out in the elements with only the sun as your light source. Are you in a city where the light is reflecting off highrise buildings? Perhaps you are in a museum where there is a lot of tungsten lighting, and flash photography is not allowed?

Image: Use creative framing and make the best of harsh midday sun during your travels.

Use creative framing and make the best of harsh midday sun during your travels.

How you handle you camera settings will depend on the location and light at that location. Harsh mid-day sun outdoors means lower ISO and high shutter speeds.

Cityscapes may mean mixed lighting with shade and harsh shadows, so you need to adjust your ISO and shutter speed accordingly.

Museum lighting may mean higher than normal ISOs along with really slow shutter speeds. You will have to pay attention to camera shake while hand-holding at slow shutter speeds.

2. Time of day and light

The fascinating thing about natural light is that it changes constantly. Depending on the time of day, season, or even the direction your window faces – light fluctuates minute to minute. Light first thing in the morning on a mountain top will be very different compared to the light mid-morning. Come sundown; the light changes again.

Knowing what time of day you are photographing will help you plan your gear as well as the kind of shots you will take.

Natural-Light-in-Travel-Photography

I have seen the apostles photographed many different ways, but this lighting just takes the cake! I did nothing except show up just after sunset!

Most travel photographers photograph at multiple times in the day and night. So take gear that is flexible and that you can use for all these different situations.

I travel with my Canon 5D MKIII, a 24-70mm f2.8 lens, and a small travel tripod at all times. Also, I have a few standard filters like a neutral density filter and a polarizer filter that fits in my camera bag. I have to admit, I don’t use it that often, but once in a while that waterfall during a hike calls my name.

Traveling light can help you be prepared for any situation – day or night – for amazing scenes that capture your eye.

3. Subjects and light

Believe it or not, light does impact the subject. Depending on where you are, placement of your subject, and where your light source is, the results can differ wildly. So, the first thing to do after working out the light is to understand it in relation to your subject.

In travel, I find that in most cases, my subjects are not mobile. They are buildings, monuments, and people going about their day.

So what is adjustable in these scenarios is me and my relative position to the subject and light. Don’t be afraid to move around to get the best angle and framing that will work for your situation.

Image: This minx gave me no time to adjust myself, so I just waited for the hop and took the shot...

This minx gave me no time to adjust myself, so I just waited for the hop and took the shot…I love the fact that I got him and the shadow in the same frame.

If you are indoors, try to use natural light from a window to light up the subject as far as possible. If you are outdoors, perhaps using the lens hood to block out the sun can help in reducing the harshness of light, especially if it is directly behind the subject.

Image: This is one of my favorite photos of my son during our travels. I saw the light and him almos...

This is one of my favorite photos of my son during our travels. I saw the light and him almost at the same time, and had a few seconds to take this shot….a perfect way to capture the majestic castles in Portugal!

4. Weather and light

A common misconception that photographers have, especially those starting out, is that they cannot go out and photograph in bad weather. Bad weather can include rain or overcast skies.

But in reality, overcast skies are great for taking travel photos. The clouds act as a natural diffuser, blocking out the harshness of the sun and making the light more even without harsh shadows.

Natural-Light-in-Travel-Photography

Sometimes all you need to do is show up and mother nature does the rest for you – fog, rain, clouds – they all add to the effect.

Always check the weather forecast before you go out shooting. Periods of rain, followed by clear skies, might be the best time to photograph landscapes where everything is uniformly lit.

Conclusion

I hope these tips help you in understanding the power of natural light in travel photography. Travel photography is often tiring because you are out and about all day; looking, feeling, and experiencing new things and trying to capture as much of it as you can.

By understanding how to use natural light in your photos, you can focus more on the creative side of photography to create stunning drool-worthy travel photos – much to the envy of your family and friends.

Do you have any other tips for using natural light in travel photography? Share with us in the comments below!


natural-light-in-travel-photography

The post How to Use Natural Light in Travel Photography appeared first on Digital Photography School. It was authored by Karthika Gupta.


Digital Photography School

Posted in Digital Photography | Tagged , , , | Leave a comment

Sony Xperia 5: A best-in-class pocket cinema, wherever you happen to be

Incredible, big-screen movie experiences shouldn’t be limited to cinemas or huge TVs, with the Sony Xperia 5 they can be enjoyed wherever you are. 

It’s all about piecing together the right tech to transport you into that TV show or movie you’re watching, or ignite your competitive edge while you’re gaming, whether it’s on a train, in the sky or tucked away in bed – the Xperia 5 is an entertainment portal.

How can such a small pocketable phone pick you out of reality? With world-class Sony design, a jaw-dropping display, ear tingling sound, and stacks of power.

Comfort and style in-hand

If you think you need a palm-stretching, giant phone to enjoy luxury experiences on-the-go, Sony begs to differ. The Xperia 5 combines a rich, cool-to-the-touch water-resistant metal frame with tempered, scratch-resistant Gorilla Glass 6 on the front and back; this phone can weather a storm. 

Design is at the heart of what Sony does; just because it’s hardy, the Xperia 5 is anything but clunky. Marrying curved corners and rounded edges, it sits like a dream in-hand. As for its screen, it’s a beautiful uninterrupted rectangle; no notches, no punch holes and no water-droplets, just content.

Cinema screen in your pocket

Switched off, the Xperia 5 looks rich, bold and striking, especially in its sleek Grey finish, exclusive to Carphone Warehouse. Switch it on, and things go from a 10 to 10,000 thanks to its eye-popping HDR OLED screen technology. 

Sharp, bright, vibrant, deep, inky and immersive, the sheer amount of tech that comes together in this compact phone’s cinematic display is colossal. Sony has worked with Netflix engineers and its film camera division to develop its Creator Mode colour profile, so your streaming movies and shows look exactly like their creators intended.

With its 21:9 aspect ratio, the Xperia 5 is also poised to playback big-screen masterpieces with no borders when held in landscape, while X1 Upscaling Engine takes standard definition video and makes it look like rich, high dynamic range content.

The Xperia 5’s screen isn’t just perfect for watching; it makes the phone an ideal workhorse, with its 21:9 aspect ratio spot-on for split-screen multitasking, and super-comfortable to hold in the hand for long bouts of typing.

Sounds as good as it looks

Combining all the traits of a top-of-the-line flagship phone, it may be small, but Sony has kitted its latest Xperia out with Dolby Atmos Audio and stereo speakers, as well as LDAC lossless wireless audio, so whether you’re listening out loud or have headphones, every sound will sing. 

Want even more immersion? With Dynamic Vibration, every sound will rumble too, emulating bass and making sure you can see, hear and feel everything you’re watching.

Sony cinema camera

The Xperia 5’s triple-camera does something unique for small-form flagships: it delivers a cinema camera 21:9 4K video recording experience.

Sony’s rich heritage in films goes way beyond a logo at the beginning of the world’s biggest blockbuster movies; the iconic brand makes pro-grade cinema cameras too. That’s how its incredible CineAlta cinema camera intelligence has trickled down into the Cinema Pro app, which offers complete control over the masterpieces you make.

You know what else Sony does very well? Photography. Its Alpha line of stills cameras is credited with being the best in the industry when it comes to low light capture, and with its incredible eye-tracking feature, has become synonymous with perfect portraits too.

The Xperia 5 draws inspiration from both alpha traits, with a long-exposure night mode, which auto-detects a night scene, gets rid of grain and makes subjects stand out, as well as autofocus eye-tracking, so your portrait pop.

A sensational smartphone with a best-in-class screen, evocative sound and an eye-tracking camera that shoots cinema-style 21:9 4K content, and all for £699; meet the Xperia 5.


TechRadar: Cameras and camcorder reviews

Posted in Camera Reviews | Tagged , , , , , , | Leave a comment

Best 15-inch laptop 2019: top picks with 15-inch displays

The best 15-inch laptops are some of the most commonly seen portables, and they could be viewed as ‘Goldilocks’ notebooks: not too big, not too small, but just the right size. In other words, when considering the entire spectrum of the best laptops, 15-inch notebooks nestle between the larger 17-inch (or even bigger) form factors, and the compact 11 to 13-inch models.

These 15-inch laptops are nicely portable – they can be very slim and lightweight indeed – yet still have enough space to fit in some more powerful components, and also benefit from a screen which is large enough to ensure you don’t have to squint to see finer details.

For gamers, these kind of machines also offer enough display real-estate so you can properly appreciate polished visuals on higher settings (and they might come packing a good discrete GPU, to boot).

We’re not just considering gamers here, though. In this list we’ve picked out 10 of the best 15-inch laptops across a variety of categories, from hybrids to business machines, covering all platforms including Windows 10, macOS, Chromebooks and even Linux. There’s something for everyone here for those hunting out a mid-sized notebook.

The best 15-inch laptops 2019 at a glance:

  1. Microsoft Surface Book 2 (15-inch)
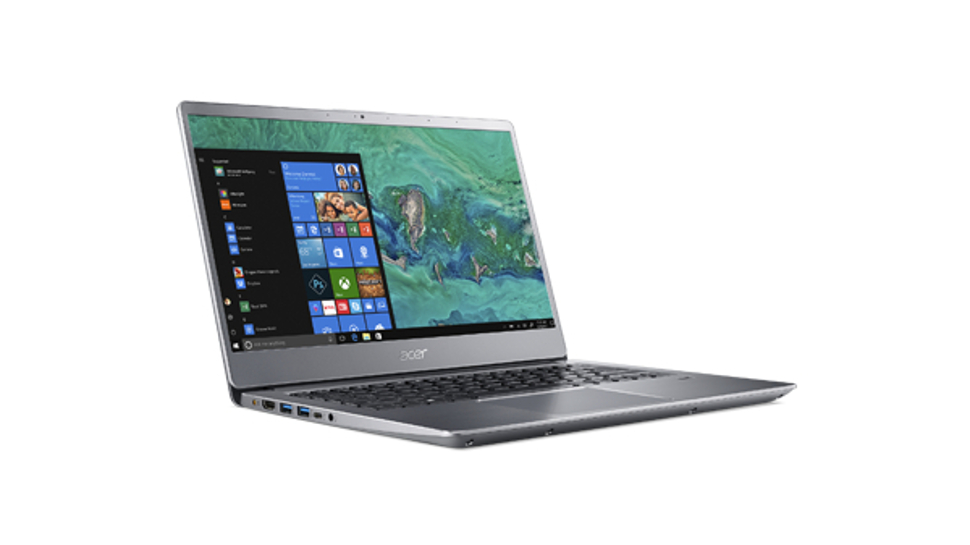
  2. Acer Swift 3
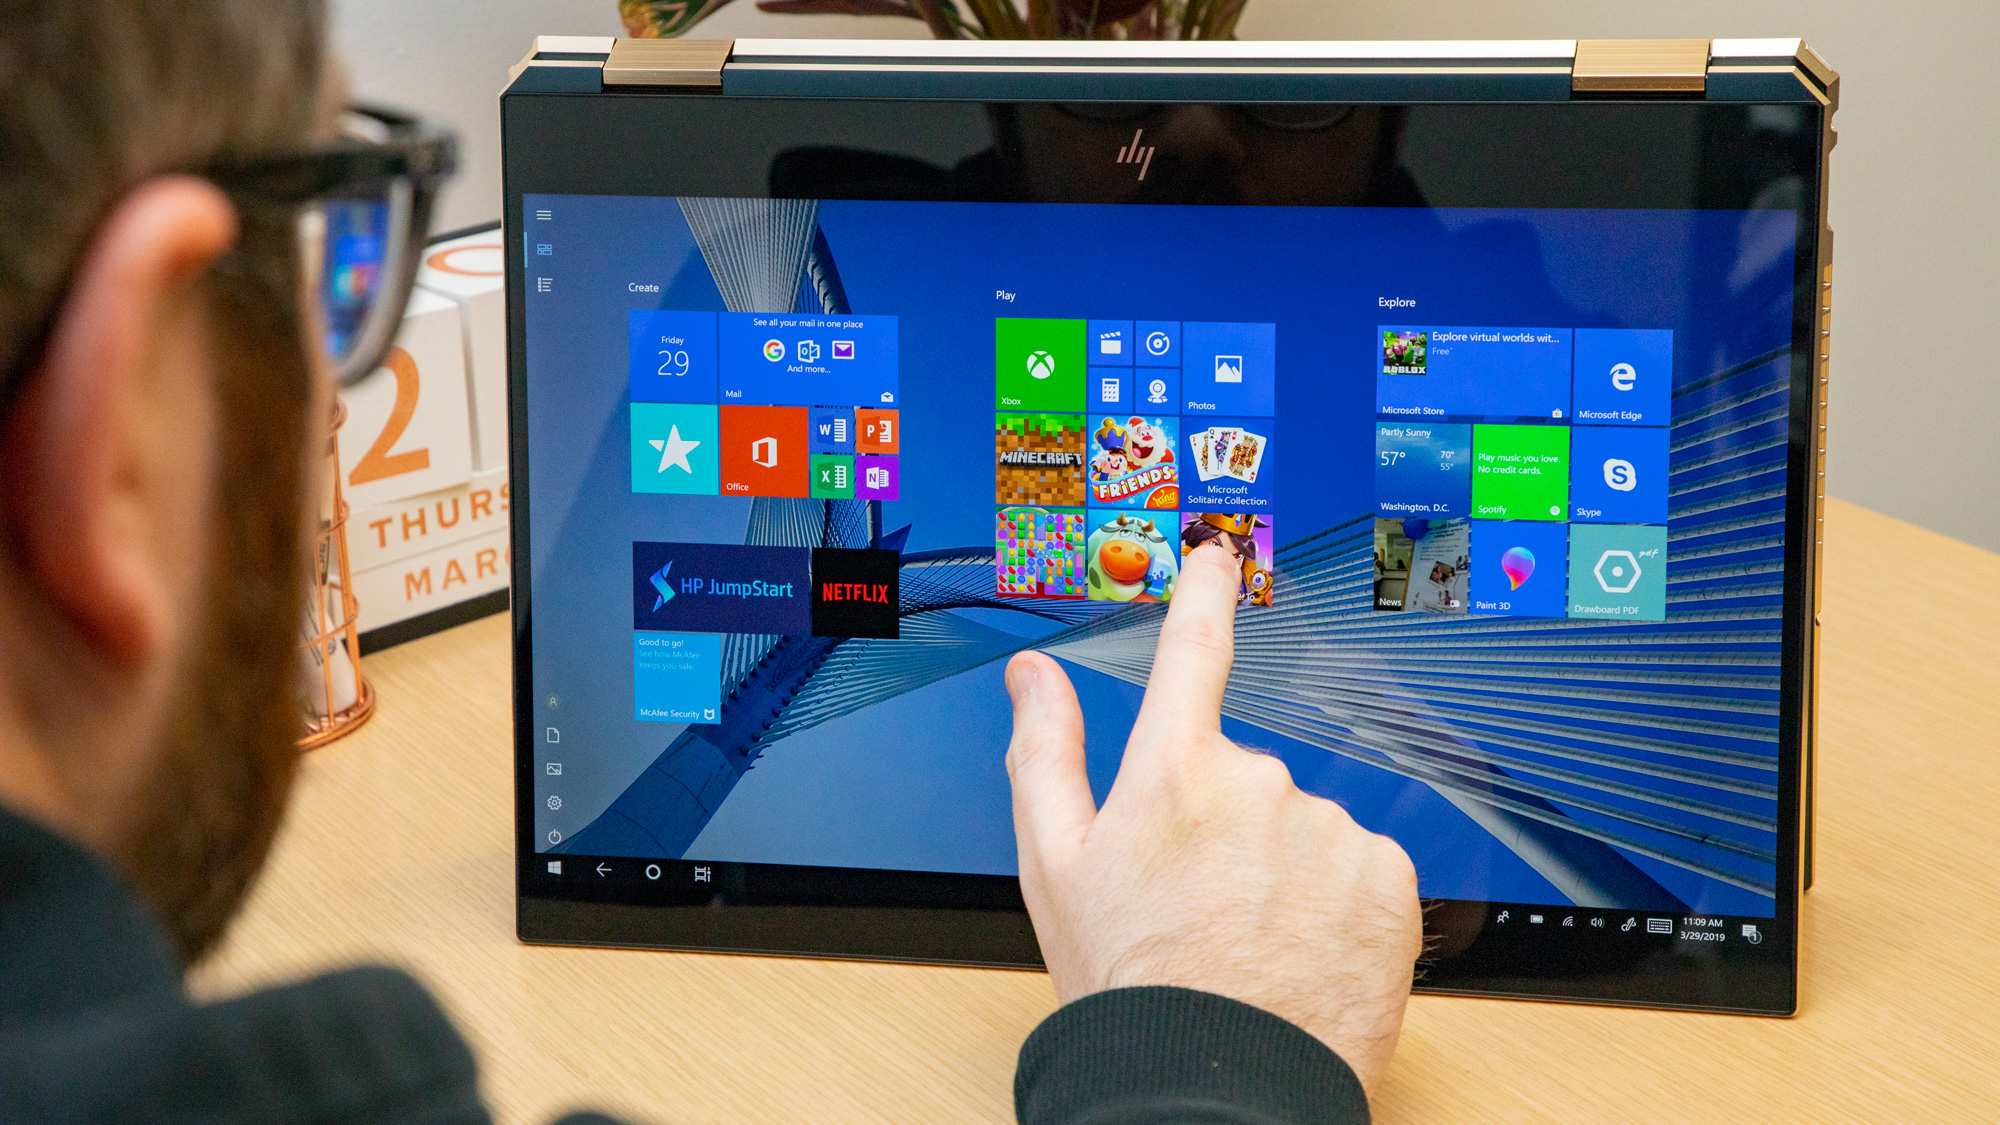
  3. HP Spectre x360 15T (2019)
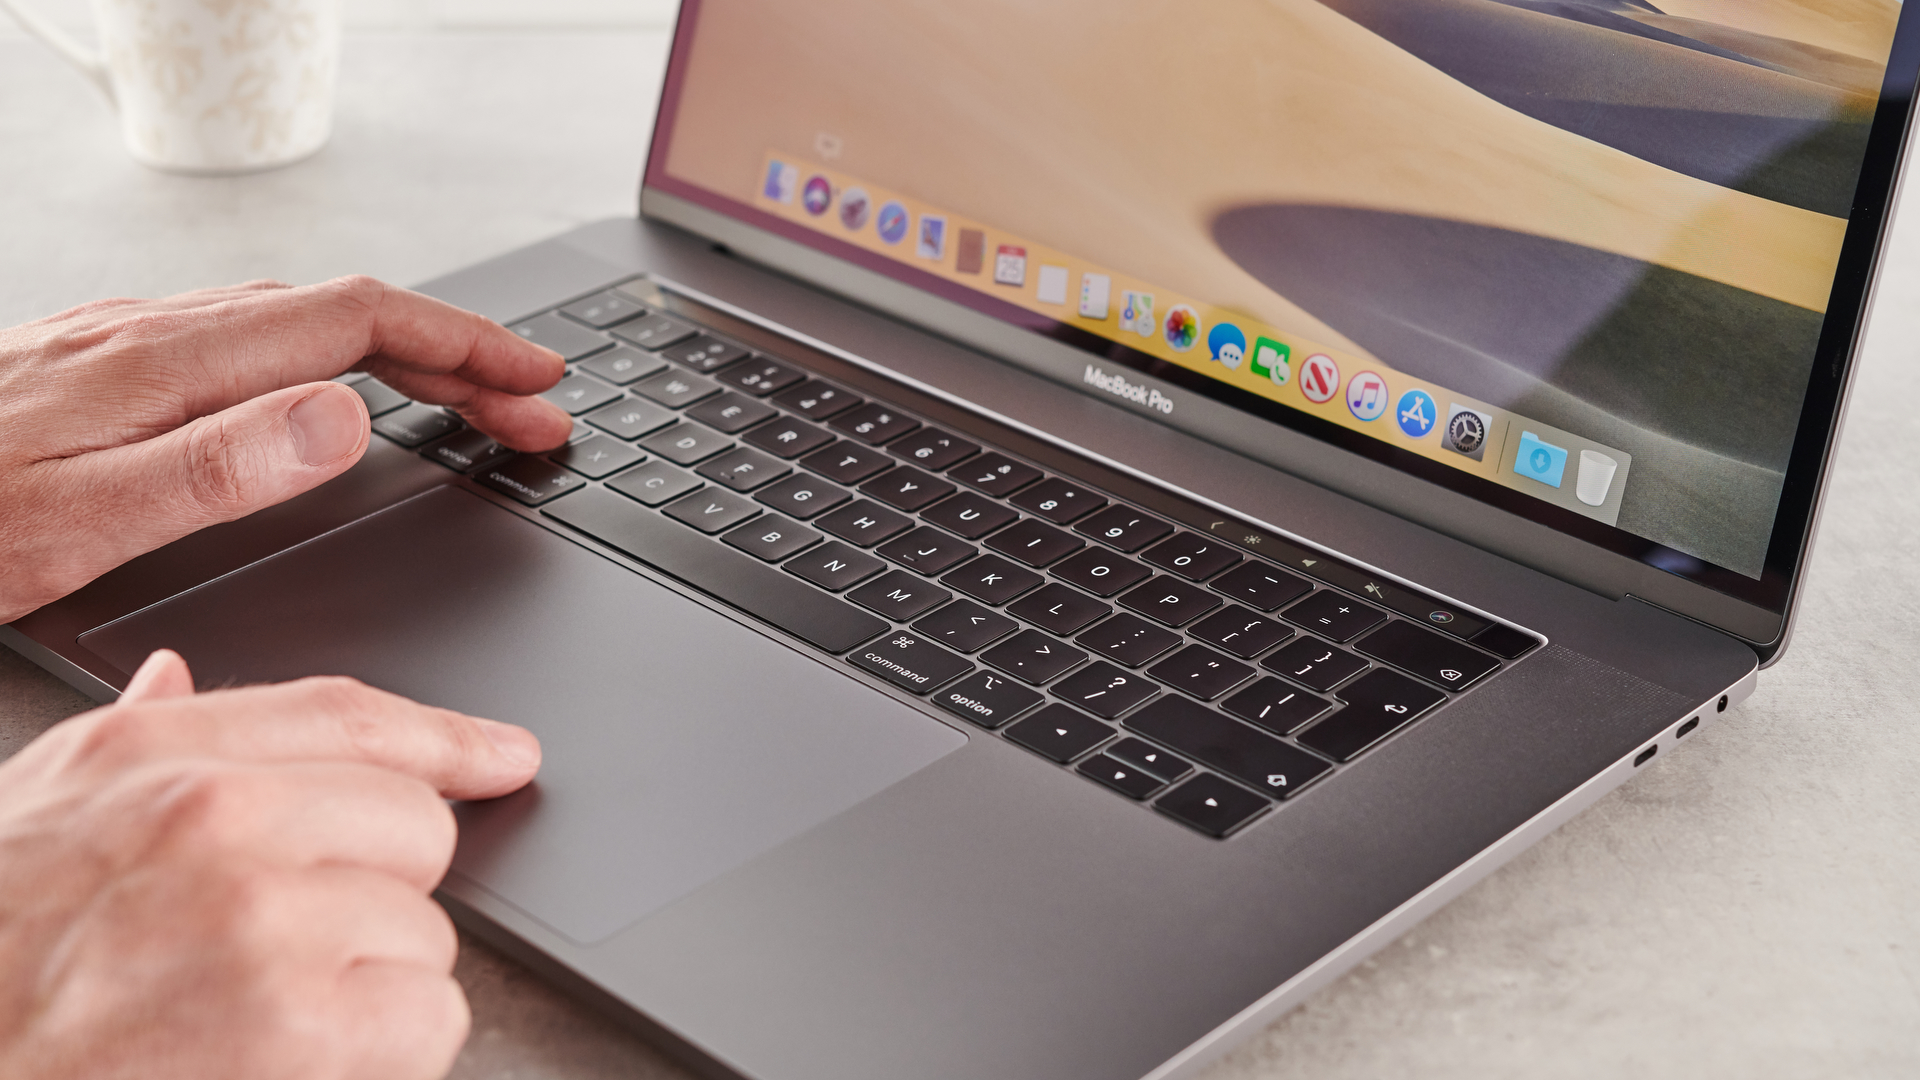
  4. Apple MacBook Pro (15-inch, 2019)
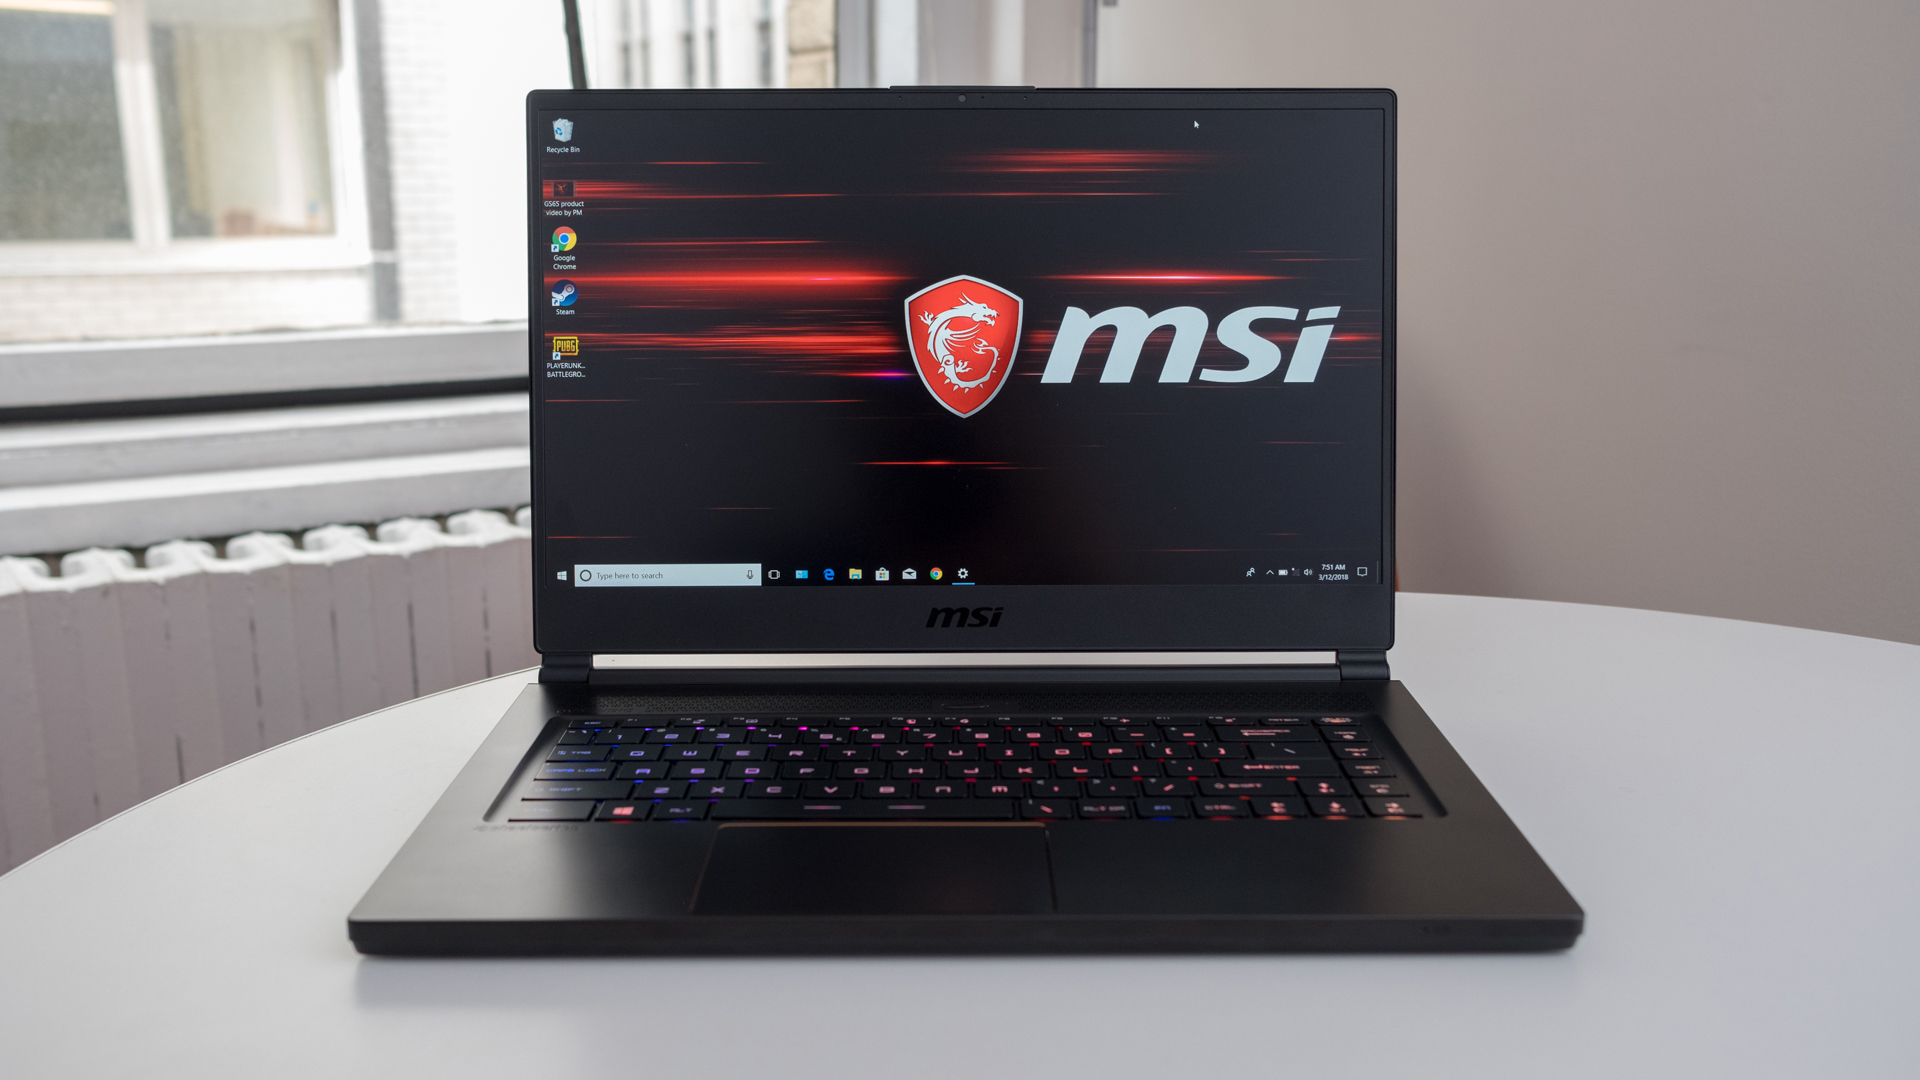
  5. MSI GS65 Stealth
  6. Dell G5 15
  7. Dell XPS 15
  8. Acer Chromebook 15
  9. Lenovo ThinkPad X1 Extreme
  10. System76 Serval WS

The best 15-inch laptops of 2019

Best 15-inch laptop: Microsoft Surface Book 2

Microsoft produced something quite special with the Surface Book 2. It’s a truly versatile machine, being a 2-in-1, and there’s a ton of power packed into that relatively slim convertible chassis. With a discrete GTX 1060 graphics card, the Core i7 version of the Surface Book 2 can even tackle newer games at Full HD resolution and decent details, when you want to kick back and relax.

This Microsoft machine also manages to pack incredible battery life, as we discovered in our testing, and has a gorgeous display. And that screen is impressively light when detached to be used as a tablet, too. There’s just so much to like here, except for one thing: that price tag.

Yes, this is one expensive 15-inch laptop, although in recent times, we’ve seen some decent discounts popping up regularly – and Microsoft has also manufactured a considerably cheaper Core i5 version (with no discrete GPU, though). At the time of writing, the latter is on sale in the US at two-thirds of the full recommended price of the Core i7 model (with 256GB storage). But yes; it’s still expensive.

As usual, if you want the best, you pay for it – but check out our next entry for a great alternative that won’t damage your wallet to anything like this extent.

Read the full review: Microsoft Surface Book 2 (15-inch)

Best 15-inch laptop: Acer Swift 3

If you don’t want to splash out a large amount of cash to secure the high-end beast which is our top overall pick – and it’s a fair comment that many won’t – then consider this alternative as a best all-round pick which is much more affordable. It’s not a hybrid, but it is very well-featured and can turn its hand to pretty much everything as a result.

Now, one thing to bear in mind here is that there are a number of different models of the Acer Swift 3 on sale, some of which are 14-inch and some 15-inch (we reviewed, and loved, the older 7th-gen Intel CPU 14-inch version here for example).

What we’re highlighting in this article are the 15.6-inch variants which run with 8th-gen Intel processors, and pack impressively powerful components given their price tags (including models with both hard drives and SSDs, giving you space plus speed, and indeed Intel Optane options).

These machines will cope with any everyday computing task admirably, and a spot of light gaming too. You also get an impressive selection of ports, alongside great input peripherals (including a large trackpad and backlit keyboard), a fingerprint scanner, and sterling battery life.

Acer’s Swift 3 might look like a bland budget portable, but do yourself a favor and don’t judge a laptop by its cover. This is a great all-rounder with some tempting deals to be had online.

Best 15-inch laptop: HP Spectre x360 15T (2019)

Those wanting a 15-inch convertible with versatility in spades should have HP’s Spectre x360 near the top of their wish-list. It’s a head-turning laptop with a slick design (albeit with a few oddities, including an awkwardly positioned trackpad), but this is no superficial portable – it backs up these good looks with enough power to cut through any computing task you might wish to tackle. Of course, it helps that the very latest incarnation of this hybrid has updated its hexa-core CPU to a 9th-gen Intel Core i7-9750H.

Creative types will also appreciate the bundled Tilt Pen which can be used to good effect with the excellent 4K resolution IPS touchscreen, and this 2-in-1 also packs a discrete GTX 1650 graphics card which means it can even tackle gaming to boot. As we said, this 15.6-inch laptop delivers versatility in spades, but prepare your wallet, because it doesn’t come cheap (but at least HP’s offering is more affordable than Microsoft’s Surface Book 2).

Read the full review: HP Spectre x360 15T (2019)

Best 15-inch laptop: MacBook Pro (15-inch, 2019)

If you’re after a powerful notebook in a 15-inch form factor which is ideal for creative usage – such as video editing or Photoshop – then you’ll be well served by taking the macOS route rather than Windows, with the larger MacBook Pro.

This year Apple has boosted the power of the MacBook Pro 15-inch with new 9th-generation Intel processors, with options that run up to a mighty 8-core Intel Core i9. So you most certainly won’t be left wanting on the performance front, with our review benchmarks showing that this 2019 incarnation is a considerably more powerful MacBook than its predecessor.

This 15-inch laptop is ideal for heavyweight editing with a choice of AMD Radeon Pro graphics solutions and the possibility to spec up the notebook to 32GB of RAM. And don’t forget the high-quality Retina display along with that improved Touch Bar which can certainly prove a very useful tool with creative applications.

Read the full review: Apple MacBook Pro (15-inch, 2019)

Best 15-inch laptop: MSI GS65 Stealth

This is the gaming laptop that has everything in many respects. It’s extremely thin (for a gaming notebook) and highly portable thanks to Nvidia’s Max-Q technology being implemented by the GPU, so you can take this 15-inch model anywhere – unlike some of the bulkier gaming machines you’ll typically find. Yet despite the svelte (and smartly designed) chassis, the GS65 is plenty powerful enough.

There’s loads to like here, including a beautiful display with a 144Hz refresh rate which allows the powerful components – that include (up to) a GTX 1070 graphics card – to deliver extremely smooth frame-rates with all the latest games.

MSI’s GS65 isn’t cheap (although what high-end gaming laptop is?), and there are a couple of niggles including some disappointingly tinny speakers (but you can always use headphones). This is, quite simply, a fantastic choice for a portable and powerful gaming notebook which we dubbed the ‘ultimate crowd pleaser’ in our review.

Read the full review: MSI GS65 Stealth

Best 15-inch laptop: Dell G5 15

If your budget won’t stretch to something like the MSI laptop above, then this more affordable gaming laptop from Dell makes a great choice for a 15-inch model that won’t make such a hole in your bank balance.

We reviewed the Dell G5 15 5590 and found it could easily deal with 1080p gaming, while giving you a pretty incredible level of battery longevity (around 10 hours for movie playback, which is remarkable for a gaming portable).

Overall, it’s a really well-balanced machine with a reasonable price tag, and the latest versions of the Dell G5 15 have been refreshed to include 9th-gen Intel Core processors (up to six-core models).

Read the full review: Dell G5 15 5590

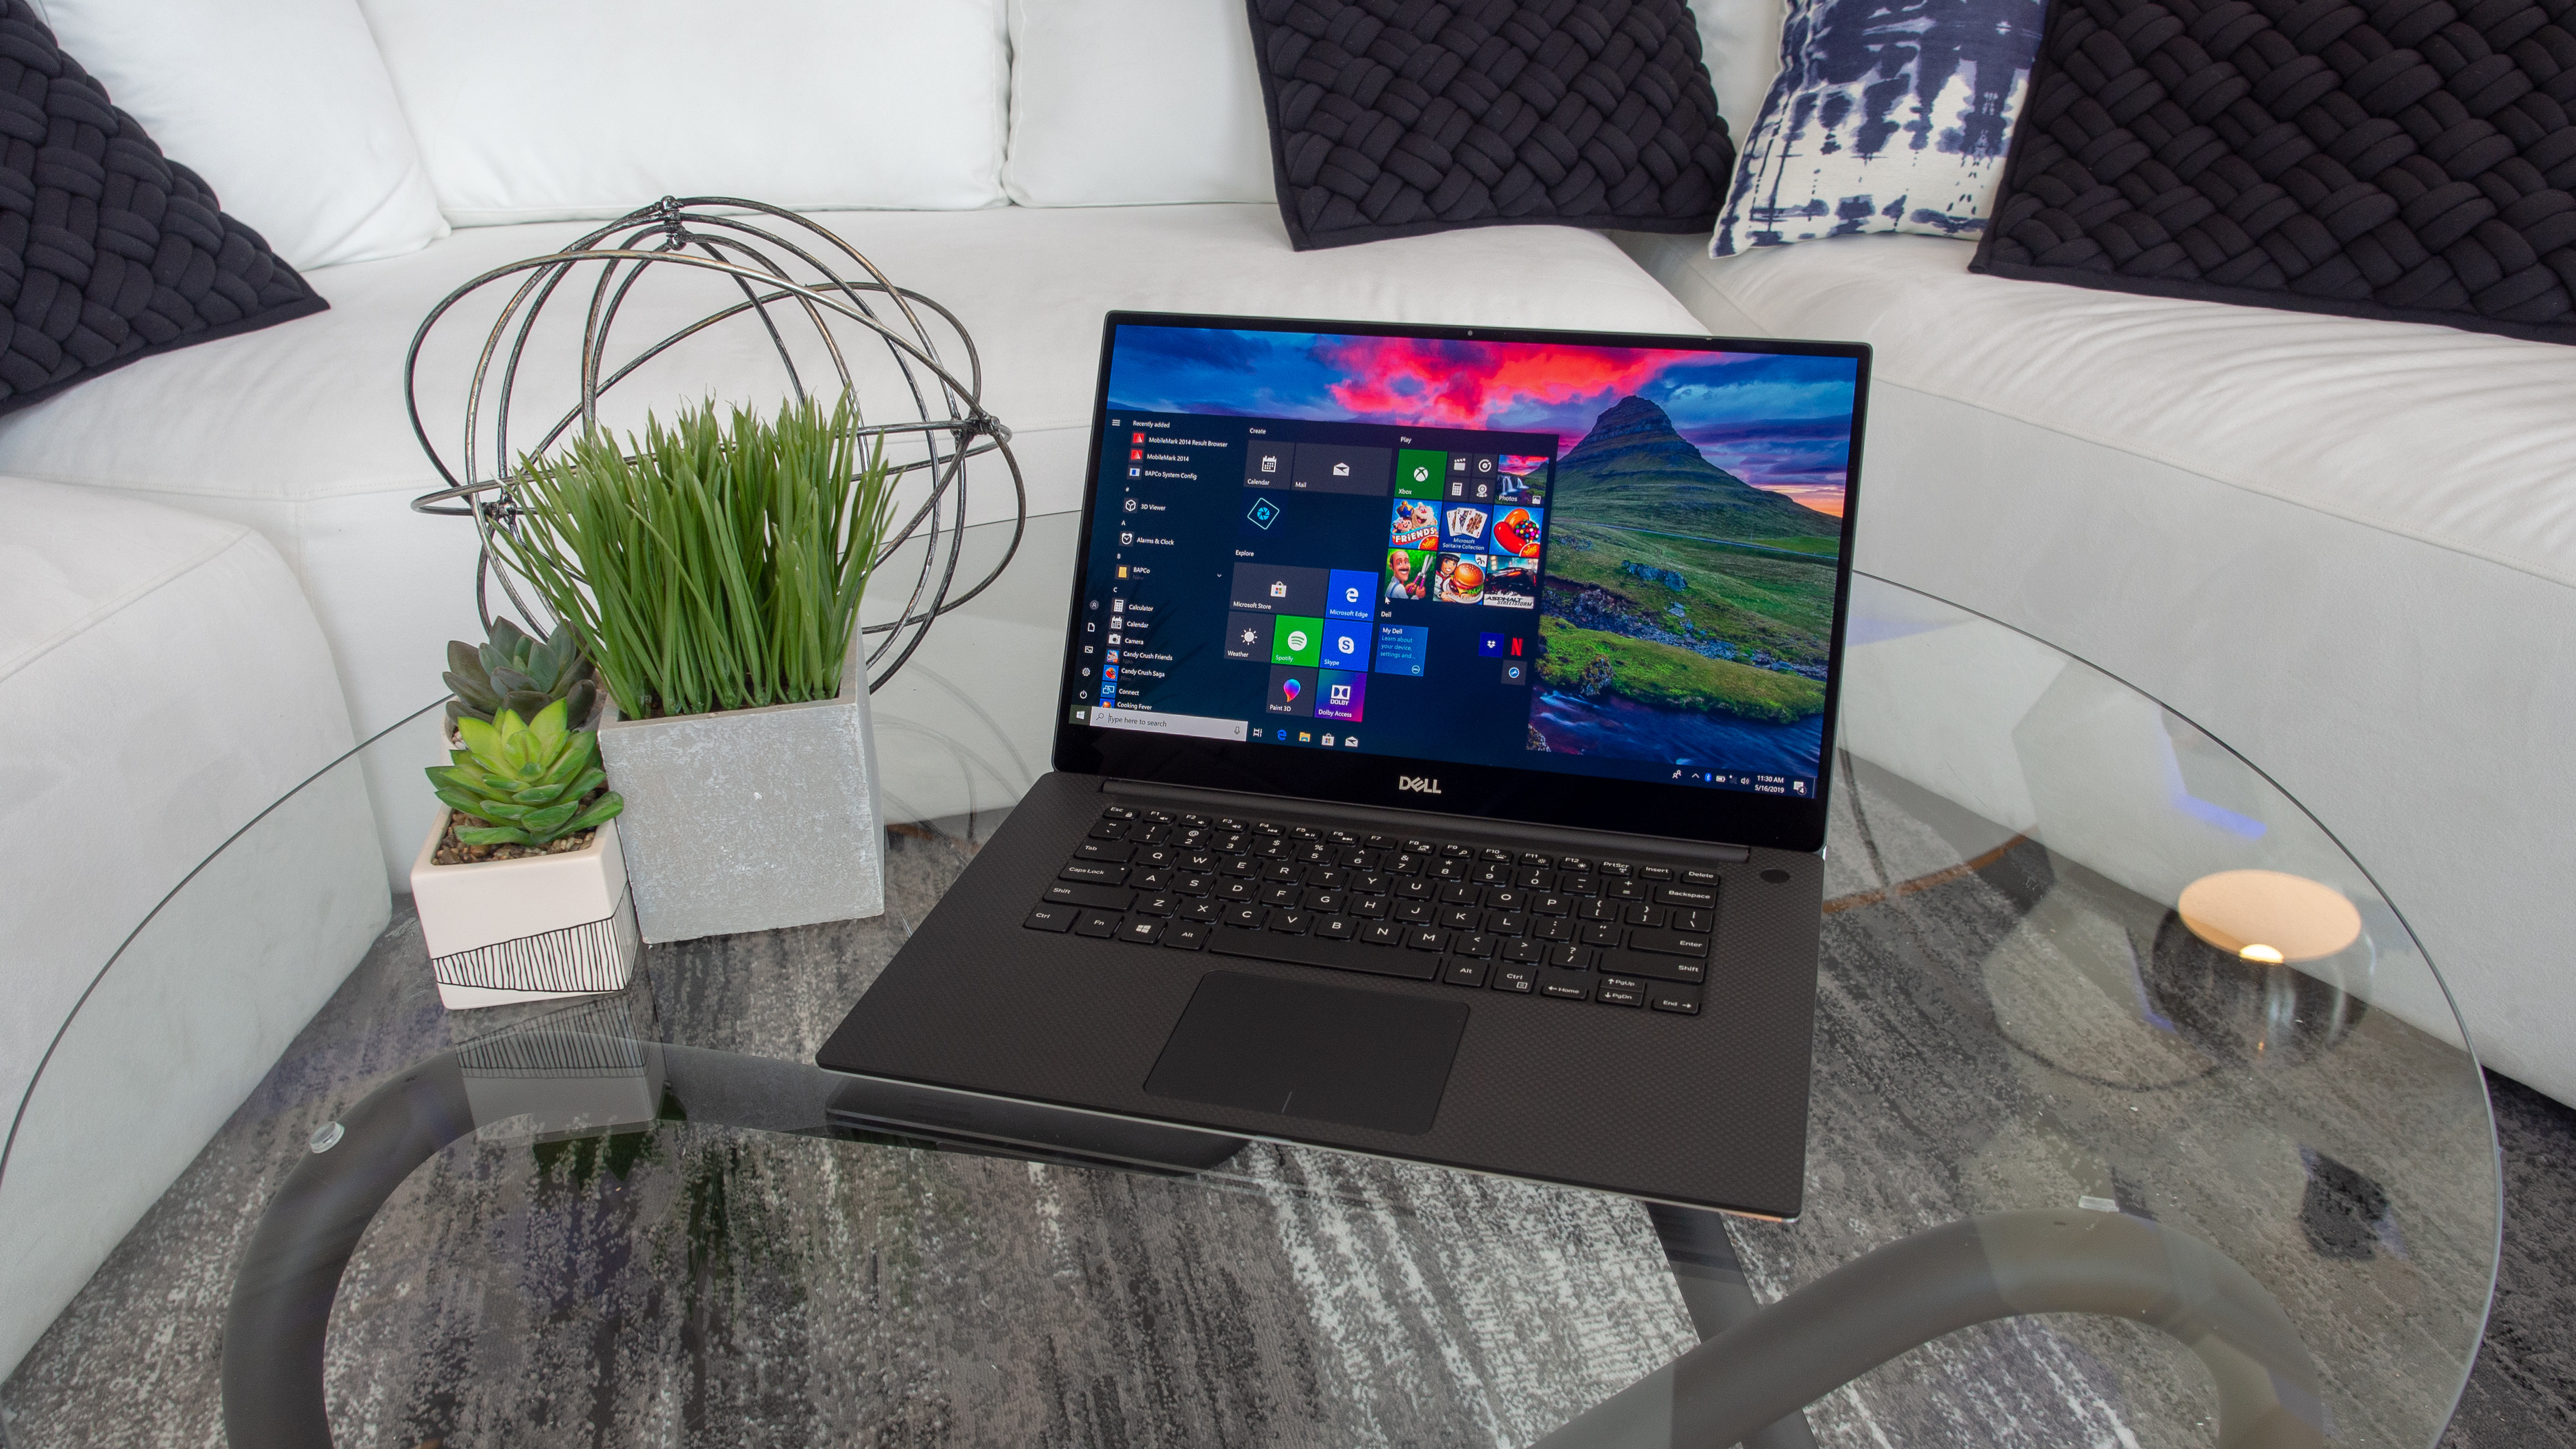
Best 15-inch laptop: Dell XPS 15

Dell’s XPS 15 may not have changed much in the last couple of years, but it remains a quality Ultrabook, and a great choice for students who need something to tackle whatever workload may come their way. It’s even possible to do some gaming – at 1080p resolution that is, although you may have to turn the details down a bit depending on the exact game.

Currently, Dell is still selling some models of last year’s XPS 15 with 8th-gen Intel processors, alongside the newly refreshed variants of this 15-inch laptop which carry 9th-gen chips (and Nvidia’s GTX 1650 GPU). You can spec these machines up to a pretty hefty level including 32GB of system RAM and a 4K OLED screen with vanishingly slim bezels (remember that this machine crams its 15.6-inch screen into a relatively small chassis, getting a big tick in the portability department).

The XPS 15 range isn’t particularly cheap, but the pricing is reasonable enough for what you get – although the new models with the OLED screen are particularly expensive, so prepare for that. However, students who are more strapped for cash might consider a Chromebook such as our next entry.

Read the full review: Dell XPS 15

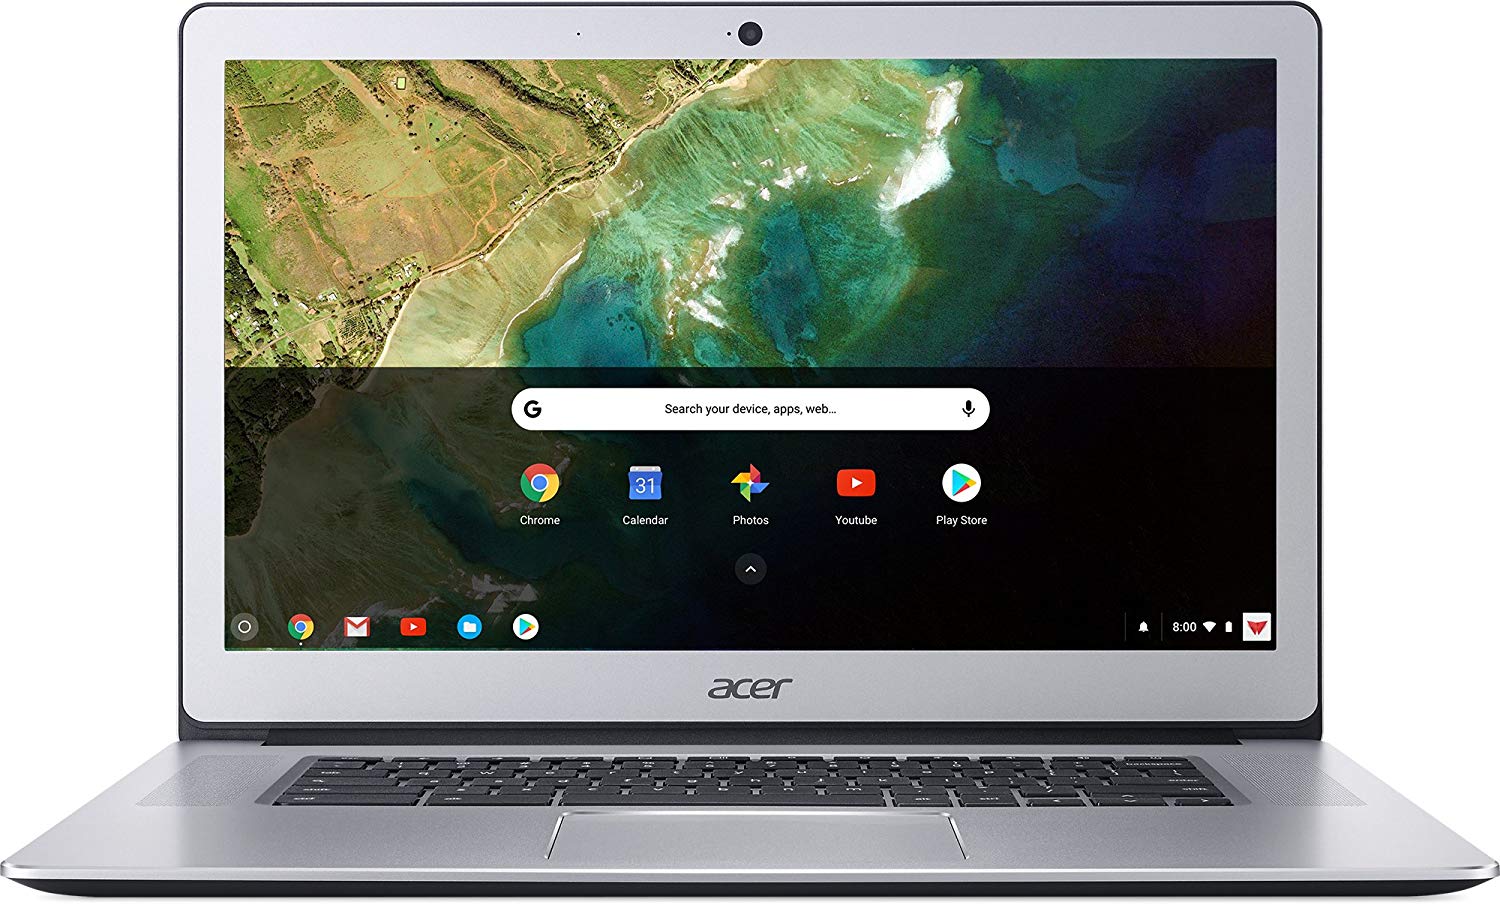
Best 15-inch laptop: Acer Chromebook 15

If you’re not bothered about running Windows (or indeed macOS), then it’s always worth considering a Chromebook, because these nifty machines can come very cheap. And this Chrome OS-powered effort from Acer is no exception on that front.

Acer’s Chromebook 15 benefits from a pleasingly sharp and vivid 1080p touchscreen display, and it’s powerful enough to do the job on the performance front. This notebook is fanless and benefits from a truly colossal level of battery longevity.

Note that the Chromebook 15 isn’t a convertible machine – although it does benefit from a 180-degree hinge which means it can be laid flat on a surface. It’s a great choice for those wanting a wallet-friendly 15-inch laptop which delivers across-the-board, particularly with battery life.

Read the full review: Acer Chromebook 15

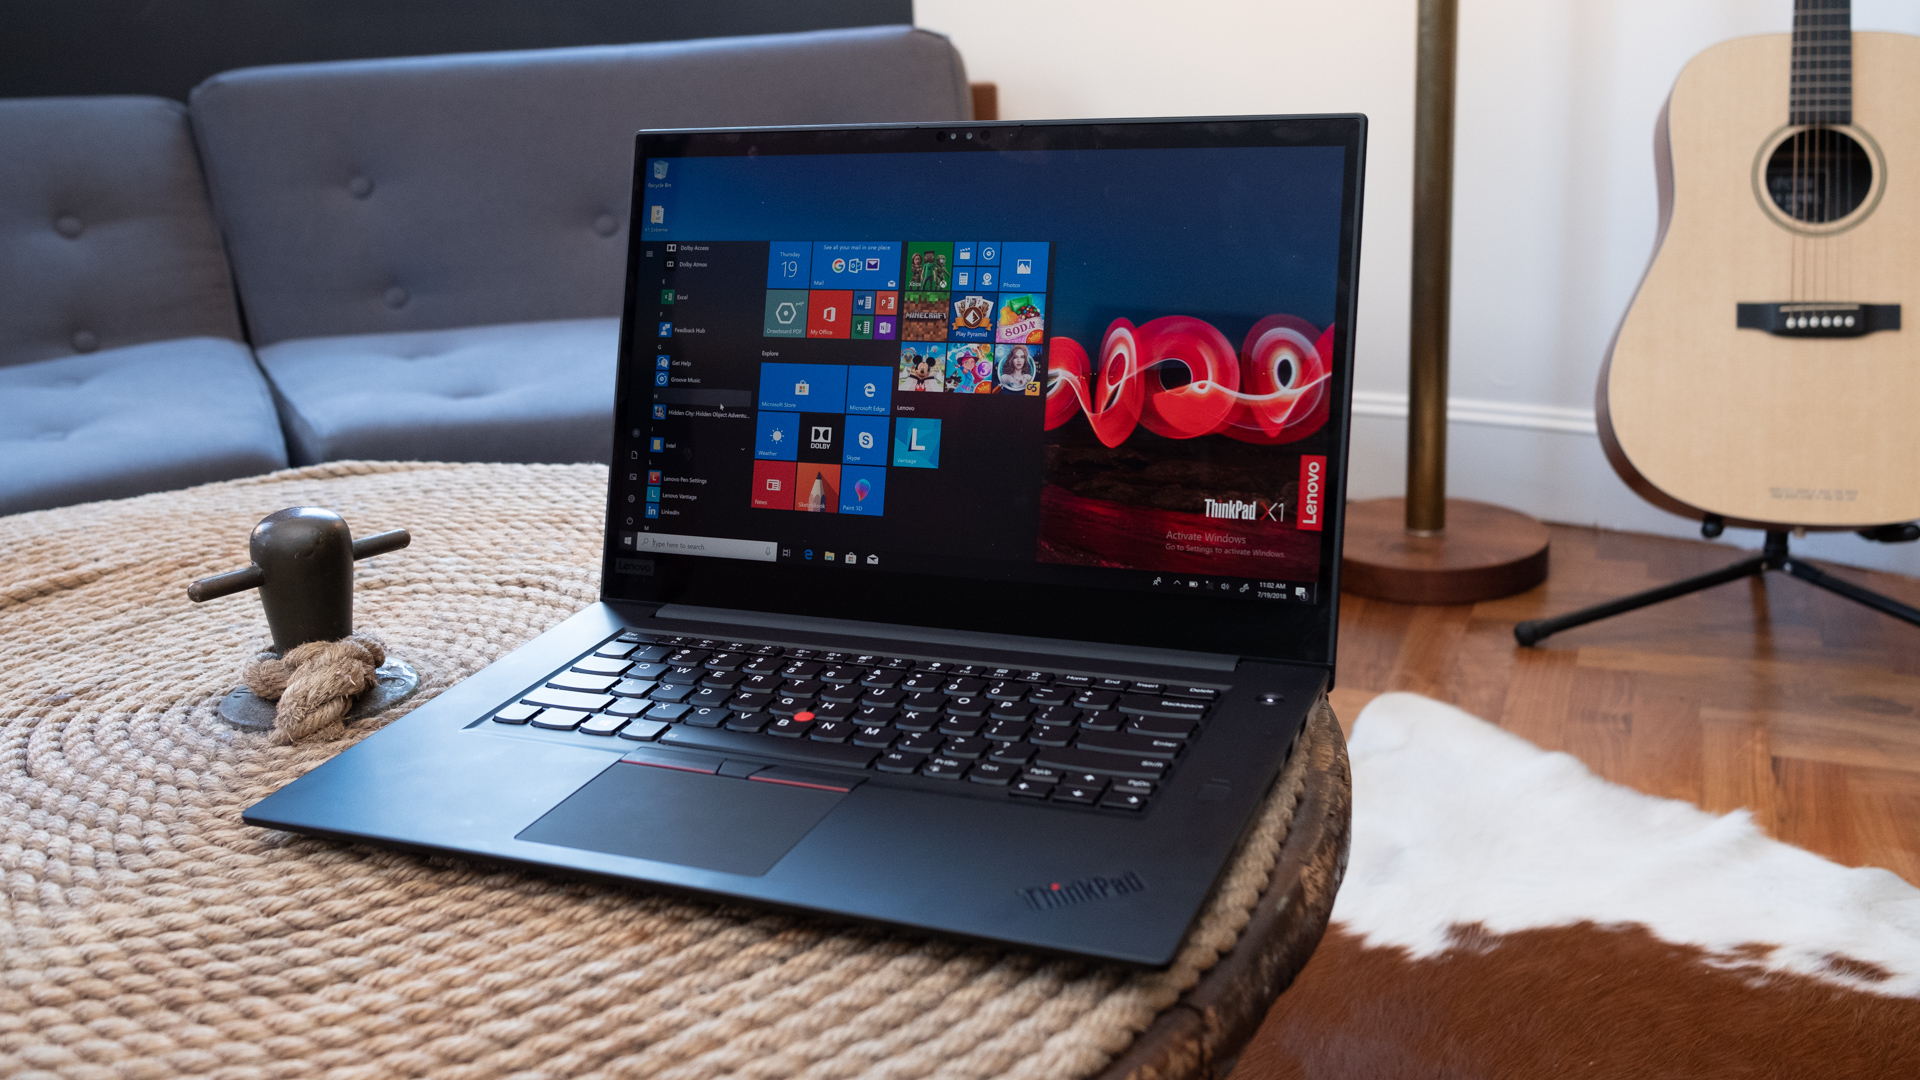
Best 15-inch laptop: Lenovo ThinkPad X1 Extreme

The good news for those after a business laptop in the 15-inch form factor is that there’s an incredible machine available in the form of the ThinkPad X1 Extreme. The bad news, though, is that the price tag is as extreme as the superb performance levels you’ll get with this portable.

It’s difficult to know where to start in describing just how good this machine is. Maybe the 15.6-inch multi-touch display, which in the 4K HDR option is simply stunning and benefits from top-notch color accuracy? Or the speedy performance driven by a six-core CPU, GTX 1050 Ti graphics and superfast NVMe SSD? Or just the little things, like the well-featured connectivity, the refined keyboard, or the potential for upgrades with this laptop?

As we already mentioned, the price may cause the odd eyebrow to rise or jaw to slacken – possibly both – but some corporate users will doubtless want to own the ultimate business laptop for their mission-critical tasks. And the ThinkPad X1 Extreme definitely fulfils that ‘ultimate’ billing, and arguably not just in the 15-inch world.

Read the full review: Lenovo ThinkPad X1 Extreme

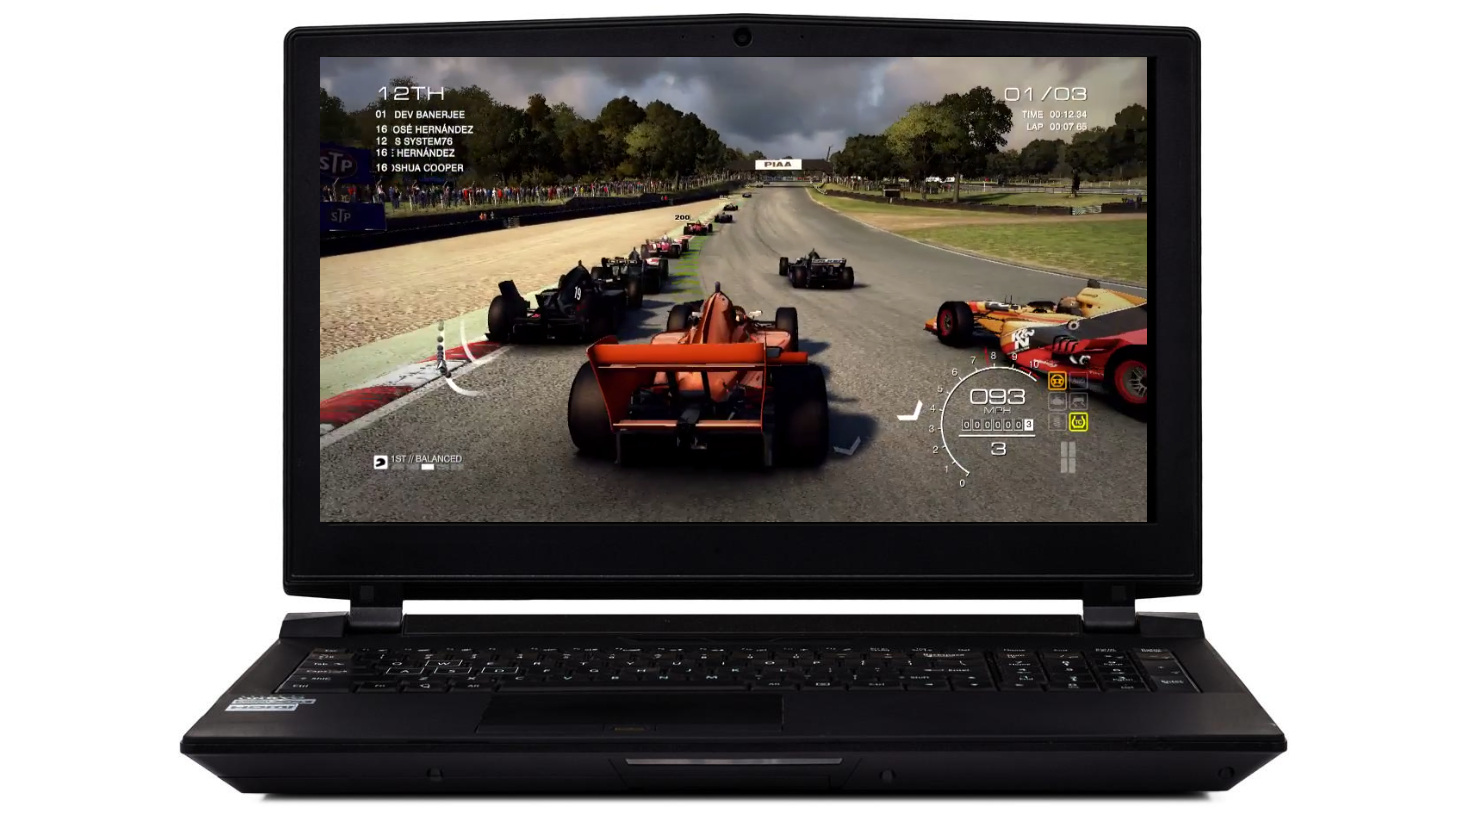
Best 15-inch laptop: System76 Serval WS

We’ve covered Windows and Mac portables, as well as a Chromebook in our list, so it’s only fair to round off with a dedicated Linux 15-inch laptop. And our pick of the bunch is System76’s offering (which also comes in a 17-inch flavor).

The Serval WS sports bags of power under the hood with a six-core 9th-generation Intel processor, backed up with an RTX 2060 graphics card. You can spec up to 64GB of system memory (although that will cost you, unsurprisingly) and up to 2TB of SSD storage (NVMe optionally). All of which will give you quite the Linux machine capable of running heavyweight apps and demanding gaming (making the most of the notebook’s 144Hz screen for your frame-rates in the latter case).

With these components, even the base machine isn’t cheap, but if you want a fully-fledged Linux monster of a portable – which can be pre-installed with Ubuntu 18.04 LTS or Pop!_OS – this System76 machine fits the (substantial) bill.


TechRadar: Photography & video capture news

Posted in Photography | Tagged , , , , , | Leave a comment

Canon EOS R Mirrorless Camera – $1,627.26 Shipped (Compare at $1,999.00)

eBay (via 6ave – 99.6% Positive Feedback) has the Canon EOS R Mirrorless Camera available for $ 1,627.26 with free shipping. Compare $ 1,999.00 ater $ 300.00 instant savings.
 
You can also pick up a Canon Mount Adapter EF-EOS R for only $ 60.19 with free shipping.
 
Note: This is likely a grey market item and therefore would not qualify for a manufacturer warranty.

Canon, Nikon, and Sony News, Deals and What’s New at The-Digital-Picture.com

Posted in Photo Equipment | Tagged , , , , , , | Leave a comment

Has Wescott Out-Godoxed Godox with the Westcott FJ400 Strobe?

The post Has Wescott Out-Godoxed Godox with the Westcott FJ400 Strobe? appeared first on Digital Photography School. It was authored by Carl Spring.

The FJ400 flash and trigger

Wait? How Much? Did Westcott just outdo Godox?

Westcott has just announced the FJ400 Strobe, which on first glance is not that exciting. Then you see the price, only $ 569! That is $ 80 cheaper than the ultra-popular Godox AD400. That’s before you get to the universal trigger system. Has Wescott done the impossible? Has Westcott out Godoxed Godox?

Specs

Let’s get this stuff out of the way. If you want the headline numbers, here they are:

FJ400 Strobe

  • 400 watt-second AC/DC strobe
  • 9 F-stop range in 0.1 and 1.0 increments
  • Mains power adapter included
  • 0.9 recycle time at full power
  • 480+ full-power flashes per strobe
  • 0.05 second recycle time at the lowest power setting
  • 20 watt LED modeling lamp (Daylight balanced)
  • High-Speed Sync up to 1/8000th second, TTL and rear curtain sync
  • Bowens Mount
  • Series of gels (full CTO, has CTO, window green and diffusion) included. These attach by magnets
  • Color Screen

X2-M trigger

  • Universal wireless radio trigger for FJ400 strobe
  • Compatible with many Canon, Nikon, Sony (with adapter), Fuji, Panasonic Lumix and Olympus cameras (more are being tested by Westcott)
  • Integrated long-lasting lithium-ion battery
  • Up to 200,000 flashes per charge cycle
  • Wireless communication range of up to 985 feet (300m)
  • Bluetooth compatible with free mobile app
  • USB Type-C to USB-A cord for quick charging and firmware updates
  • 6 groups and 16 wireless channels
  • Color LCD screen

This is a serious specification list that clearly shows that Westcott is after potential Godox users. 

The Flash

westcott-fj400-strobe-Wescott FJ400 flash with bag and filters

The headline specs on this are huge. Not only is the flash cheaper than the Godox AD400, but it has a larger battery allowing for more flashes (480 for the Westcott vs. 390 for the Godox). This is at the expense of size, with the Westcott being slightly larger than the Godox. I would personally happily trade the size (and accompanying weight) difference for the extra flashes. 

The other really impressive feature is that the Westcott includes a mains cable, allowing you to plug in the Westcott FJ400 Strobe and use it as a standard studio strobe. For the Godox this is an additional extra. 

Lastly, the mount is Bowens (as is Godox), which allows you to use several different modifiers at all different price points. It also has an adapter for the Rapid Box system, meaning you can easily use the excellent Westcott modifiers

The Trigger

westcott-fj400-strobe-Westcott X2-M Trigger

The universal trigger is something that is going to be incredibly useful to many people. I shoot both Canon and Fuji and currently have two triggers that I have to remember each time I shoot. The fact that this system has a universal system is really exciting for those of us who shoot different brands. 

I also like the movement in the trigger. The fact that I can flick it up when setting my lights, then flick it back down to keep a more compact footprint is exciting. The LCD screen size is nice and big meaning it will be easy to change settings. The included Li-Ion battery is good for 200,000 flashes. This is great, but I do like using AA batteries on my triggers. It’s the peace of mind that I can get batteries no matter where I am. 

For those of you who use Sony cameras, you will need to buy an adapter. However, this is only $ 20. 

Isn’t this just a rebadged Jinbei?

It certainly looks like these strobes are based on the Jinbei. It is not totally surprising that the FJ400 Strobe has been based around an existing system. The price point Westcott has brought this unit out at would be incredibly difficult if they had to create the whole system from scratch. 

I am not an expert on electronic engineering, so cannot comment on the exact differences, but I have a hunch that the Westcott FJ400 will be built to a slightly higher specification. How much, however, is to be determined. The filter system included with the Westcott is more practical than those I have seen included with the Jinbei system. 

Also, Westcott has excellent customer service. You get to talk to a real person on the phone and things are US-based.  For many photographers, and especially professionals, great customer service is worth its weight in gold.

When can I get it?

Westcott expects to be shipping the FJ400 Strobe for the end of October. 

If you want to get yourself more excited, you can check out the announcement video below.

So, are you excited by the FJ400? Is it enough to persuade you to look at the switch from Godox? As always, let me know in the comments! 

The post Has Wescott Out-Godoxed Godox with the Westcott FJ400 Strobe? appeared first on Digital Photography School. It was authored by Carl Spring.


Digital Photography School

Posted in Digital Photography | Tagged , , , , , | Leave a comment

10 DSLR Camera Features You Should Know

Final reminder: only hours left for Topaz Sharpen A.I. at 25% Off

Here are 10 features of your DSLR camera that you should know. They will help improve you as a photographer.

dslr camera

photo by Scott Symonds

1. Shooting Modes

Aperture Priority Mode

Aperture Priority Mode lets you control / adjust the aperture while the camera takes charge of determining the shutter speed, based upon the other settings (including the aperture). Adjusting the aperture causes background elements in your scene to become either crystal clear or blurred. The wider the aperture, the more the background elements will become blurred, as you focus on your main subject. Conversely, a narrower aperture enables you to include more things in your scene without them being lost to the blurring that occurs with the wider apertures.

aperture priority mode

photo by Koshy Koshy

Another thing that aperture adjustment does is to brighten or darken the overall image. With a wider aperture, you’re letting more light in through the lens and onto the camera’s sensor, so images will become bright. Go the other way, and your images will become darker as you narrow the aperture, as this time you’re letting less light reach the sensor during the period of the exposure.

Shutter Priority Mode

Shutter Priority Mode lets you control / adjust the speed of the shutter while the camera takes charge of determining the aperture. Adjusting the shutter speed will let you freeze motion if you choose a faster shutter speed. A slower shutter speed will increase the amount of motion blur in your images. A good example would be including a subtle blurring of the wings of a kestrel, as it hovers in the sky. You capture this activity with a slower shutter speed. Adjusting the shutter speed also affects the brightness of the image in a similar way as adjusting the aperture. If you select a faster shutter speed, you’re reducing the time that the shutter is held open, which lets less light into the camera’s sensor, resulting in a darkening of the overall image. Conversely, you will notice images become brighter as you slow down the shutter speed, as you’re causing the camera to hold the shutter open for slightly longer, letting in more light onto the sensor as a result.

Manual Mode

Manual Mode lets you control / adjust both shutter speed and the aperture. Choose this option if you want total control over determining these two settings rather than letter the camera’s algorithms calculate the most appropriate settings. You may be fine with that; but, then again, taking manual control will allow you absolute control over the artistic process and outcome with your photography.

2. ISO

This feature is pronounced “EYE-so”—unless you want to wind-up nerdy-types who get a bit manic over such mispronunciations, in which case treat it as an acronym; call it “I.S.O.”, then enjoy their fit of apoplexy. As for what this feature does, it allows you to control the camera’s light sensitivity based on a numerical system. The lower the ISO number (e.g. 100, 125, 200, 400), the less sensitive the camera will be to light, typically resulting in darker images (unless you have a sufficiently bright light source to compensate, such as an external flash unit). The higher the ISO numbers (e.g. 800, 1600, 2000, and beyond), the more sensitive the camera’s sensor, with lighter images being the result. But, you need to know that this light-enhancing wizardry comes at a cost, and that cost is a reduction in the overall quality of the image as a result of bumping up the ISO setting, particularly above the 1600 level.

high ISO

photo by Dave Doe

Camera technology is improving all the time, and every generation of camera gets slightly better at processing images with slightly higher ISO settings. In some cases, it can be better to sacrifice overall image quality in order to get a “once in a lifetime shot” (I’m not sure that many complained about the relatively low quality of images from the first moon landings, did they?). However, in general, if you’re in pursuit of quality, then it’s often best to go for the lower ISO values, specifically, the lowest “native” ISO setting your camera lets you select. What I mean by this is that some digital cameras allow you to set the camera into “Extended ISO” mode, which opens up additional ISO settings. For instance, on the Panasonic GH4, the Extended ISO feature lets you drop down to either 80 or 100. Turn off the Extended ISO feature and whatever the lowest value you see is the camera’s true lowest “native” ISO setting. On the Panasonic GH4, this happens to be ISO 200. That’s just how this camera is designed and the engineers felt this camera worked at its most optimum levels with a minimum native ISO setting of 200. Some cameras have 100 as their native setting; others, such as the Panasonic FZ1000, begin at 125.

3. Focusing Modes (Single Point vs. Spectrum)

This relates to how the autofocus system works. You may have the experience of turning on a DSLR camera and, when you go to focus the camera, in order to take a test shot, a bunch of different indicators flash upon the LCD or Electronic Viewfinder (EVF). These indicators are the different points of the spectrum that have been activated and the camera calculates that certain areas are the ones that you may want in focus, and these are typically represented by red or green boxes over different parts of the image. What typically works better (and by that, I mean, is more reliable and less annoying), is to go into your camera’s menu system, turn off the spectrum focusing option, and switch your camera so that it focuses just on a single point (typically in the center of the frame, although you can adjust this, such as placing the single focusing point over the point where a key subject is or will be in your image so that you get that subject in focus).

4. Back Focus

It seems that a lot of DSLR cameras are set up by their manufacturers so that the shutter button handles both the focusing part AND the exposure part of taking a photo. This can be fine, for a while, and you can get pretty adept at subtly pressing the shutter button half way to focus on your target subject before applying a bit more pressure on the same button to take the photo. However, there may come a time when this system ends up costing you valuable photo opportunities. For instance, when doing light painting photography, you’ll be working in relative darkness, taking time to set up your camera and focusing on just the right point in the image where you want tack-sharp clarity. Then comes the moment when you’ll press the shutter button to begin the long exposure so that you can walk out in front of the camera to wave your torch around, to capture the spectacular movements of light. However, just as you go to press the shutter button, you fail to put the right amount of pressure through the button, and the camera treats it like you’ve requested a change of focus, and the autofocus system kicks in, taking the camera out of the perfectly adjusted focus point.

On the more sophisticated DSLRs, you can save yourself this sort of aggravation by decoupling the autofocus feature from the shutter button and assigning the autofocus to one of the other option buttons. The reason why this method is called “Back Focusing” is because the button that is usually selected for the job of focusing is typically on the back of the camera, but in close-enough proximity to the shutter button so that you can easily engage the newly assigned autofocus button with your thumb while your forefinger remains the trigger finger to engage the shutter button. It does take a little getting used to, but it does enhance your workflow and the way in which you operate your camera.

5. Exposure Compensation

You may not use this feature all of the time, but there are certainly occasions when you’ll want to take advantage of the exposure compensation setting to help improve the overall quality of your image. The exposure compensation settings are measured in values, with zero in the middle, then you either go to the plus values, to brighten the image, or into the minus values, to darken the image. Why would you want to do this, when you’ve already adjusted the brightness with either the aperture, shutter speed, and/or ISO settings? The problem is, with modern DSLR cameras, the algorithms they use tend to result in overcompensation of light quality with the resulting image. If you’re photographing in dark conditions, such as at night or in the evening (when you get those darker blues, for instance), without using exposure compensation, the camera will calculate that any source of light, such as street lights, lanterns, etc., will be rendered extremely bright, as the DSLR overcompensates to make sure the light can be seen in the dark environment. Professional photographers will often deal with this by using the exposure compensation feature, and dialing down into the minus values, typically going to -1 of exposure compensation, in order to tone down those light sources in the resulting image. Conversely, when out in a really bright environment, such as in snow, an exposure compensation value of +1, or even +2, will help to combat the camera’s tendency to overcompensate in the other way. What you’ll typically find is that without adjusting the exposure compensation settings, anything that’s white in your scene will most likely be rendered a really ugly grey color. By adding a value of +1 or +2 of exposure compensation, you’re able to bring back that brilliant white.

6. Custom White Balance

I know of some professional photographers who will typically shoot in auto white balance mode, most of the time. However, there are times when they won’t do that, such as at an indoor ice rink, where the indoor light can render the white of the ice rink a different color to what you actually see. So, to combat this, they will instead prefer to dictate to the camera what “white” actually looks like. This generally involves you going into the white balance menu system, selecting a custom preset option, and then you will take a photo of how you want the white to be in all of your photos. For example, you’d point the camera at a bank of snow, or the white of a wedding dress; fill the frame with that color, and take the photo. The camera will then treat that as white, and balance all the other colors in the scene accordingly, until you reshoot with a different custom white balance, or return it to one of the preset white balance modes, such as AWB (Auto White Balance), or the Cloudy or Sunny settings.

custom white balance

photo by greg westfall

7. Highlight Control (The Blinkies)

Some DSLRs allow you to turn on a highlighting feature that is often referred to as “The Blinkies” (because when you go to take a photo and have the camera’s settings such that it might result in part or all of the image being washed out or lost in brightness, the LCD screen will “blink” at the areas that will become overexposed). This is something you wouldn’t want if, say, you were photographing a bride on her wedding day. If you overexpose the wedding dress, you are likely to lose any subtle detail, and you most likely won’t be able to recover the detail in post-production (e.g. Lightroom), because the software won’t have any data for those overexposed parts of the image. So, Highlight Control is often a good warning indicator to have turned on.

8. Metering Modes

Your DSLR will probably allow you to change to one of three different metering modes, depending on what you intend to photograph:

Evaluative Metering (also known as Multiple Metering)

Evaluative Metering gets the camera to measure the most suitable exposure by determining the levels of brightness in the entire frame. This is generally the one you will want to use—most of the time.

Center Weighted Metering

This method is used to focus on the subject in the center of the frame in order to measure the whole screen evenly.

center weighted metering

photo by Nathan Siemers

Spot Metering

This is going to get the camera to meter in just one area of the frame.

In certain situations, such as music concert settings, if you were to select Evaluative Metering, you will run into problems because the light typically changes every couple of seconds—either different colors, or sometimes the light will shine on the artist, other times the light will shine elsewhere, leaving the artist’s face in more darkness; sometimes the light will shine on one band member and not another… and all of these light variations gives your camera a really hard job of trying to calculate how to measure the light to help create a really nice image. When you go to photograph music concerts, Spot Metering is generally the option you want to go with, because you’re going to be targeting the musician’s face. That’s who you’ve come to see, so you want to make it clear in your photograph who the artist is, and that means capturing them in the best possible light by using the most appropriate metering mode—Spot Metering, in this case.

spot metering

photo by photophilde

9. External Flash Control (From Your Camera)

Some of the more modern DSLRs, typically at the higher price range, allow you to operate the functions of a compatible external flash unit right from the menu system of your camera. This is a really great feature, especially if you’ve got multiple flash units set up all over the place, or you set your single flash unit up in a perfect, but awkward-to-reach spot, where it’s difficult to see the LCD display and buttons on the flash in order to adjust the settings. Rather than going back to each individual flash unit and having to fiddle about with the settings, which might be troublesome if they’re in a typically high-up, awkward position, you are able to turn your flash unit(s) on or off, raise or lower the power setting, or change how the flash responds, all from the menu system of your DSLR. Both the Panasonic FZ1000 and GH4 cameras have this wireless feature, but you need their compatible wireless external flash units in order to take advantage of this—it is definitely worth the investment.

10. The Beep

If you want to make yourself really unpopular, go into any quiet setting and start taking photos with your camera’s system of beeps fully audible. Don’t do this; it can become a really irritating and off-putting sound. It’s not necessary to have the camera audibly tell you when it has something targeted with its Autofocus system, so it’s best for everyone if you find out where the sound controls are located in your camera’s menu system and turn it off (or, at the very least, as low as possible, if there’s such a volume control option on your camera).

So, those are ten features of your DSLR camera that will help you improve as a photographer.

About the Author:
Graham Wadden created and maintains the Creative Commons photography website, WaddenCCPhotography, specializing in creating stock photography primarily for home educators and those in education.

For Further Help Achieving Crisp, Sharp Photos:

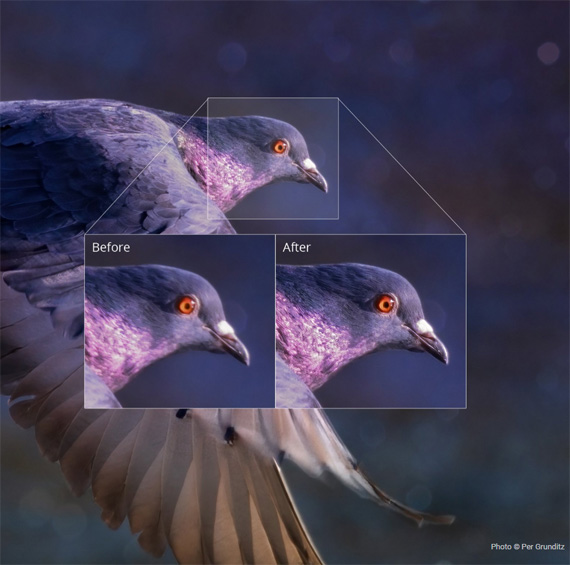
Currently on sale, Topaz Sharpen A.I. is the first sharpening and shake reduction software that can tell difference between real detail and noise using artificial intelligence and neural networks. It was trained with millions of images so it could learn the characteristics of detail vs. noise – and then enhance just the detail. In some cases, it can even recover image detail.
sharpen ai photo

Results with Sharpen AI (Click to See How it Works)

It is currently 25% off which ends tonight at midnight, plus our readers can save even more by using the coupon code picturecorrect at checkout.

Final day of sale: Topaz Sharpen A.I. at 25% Off

Go to full article: 10 DSLR Camera Features You Should Know

What are your thoughts on this article? Join the discussion on Facebook

PictureCorrect subscribers can also learn more today with our #1 bestseller: The Photography Tutorial eBook

The post 10 DSLR Camera Features You Should Know appeared first on PictureCorrect.

PictureCorrect

Posted in Photo Techniques | Tagged , , , , | Leave a comment

IT resellers are overcharging businesses

At a time when IT security budgets are already falling, a new study from Probrand has revealed the scale of margins some buyers are paying out to IT resellers which shows how businesses in some industries are unnecessarily wasting what little resources they do have.

To compile its new IT Product Margins Report 2019, the firm conducted analysis on over £12m worth of tech spending across 20 sectors over a two-year period. Probrand's report highlights how some organizations have been paying staggering mark-ups to suppliers, indicating that IT buyers aren't getting the IT deals they thought they were.

The most extreme examples in the firm's report show how organizations were found to have paid more than ten times the trade price for products. According to Probrand, one buyer in the banking sector bought Ethernet cables at a unit price of £42.32 when the trade price was 34p, representing an astonishing 12,347 percent margin.

The Society of IT Managers' industry best practice states that organizations should not be paying more than a three percent margin to suppliers. However, the study revealed that the average margin paid across all sectors and purchases was a little over 14 percent which is almost five times the recommended mark-up.

High margins

Probrand's report also revealed which products drove the highest margins including a stylus pen which was bought for £73.24 despite the trade price being £5.62 (equivalent to a 1203.2% margin) and a wax printer ribbon with a trade price of £6.42 which was bought for £83.01.

MCIPS supply chain director at Probrand, Ian Nethercot provided further insight on the report's findings, saying:

“12,000% profit has never been deemed fair and equitable for any product purchase, and IT buyers are fundamentally not getting the deals they expect or deserve.  The volatility and complexity of the market, with a dose of human intervention in between, is seeing IT budgets unknowingly wasted. Buyers are also consuming vast swathes of time doing their level best to manually get quotes, compare and negotiate discounts. We believe it is time for a change, buyers demand fair deals from an open and transparent market and that is exactly what the industry needs to deliver.  Ultimately, it will help IT procurers save time and unlock more IT for their money.”

The report's analysis also showed that the legal sector was the industry paying the highest margin on average with a whopping 23.61 percent average. Emergency services was found to be paying the lowest margin at an average of 9.3% but this is still three times the 'best practice' price.

Businesses should think twice before purchasing IT products from a reseller with high prices and they should always check the trade price before completing a purchase.


TechRadar: Photography & video capture news

Posted in Photography | Tagged , , | Leave a comment

iPhone 11 and 11 Pro deals US: get the best prices in September 2019

The September 10 Apple Event unveiled the highly anticipated iPhone 11 and iPhone 11 Pro smartphones. The latest iPhone is officially available to order today from all major carriers and retailers like Walmart and Best Buy. To help you wade through all the different plans, we've listed the best iPhone 11 and iPhone 11 Pro prices and deals that are available in the US today.

The Apple iPhone 11 features a 6.1-inch LCD display, while the iPhone 11 Pro comes with a Super Retina XDR OLED display in either a 5.8-inch or 6.5-inch size. The iPhone 11 and 11 Pro both have updated camera hardware with a Wide and new Ultra-Wide camera on the back of the iPhone 11 and Wide, Ultra Wide and Telephoto cameras on the iPhone 11 Pro. The multi-camera system allows you to capture ultra-wide photos and videos, and even "zoom-out" after a photo is taken to see more of the captured image. The front-facing camera on all new models is now an upgraded 12MP TrueDepth camera that can capture wider angle and even slow-motion selfies.

The battery received an upgrade with Apple stating that the iPhone 11 provides a one hour longer battery life compared to the XR, the Pro offering four more hours of battery life when compared to the XS, and the Pro Max offering 5 hours more battery life compared to last year's XS Max. All the new phones feature the A13 Bionic chipset which Apple claims is the fastest processor ever in a smartphone.

The iPhone 11 comes in six new color choices which include black, white, yellow, purple, green, Product Red and the 11 Pro and 11 Pro Max is available space gray, silver, and gold, as well as a new midnight green option.

The iPhone 11 has a starting price of $ 699 for the 64GB storage model which is actually $ 50 cheaper than the iPhone XR was on launch last year. The 64GB iPhone 11 Pro is priced at $ 999, and the 64GB iPhone 11 Pro Max is priced at $ 1,099, which is the same price as the XS and XS Max when they launched last year in the US. Apple is offering up to $ 300 off the iPhone 11 and 11 Pro when you trade-in a qualifying iPhone.

The best Black Friday iPhone 11 deals and prices

While there are plenty of fantastic offers below, there's also Black Friday 2019 that you can look forward to. The November sale event is an excellent opportunity to find online bargains, and lucky for you we've put together a guide on how to find the best Black Friday deals of 2019. We'll also tell you everything else you know to know, such as the date, what retailers are participating, and what deals we can expect to see.

iPhone 11 deals from US carriers:

iPhone 11 Pro deals from US carriers:

iPhone 11 Pro Max deals from US carriers:

The iPhone 11 Pro Max, the bigger version of the 11 Pro, is priced at $ 1,099 from carriers such as AT&T, T-Mobile, Sprint, and Verizon. Sprint is offering the Pro Max for $ 16.67 a month with an eligible trade-in and on a Sprint Flex 18-month lease, and Verizon is offering up to $ 500 off with select trade-in and Unlimited. While AT&T isn't offering a promotion on the Pro Max,  you can get the iPhone 11 for free when you buy another eligible iPhone.

Learn more about the newest iPhone with our hands on iPhone 11 review, iPhone 11 Pro review, and iPhone 11 Pro Max review.


TechRadar: Cameras and camcorder reviews

Posted in Camera Reviews | Tagged , , , , , | Leave a comment

New Smartphone Includes a 108-Megapixel Camera and Wraparound Display

The post New Smartphone Includes a 108-Megapixel Camera and Wraparound Display appeared first on Digital Photography School. It was authored by Jaymes Dempsey.

xiaomi mi mix alpha

These days, smartphone manufacturers seem to be in a race of their own: to include the most cameras with the most megapixels.

Apple has just released the iPhone 11 Pro, with its 3-camera setup. The Huawei P30 Pro packs a 40-megapixel sensor.

And now we have a new smartphone to evaluate:

The Xiaomi Mi Mix Alpha 5G, which includes some features that can only be described as “intriguing.”

First, the camera: The Mi Mix Alpha 5G boasts a single 108-megapixel camera.

Yes, you read that right:

108 megapixels, which is not only more megapixels than the leading Google, Apple, Samsung, and Huawei cameras combined, but is also more megapixels than you can find in any Canon or Nikon DSLR.

Now, so many megapixels can cause problems:

More megapixels in a small sensor results in lots of noise, especially when shooting at higher ISOs.

But Xiaomi has attempted to account for this problem, including a “tetracell” design that can combine four pixels into a single pixel element, in order to produce 27-megapixel photos when shooting in low light.

Will this truly keep noise levels down? I’ll admit that I’m skeptical. On the Mi Mix Alpha 5G’s 1/1.33 inch sensor, even 27 megapixels is a lot, and 12-megapixel smartphones (i.e., Apple’s latest iPhones) still struggle with noise.

There’s also a question of whether a 108-megapixel camera even makes sense. Do any smartphone photographers actually need this many megapixels? Sure, more megapixels are good for printing large or doing big crops, but 108-megapixels seems like overkill for such consumer-oriented tech.

Note that the same sensor will be included in Samsung’s upcoming Galaxy S11, though the Mi Mix Alpha 5G will be the first of the two to debut the camera.

The Mi Mix Alpha 5G also features a wacky “surround display,” which wraps completely around the smartphone.

While the concept is cool, it seems like the reality might be problematic. For one, a wraparound screen can’t use a case, which means the smartphone is much more likely to be broken when dropped or banged up.

And having a display on the back of the phone seems like it could cause privacy issues; if you’re using one side of the phone, will people be able to read your messages on the other?

That said, the Mi Mix Alpha 5G is definitely a unique smartphone with a powerful camera. So if you’re the type that likes more experimental technology, go for it! The Xiaomi Mi Mix will be available for around $ 2800 USD this December.

Now I’d like to ask you:

What do you think about the Xiaomi Mi Mix Alpha 5G? Would you be interested in a 108MP smartphone camera? And what do you think about the wraparound display? Would you worry about dropping it? How about privacy?

Share your thoughts in the comments!

The post New Smartphone Includes a 108-Megapixel Camera and Wraparound Display appeared first on Digital Photography School. It was authored by Jaymes Dempsey.


Digital Photography School

Posted in Digital Photography | Tagged , , , , , | Leave a comment

Refurb. Canon EOS M100 EF-M with 15-45mm f/3.5-6.3 IS STM Lens – $299.99 Shipped (Compare at $449.00 New)

The Canon Store has the Refurbished Canon EOS M100 EF-M with 15-45mm f/3.5-6.3 IS STM Lens available for $ 299.99 with free shipping. Compare at $ 449.00 new.
 
Refurbished items purchased from the Canon USA Store come with a retail-matching 1-year warranty.

Canon, Nikon, and Sony News, Deals and What’s New at The-Digital-Picture.com

Posted in Photo Equipment | Tagged , , , , , , , , , | Leave a comment

11 Tips for Shooting Travel Stock Photography to Make Money

The post 11 Tips for Shooting Travel Stock Photography to Make Money appeared first on Digital Photography School. It was authored by Kav Dadfar.

Stock photography is a tough industry to master. The competition is fierce and prices have been falling over the last decade. But if you are willing to put the effort in and have a long term plan, you can certainly reap the rewards. As a photographer who has been involved in stock photography for over a decade, I have certainly seen the highs and lows. So here are my top tips for shooting travel stock images and how to make money from it.

shooting-travel-stock-photography

1. Include people

Picture buyers are always looking for something new and fresh. Including a person can often be what makes your images unique to the thousands of others that already exist. Including a person in the shot also gives the image some context and shows more of an experience rather than just documenting a place.

Some scenes are busy enough that you don’t need someone to pose. But if you do need someone, don’t be afraid to ask a stranger. Rarely have I found that anyone says no. I always offer to send them a copy of the image to sweeten the deal. This doesn’t mean you shouldn’t take the more generic-type shots. It more about maximizing your sales potential by shooting a variety of different images.

shooting-travel-stock-photography

2. Get a model release

So once you have included a person when shooting travel stock photography, it is a good idea to get a model release. If the person or people are mainly unrecognizable, or if you intend to sell your shot for editorial purposes only, you won’t require one. But be aware that some stock agencies will require a model release even if it is someone’s hand showing in a photo. Of course, there are times where it simply isn’t feasible, for example, if you are photographing a crowd of people. Getty Images have a great model release form that you download here.

shooting-travel-stock-photography

3. Shoot portrait and landscape

When shooting travel stock photography, you should always shoot a landscape and portrait version. Not all scenes work in both landscape and portrait, so sometimes it might not be possible. But if you can, it will come in really useful.

But not only portrait and landscape, try to capture some different compositions. For example, place your point of interest on the left or right. Leave room above and below. You are already at the location so you might as well cover as many possibilities as you can. You never know when a buyer will ask if you have that image in a different crop. Doing this will mean that for example, your image may get used as a double-page spread or a front cover.

11 Tips for Shooting Travel Stock Photography to Make Money

4. Leave space for copy

It is important to shoot images with dead space to allow for copy or headlines to be put in. Sometimes this can mean breaking those all-important rules of composition you have spent years perfecting. But it’s worth it to make those sales.

As mentioned above, you can always shoot multiple versions of the same shot. Try to imagine where and how your image will be used in a publication (or even a website), and compose your shot with that in mind.

Image: There was plenty of free space at the top of this image for the copy to be placed.

There was plenty of free space at the top of this image for the copy to be placed.

5. Choose the right agency

This might be pretty obvious, but it’s important to submit your images to the correct stock photography library. If you shoot travel stock photography, then a specialist travel site is best. If you shoot still life, then an agency that specializes in this would be more successful.

Beyond that, spend some time researching the agency that you are thinking of submitting to. For example, are you happy to see your images sold for a few cents? Consider what your commission rate will be as well as they vary greatly from one agency to another.

shooting-travel-stock-photography

6. Think carefully before submitting to Microstock

Every single person I have ever spoken to who submitted to microstock sites regrets doing so down the road. Of course, there are probably some photographers out there who are very happy with their returns. The problem is that you will need such a huge collection of images with a wide coverage to see any returns that will be worth your time. This is because microstock sites sell images for cents. Ask yourself, would you prefer to sell one image at $ 25 or 250 at 10 cents?

11 Tips for Shooting Travel Stock Photography to Make Money

7. Find fresh angles

If you really want to make your images stand out and catch the buyer’s eye, photograph it differently! Every picture buyer has seen the classic shot of the Eiffel Tower, and it has been on the cover of hundreds, if not thousands, of publications. So the same is not likely to catch many prospective client’s attention. It’s not always easy, but if you can capture something different or unique, you might end up with a few sales from it. This could be as simple as photographing something from lower down or higher up.

11 Tips for Shooting Travel Stock Photography to Make Money

8. Unique location

As well as finding fresh angles, find new locations. Iconic locations such as London or New York, are constantly changing, so there are always potential new places from which to capture photos. This could be from a new rooftop bar with a unique view of Manhattan or new art installation on the streets of London. Even if your location isn’t ever-changing, finding somewhere with a view that not everyone photographs can be very useful.

shooting-travel-stock-photography

9. Quality over quantity

This is often a bit of a contradiction when it comes to stock photography because stock photography is a numbers game. The more images you have, the better your chances of making a sale. However, the key is that they have to be quality shots that people would be willing to pay for. This is the reason that it will take most stock photographers a few years to get a wide enough coverage of images to see a decent return.

Try to always shoot the best locations at the best possible time of day. More often than not, this will be sunrise or sunset, but you will need to assess each scene individually. Your aim should be to capture each shot in a way that you can sell it.

11 Tips for Shooting Travel Stock Photography to Make Money

10. Stay local

Shooting good travel stock photography doesn’t always mean jetting off to far-flung locations. You can often produce great travel stock images a lot closer to home. If, like me, you are lucky enough to live near an iconic place (for me it is London), then you already have endless photo opportunities.

Shooting locally has other benefits as well.

You can revisit locations easily if the weather wasn’t great. You don’t have to worry about the additional travel expenses that eat into your profits. In fact, you will probably find that your local shoots end up having a far better ROI (return on investment) than traveling to other places.

11 Tips for Shooting Travel Stock Photography to Make Money

11. Do something different

Another way that you can try to capture different types of images is to use different technology. For example, drones have now been around a while and can offer a completely new and unique view of something that may have been photographed a lot. But there’s no denying it’s getting harder and harder to fly drones in many places. So if it’s something you are interested in, it’s probably a good idea to get a license. But drone images do sell pretty well, so it is worth considering.

shooting-travel-stock-photography

Conclusion

For most people stock photography will never be the main source of income. However, with some preparation and planning, you can certainly make some extra money from your hobby or profession. The key to being a successful travel stock photographer is to treat it like a business as much as possible. Keep your costs as low as you can, and shoot as often as you can.

Do you have any other tips you’d like to share? Do you make money from shooting travel stock photography? Share with us in the comments!


shooting-travel-stock-photography

The post 11 Tips for Shooting Travel Stock Photography to Make Money appeared first on Digital Photography School. It was authored by Kav Dadfar.


Digital Photography School

Posted in Digital Photography | Tagged , , , , , | Leave a comment