It’s 2017 and it’s probably time you updated (or created) a Metadata Preset to add your copyright information to all your photos. In this article, you’ll learn how to edit a Metadata Preset, and how to use it when importing your photos into Lightroom.
If you want to get paid (or at least get recognition) for your photos, it’s a really great idea to include your name and contact details in your photos. You might find that doing this on a photo by photo basis (or even in batches) a bit tedious. Too much time spent dealing with metadata tends to take the fun out of photography, despite it being a necessary evil. What if there is a better way?
That way is the Metadata Preset. A Metadata Preset is a predefined set of information that gets added to all selected files from the Metadata panel, or (even better) gets added to all files upon Import. It can be extensive and specific to a job, or general to apply to all images.
Creating a Metadata Preset
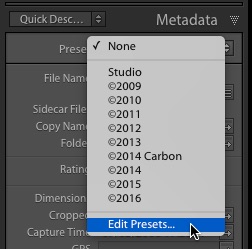
Let’s create a Metadata Preset. First, go to the Metadata panel in Lightroom’s Library Module. At the top is the Preset Dropdown. From the list choose Edit Presets.
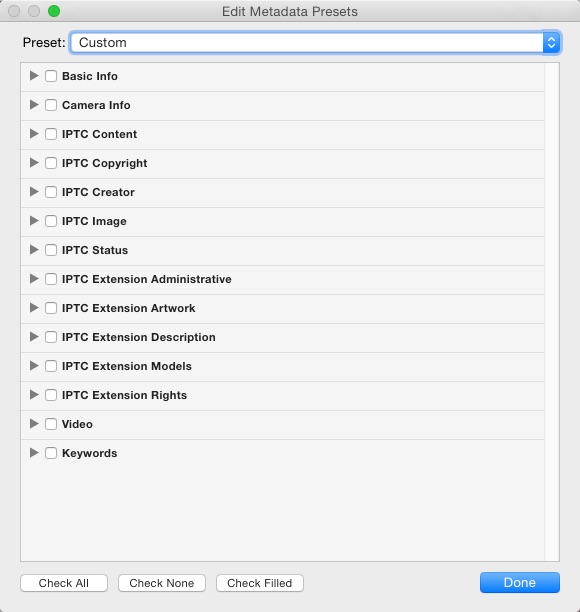
A quick look at the headers above shows the sheer amount of information that can be added to your files. While the Metadata Preset you’re going to create here is for copyright, you can create a metadata preset for a specific event with all the keywords and captions prepared in advance. Fortunately, you don’t need this level of detail for a copyright preset.
IPTC Copyright
The first section you need to fill in is the IPTC Copyright section. While the Berne Convention doesn’t require a year for European copyright, it’s better to include it anyway for worldwide compatibility. Start with the copyright symbol © (Option+G on Mac, or hold down Alt and type 0169 on PC). Alternatively, copy and paste it from this article.
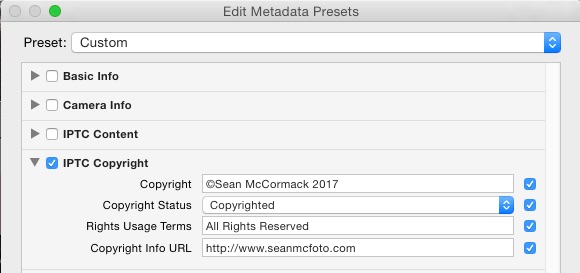
It’s 2017, so add this after the symbol. Add a space and then your name. This text will also be used as the Simple Text option for watermarking.
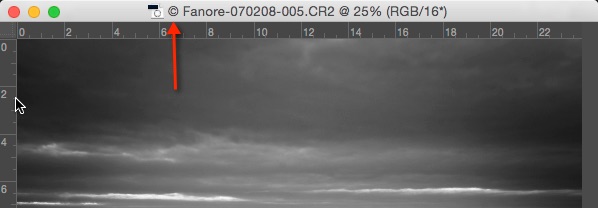
The next section is Copyright Status. There are three options here; Unknown, Copyrighted and Public Domain. Obviously, you need to choose Copyrighted. With this preset, when you open an image in Photoshop (or any other software that reads this information), the name in the title bar will include a copyright symbol, letting anyone opening know that it’s a copyrighted file.
Rights Usage Terms is your next field. If you’re keeping your images fully rights managed (people need your permission to use the photos), then enter All Rights Reserved here. If you’re using one of the Creative Commons licensing options (e.g. Non-commercial with attribution), include that here.
The final option you have here is Copyright URL. You may have a dedicated page explaining copyright on your website. Alternatively, it could be your contact page or main website address.
IPTC Creator
The second part you should fill in is the IPTC Creator section. This includes your contact information so users can potentially connect with you to ask for permission to use your image. It’s pretty straightforward and includes your name, address, phone number, email address, and website. You absolutely should include this information.
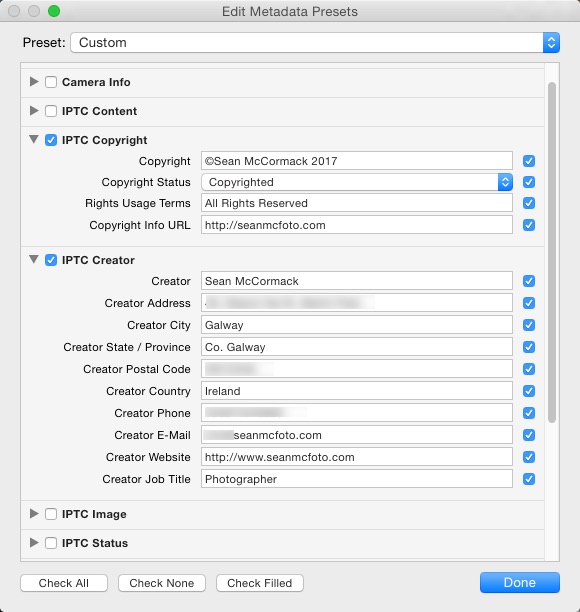
Note: if you do not wish to put your address just put your State/Province, country and a way to contact you – email is a good option.
When you’re done, click the Presets pull-down at the top and choose “Save Current Settings as New Preset”. Give it an appropriate name, like “© 2017” and click Done. Alternatively, press Done first, then choose Save As in the dialog box that appears (below).

Name the Preset and click Create.

That’s all you need for a copyright Metadata Preset.
Apply on Import
Next, open the Import dialog. Press Shift+Control+I on PC, or Shift+Command+I on Mac. Select any option at the top center except for ADD. Go to the Apply During Import section in the right-side panel. From the Metadata Preset menu, choose the preset you just made.
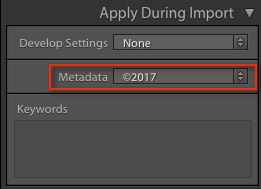
Once you’ve selected a Metadata preset, Lightroom remembers this for the next time so you can just cancel out of the Import dialog. The only reasons it would change is if you select another preset, or your Lightroom Preferences get reset.
Other Uses for Metadata Presets
So that’s how you create a Metadata Preset. Remember that they are not just limited to copyright information. Starting with the copyright preset as a template (so you’re not entering this information again), you could create one for that dance show you’re shooting. You could set up the caption in the preset (e.g. Dance Show at Dance Theatreby Dance group on date month year), and include a series of appropriate keywords for the show.
If you were doing a fashion shoot, you could include the models name and model release information.
Even if you haven’t been applying Metadata Presets so far, you can still use the Filter Bar in the Lightroom Library Module to sort your images. Select a year from the Date Column, in this case, select 2017, then Ctrl/Cmd+A to select all, and from the Metadata panel, select your 2017 preset. This information will applied to all selected images.
The post How to Create and Use a Metadata Preset in Lightroom by Sean McCormack appeared first on Digital Photography School.