Outdoor portrait photography involves going outside, and utilizing the beauty (or the ugliness) of your surroundings. You probably already know some local beauty spots, and can think of some good places to take portraits right away. But once you start observing your local area with the aim of making portraits in mind, you will begin to see the potential, even in mundane locations. But how do you find great backgrounds for outdoor portraits?

Here are some ideas to get you started.
1. What lens are you going to use?
This is important because, broadly speaking, there are two different ways to take portraits. Both involve the use of different types of lenses.
The first is to to use a wide-angle lens to take an environmental portrait. This may be documentary in approach, or it may be more fashion or beauty orientated. Either way, the idea is that you use a wide-angle lens to take a portrait, and that the setting is as important as the model.
The second is to use a longer focal length, and shoot with a wide aperture to throw the background out of focus. In this situation the requirements for the background are different, because you are looking for something that looks good out of focus. Also, because longer lenses have a narrower angle of view, you are using less of the setting in your portrait.
Of course, it is more than likely that you can find opportunities to take both types of portraits, in the same setting. You may also make up your mind, once you have scouted a location and assessed its potential. But it helps immensely if you know what your approach to the shoot will be, while searching for a spot to shoot.
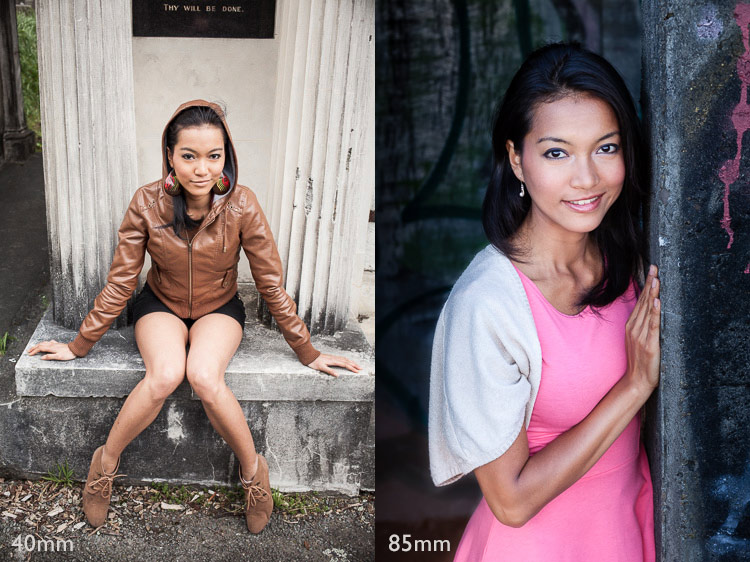
These two portraits show the differences in the two approaches. The first was taken with a 40mm lens (on a full-frame camera), and shows the setting as well as the model. The second was taken with an 85mm lens (also on a full-frame camera) and shows much less of the setting.
2. Where does the light fall?
Some photographers tend to shoot portraits entirely in natural light; others use flash to supplement it. Whichever approach you take, it is still important to assess the quality of the light in your given location.
Take into account the time of day you plan to do the shoot. To take full advantage of natural light you should aim to shoot in late afternoon or evening, during the golden hour, when the sun is close to the horizon. For this reason it helps if you do your scouting at the same time of day, so you can see how the location looks in this beautiful light.
Another option is to take photos on a bright sunny day, but in the shade. The light bounces off nearby surfaces, which acts as a giant reflector. This is another type of natural light with beautiful qualities.
Alternatively, you might like to shoot on a cloudy day. This means that time of day is not so important, but it does mean that the light is most likely to come from above, and may create shadows under your model’s eyes and chin. In this situation you can use a reflector or fill-flash to minimize shadows. So think about whether there is room to set up a light-stand (if using flash) or for somebody to stand and hold a reflector (if using natural light).
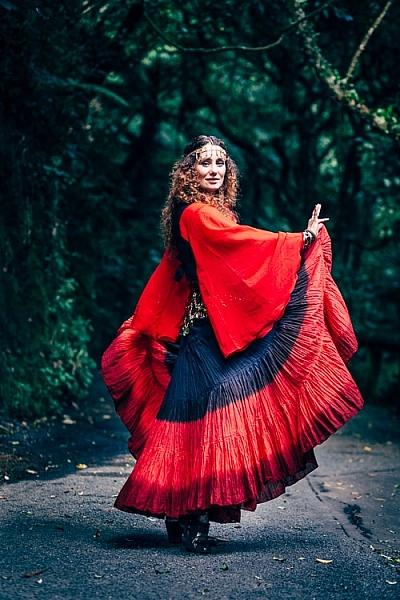
This photo was taken in Wellington Botanical Gardens, and the model is illuminated by light coming from above, through the tree tops. As she is in costume, I thought the direction of the light was reminiscent of a spotlight on a stage, and appropriate to the style of portrait. I used a short telephoto lens (85mm, full-frame camera) to separate the model from the background.
3. Use a smartphone to take photos
You can use a smartphone to take photos of locations to help you remember what they look like. Of course, you can do this with any camera, but the advantage of a smartphone is that most of them have GPS, and this helps you remember, and find, the exact location again later. This could be important if you are out in the countryside somewhere. There is nothing more frustrating than finding a great place to take some portraits, then not being able to remember where it is.
You could also import the photos into a specific Collection in Lightroom, and go to the Maps module to see the locations displayed on a map.
Here are some types of location you can search for. Remember, it’s important to think about what type of lens you are going to use for your portraits, as well as to assess the quality of light.
Backgrounds by the coast
Any location by the sea is full of potential. The same place can look very different every day, thanks to changing tides, weather patterns, and light. If the coastline is rugged, look for locations where you can use the rocks and cliffs as a background. Each bay or beach has its own character, so get out and explore. You are likely to find a good variety of beautiful locations, even in a relatively small area.
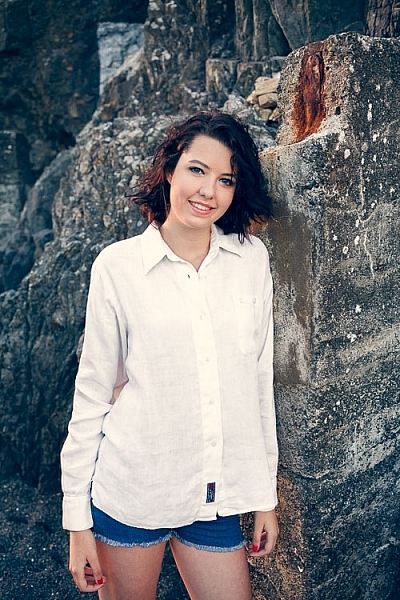
This photo was taken on a local beach, which has become one of my favorite locations for taking portraits, using a 40mm lens on a full-frame camera. This lens has a slightly wider angle of view than a 50mm standard lens, and allowed me to include a little of the beautiful location, but still make the model the focal point of the photo.
Graffiti backgrounds
It may be bit of a cliche, but there’s no doubt that graffiti or street art, can make an interesting and colorful background.
This photo was taken on a local beach with a graffiti covered, concrete bunker in the background. I used an 85mm lens (on a full-frame camera) to include just a little of the artwork in the frame.

Field and forest backgrounds
Fields and woodlands often make good locations for taking portraits, especially in the spring and summer. Fields of flowers are gorgeous locations. Try using a telephoto lens, and shooting through the flowers so they are out of focus.
The light in a forest is usually most suitable for portraits on a cloudy day. The light is soft, and unlike on a sunny day, your camera can easily cope with the brightness range. The one thing to watch out for is the direction of light. It comes from above, through the trees, and is highly directional. You will have to search for the places where gaps in the trees let light through. You may have to use a reflector to fill in the shadows created by the top light, or ask your model to tilt her face toward the light.
On sunny days, try shooting at the end of the day, when the light is softer, and use backlighting.
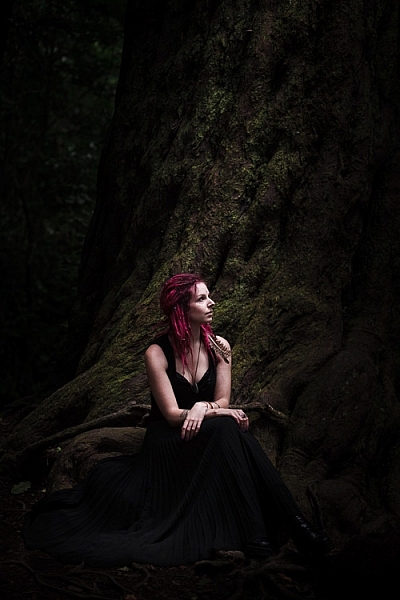
This portrait was taken on a cloudy day, in a thick forest where not much light penetrated through the trees. We found a clearing next to a large tree that we were able to use as a background. I used an 85mm lens (full-frame camera) to pull the tree in close to the model, and exclude most of the forest from the frame.
Local buildings for backgrounds
Keep an eye out for local buildings with public access that you can use for photos. I’m not talking about busy locations, as they are difficult places to work, unless both you and your model are very experienced. Let me give you some examples.
Here’s an abandoned boat shed on a lonely beach.
Test shot

This is the portrait we made at that location.
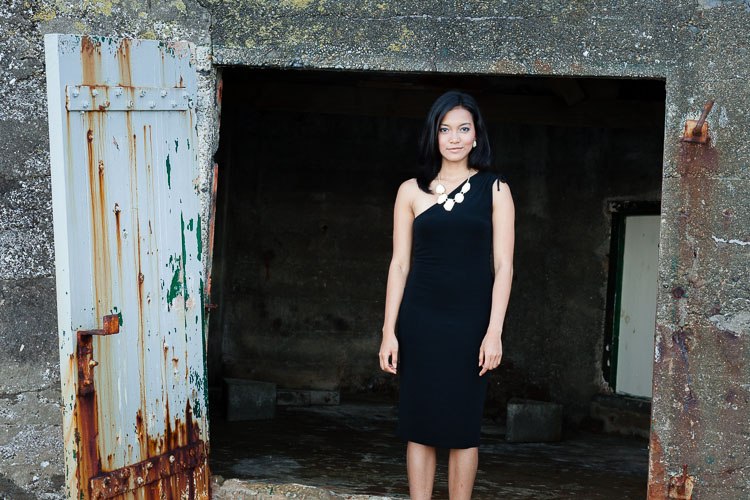
The second example is a graffiti covered concrete bunker left over from WWII.

Test shot.

Here’s a portrait we made there.
In both examples I used a small part of the building as a background. You can see the same technique in the other photos in this article. The idea is to make sure the background complements the model in your portraits, and doesn’t overwhelm her.
Summary
The outdoors is a bit like a giant stage set, just waiting for you and your model to use. Wherever you live, I am sure that there are plenty of great locations for portrait photography nearby. It’s just a matter of learning to spot their potential, and thinking about which lens (or lenses) you will use for your portraits.
Share some of your images from your favorite spots in the comments below.
Mastering Lenses
If you want to know more about buying and using lenses then please check out my ebook Mastering Lenses: A Photographer’s Guide to Creating Beautiful Photos With Any Lens.
The post How to Find Great Backgrounds for Outdoor Portraits by Andrew S. Gibson appeared first on Digital Photography School.