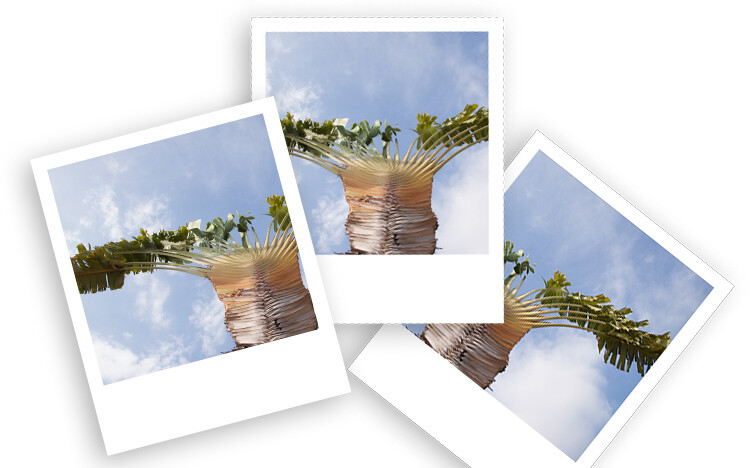
Nostalgic for the printed photos? Polaroids are coming back as trend as are many vintage things. Do you want to achieve this effect while still maintaining the advantages of the shooting digital? In this tutorial, I’ll show you how to make your digital photo look like a Polaroid and even like a stack of Polaroids in a very easy way using Photoshop.

Make a new document in Photoshop
The size of the image in an original Polaroid (just the image without the white frame) is 3.1 inches by 3.1 inches. Therefore, you need to open a new document in Photoshop with those measurements. If you are going to keep the result digital then you can leave it at 72 dpi (dots per inch). If you want to print it then set it to 300 dpi. Make sure the background color is black and then click OK.

Double-Click on this background so that you make it a layer, that is by default called Layer 0. Then make a new empty layer by going to Menu > Layers > New Layer.
Add the white frame
Now you need to do the outer frame which is the white border of the Polaroid. In order to make sure it’s centered, you can do it in two steps. First, go to Menu > Image > Canvas Size and this will open a pop-up window. The original Polaroid has a width of 3.5 inches, regardless you put it as both width and height. Make sure the point in the grid below is on the center square.

Now you just need to make the bottom part of the frame larger. For that, go again to the Canvas Size but this time the point should be in the top square. Now fill this layer with white color by going to the paint bucket tool, make sure white is the foreground color and then click on the layer.

Add the background and a drop shadow
Create a new layer that will be your background. It can be white for now, but you can also add a texture like wood, for example, if you want to make it look like a table top, and so on. Go to Canvas Size and make it bigger once again. You can choose the size that’s best for you, here I’m doing 5.5×6.5 inches.
Select the layer that contains the frame (the white rectangle) and click the Add a Layer Style button at the bottom of the palette (fx). Select Drop Shadow and in the window that will pop-up, you can choose your settings. I’m using a 45-degree angle, with a distance of 30, a size 10, and setting the opacity to 29. You can set all these however you want, just move them around until you like how it looks. Make sure the preview option is ticked so that you see what you’re doing.

Put your image inside the frame
Up until now, you have prepared your Polaroid and you can use this process for any photo or save it as a template.
To put your photo inside the frame you need to open your raw image and make the adjustments you want until you are satisfied, as you would do normally.
Now open the image as a Smart Object by holding Shift to make the Open Image button turn into Open Object and click on that. Another way to do it is to click the link at the bottom of the image window and in the pop-up window tick the option “Open in Photoshop as Smart Object”.
For more information about Smart Objects you can see my previous article on that topic here: How to Create with a Good Workflow Using Smart Objects in Photoshop.

Now drag the thumbnail of that image into the layers palette of the Polaroids document you’ve been working on and it will be added as a Smart Object there as well. Now you can choose the image and keep working on the Polaroids.
Make sure the Smart Object (your image layer) is on top of all the other layers (with your black square directly underneath). Right-click on the image layer and select Create a Clipping Mask from the menu. Then use the Move tool to position the image to best compose it within the square.

Oops, notice my layers are in the incorrect order here. Make sure your image is on TOP of the black square.
Try out some backgrounds to make it more interesting!
How to make a stack of Polaroids
If you want to make a stack of Polaroids follow these directions.
Select all the layers except the background and put them into a group by going to Menu > Layers > Group Layers. Now make as many copies of it as you’d to have like in your stack. You can do this just by dragging the group into the New Layers button at the bottom.
Finally just give a little twist to each one (use Edit > Transform > Rotate). There you go!


Or you can play around with the composition. Remember you can also change the image that appears in each frame.

Extra effects
If you like to give your digital photo a printed quality but you don’t want to do a Polaroid, try curling the corner as if it was a page turning in only three steps.
1. Draw a square selection in the corner and draw a Gradient inside it with the Gradient tool set to go from black to white.

2. Go to Menu > Edit > Warp and drag the corner to create a curl.

3. Add a Drop Shadow like you did with the Polaroids.

Give it a try
So have fun making Polaroids in Photoshop and share your questions, comments and Polaroid compositions in the comments section below.
The post How to Make Your Digital Photo Look Like a Polaroid Using Photoshop by Ana Mireles appeared first on Digital Photography School.