Glyn Dewis has an innovative tutorial for your underexposed, throwaway images. Especially on days where you can’t get out to shoot, retouching some of those photos you never thought to use can be a great way to expand your portfolio and skillset:
Lightroom Workflow
Dewis starts his endeavor in Lightroom in order to fix the lighting and other small details:
1. Increase the exposure of the whole image. Using the shadow slider on the right side of the screen, slide all the way to the right or as far as you need to lighten the shadows and allow more details to be seen. You can also adjust the exposure a bit to the right, but be careful to no blow out the highlights using this method.
2. Bring out the details of the subject. Using an adjustment brush, slide the shadows all the way to the right again. Paint over the entire image using a mask, and then remove the mask overlay by pressing O. This should further lighten the underexposed areas of the photo and increase detail.
3. Add detail to the face. Using another new adjustment brush, bring up the shadows and exposure for the facial area to give it that added detail.
4. Add shine to the clothing. Using a new brush and a mask overlay, paint over the clothing that you wish to add shine to. Press O to remove the overlay, and increase the clarity, shadows, and exposure. For a more dramatic feel, duplicate the effect.
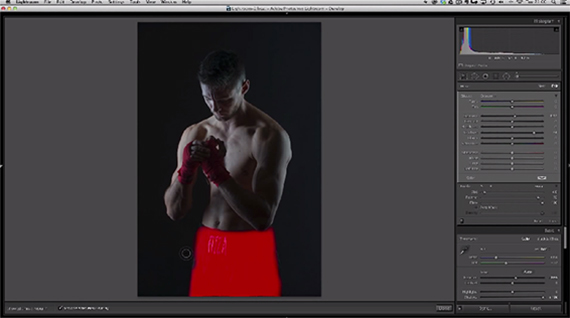
5. Remove blemishes. Using the spot removal tool in Lightroom, remove any noticeable blemishes on the skin.
6. Add finishing touches on the entire image. Click on the background and lower the Temp to a more blue tone. Add sharpening to about 90. Pressing Alt and clicking on the masking slider should allow you to drag the slider right until the white shown on the image is only on the areas that need to be sharpened.
Photoshop Workflow
Next, Dewis sends his work over to Adobe Photoshop CS6. In order to be as nondestructive as possible, he does this by going to Photo > Edit In > Open as a Smart Object in Photoshop.
1. Decrease any noticeable flaws in the photo. In this photo, Dewis used the Liquify tool (Filter > Liquify) to reduce the bulge of the man’s abdomen. He uses the Freeze Mask option to paint the areas that he wants to protect from liquefying and then drags in the abdomen to get rid of the bulk. If you feel that you go too far with the Liquify tool, you can click on Reconstruct which gives you flexibility to change the degree of change that you would like.
2. Dodge and burn. Creating a new layer, fill it (Edit > Fill) with a 50% gray. Set the blend mode to Soft Light. Use the Dodge tool to add highlights; pressing the Alt key will switch to the Burn tool in order to add shadows. Great places to add these details are on muscles or the face.
3. Clean up the background. Using the Clone Stamp tool, sample the current and below layers. Alt+Click on a clear area of the background. Then, paint over any light or marks that detract from the overall image.
4. Add interest to the background. A great way to do this is using textures. For those of you who have CS6 and subscribe to Creative Cloud, you can access many free textures by going to Windows > Extensions > Adobe Paper Texture Pro. You can click on a texture to add it to the photo. Once you have one you like, desaturate (Image > Adjustments > Desaturate) the color from it. Add another texture on top if you would like and desaturate it, as well. You can play with the blend mode of the two textures; Soft Light is always a nice option. Make a new group of the two texture layers and create a group Layer Mask. Using a soft black brush, paint over your subject where you don’t want the texture to appear. You can Alt+Click on the layer mask to see if you missed any areas.
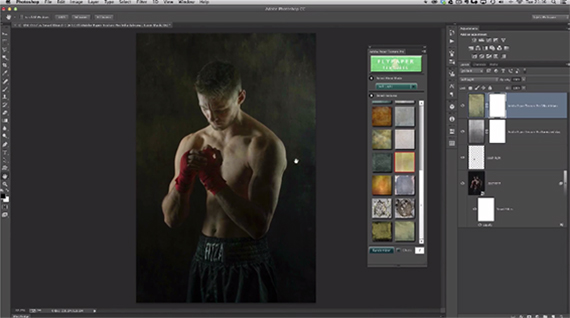
5. Add lighting effects. Create a new layer, and set your foreground color to white. Put a medium sized circle of a soft brush in the middle of your image. Transform the layer and drag the four corners of the brush out to the edges of the image. Move this to where you want the light coming from. If more than one light source is needed, duplicate (CTRL+J) the layer, and drag it to the other area.
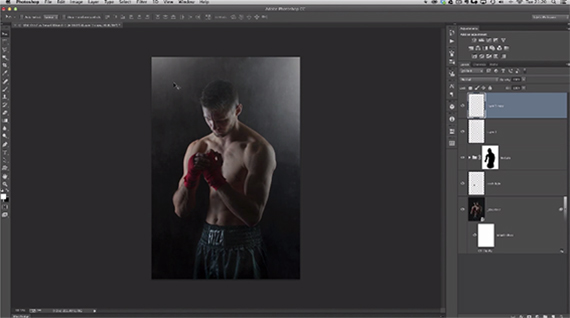
6. Add dust and specks to the light. Open a picture of blurry rain falling in the dark or dust and specks on a dark background. Drag it into your image. Rescale it to roughly the size of the image using Transform. Set the blend mode to Screen and lower the Fill percentage, so there are only traces of the specks. In Dewis’ image, most of the light comes from the top, so he wants to remove the specks from the bottom half of the image. He adds a Layer Mask and opens the gradient tool. With a black foreground, he uses a foreground to transparent gradient and places a small gradient starting at the bottom of the image to remove some of the lower specks.
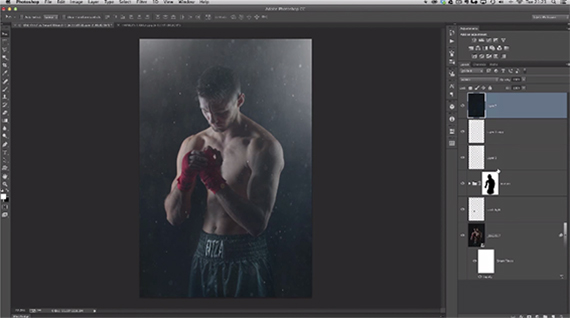
7. Add fake smoke. Create a new layer and press D to reset your foreground and background colors to default. Create a Clouds filter by going to Filter > Render > Clouds. The clouds that the tool makes will not be very realistic, so use the Rectangular Marquee tool to choose a small area of the clouds. Create a layer by copy (Layer > New > Layer by copy), and delete the lower layer of clouds. Using Transform, drag the small version’s corners out until the clouds look more realistic. Lower the Opacity to a small number such as 5-10 percent.
8. Desaturate the colors of your image. Set your colors back to default (D), and create a Gradient Map with opacity 30 percent. This is to add a bit of interest and shading to your image while toning down the colors.
9. Add lighting color. Now it’s time to add a special layer for color effects. Go to Layer > New Fill Layer > Gradient. Choose a gradient with complimentary shades; in Dewis’ image he used one that went from Orange to Indigo. You can click on the color swatches to edit the shades of the gradient, as well. Use the angle of the gradient to adjust lighting. You can set the blend mode of this layer to Soft Light and adjust further from there. You can click on the actual image and actually move the gradient to adjust, as well. Lower the opacity once you are happy with the gradient.
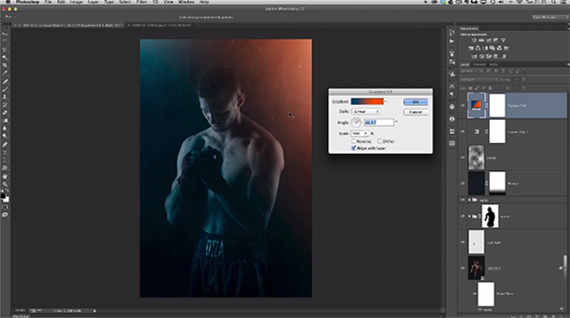
10. Add some contrast. Create a merged layer of all the layers by selecting all and then going Edit > Copy Merged and pasting it on a new layer. Create an Unsharp Mask (Filter > Sharpen > Unsharp Mask) to add contrast without any color change. Dewis uses an amount of 20 and a radius of 20.
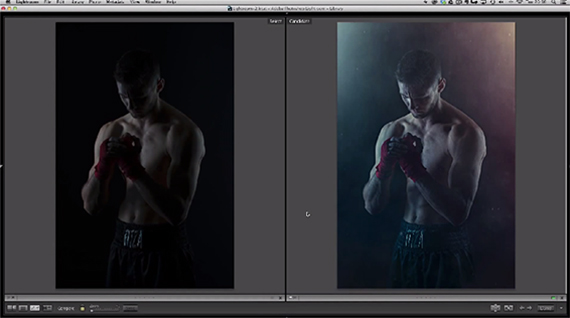
Before / After
Now your image is done! Using and applying these techniques to your own photos will hopefully allow you more flexibility in which images are considered editable and which are not.
“We can make something that would ordinarily be a throwaway picture and turn it into something that’s actually portfolio-worthy.”
For further training: Lightroom Mastery at 50% Off
Go to full article: How to Turn a Bad Photo into a Great Photo
What are your thoughts on this article? Join the discussion on Facebook
Article from: PictureCorrect