Quick note: Check out Lightroom expert Andrew’s brand new Mastering Lightroom Email Course; enrollment is open until the end of February.
Whether you’re new to Lightroom or have been using it for years there are certain things you need to know in order to ensure that everything runs as smoothly and efficiently as possible. Do these properly and you can look forward to many years of hassle-free and effective Lightroom use.
Let’s start with what is probably the most important thing of all—backing up your Catalog.
1. How to Back Up Your Catalog
Your Lightroom Catalog is essential because it’s where Lightroom stores every piece of information it has about your photos. This includes the location of your photos (i.e., where they are saved on your hard drive), metadata (such as camera settings and keywords), Lightroom specific information (like which Collections you’ve added photos to) and any edits you have made in the Develop module.
How much of a disaster would it be if you lost all this data? You can prevent it by making sure that Lightroom is set to back your Catalog up regularly.
Do this by going to Edit > Catalog Settings (Windows) or Lightroom > Catalog Settings (Mac). Go to the General tab and set Back up Catalog to Every Time Lightroom Exits.
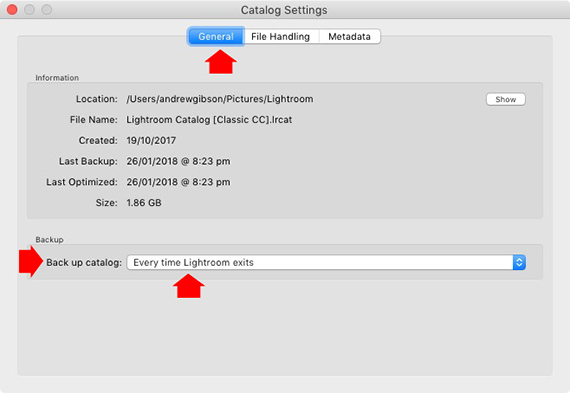
Catalog Settings
Then, next time you close Lightroom, the Back Up Catalog window appears. Check the filepath shown under Backup Folder to see where your Catalog backups are saved. Click the Choose button to change it if necessary, and the Back up button to complete the process. The important thing is to back your Catalog up to an external hard drive, so you don’t lose the backup if your main computer is lost or stolen.
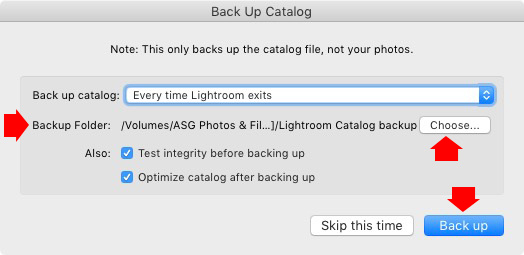
Backup Folder
Here are some important things to note about Catalog backups:
- You only need to keep two or three backups. You can delete older ones.
- Lightroom 6 and Lightroom Classic CC compress Catalog backups, saving hard drive space.
- Once a month or so copy the latest backup to Dropbox, Google Drive or another cloud storage solution, in case you lose both your computer and your external hard drive to theft or fire.
- The Catalog doesn’t contain your photos, only information about your photos. Photos need to be backed up separately.
2. How to Set up File Handling in Catalog Settings
Found also in Catalog Settings, the File Handling settings are important because they help you optimize Lightroom’s performance speed. Get the settings wrong and your previews files will eat up your hard drive space. This is a issue because you need to keep at least 10 percent—preferably 20 percent—of your hard drive space free, otherwise Lightroom (not to mention every other program on your computer) will start to run more slowly.
There are two important figures in the Catalog Settings (both are marked below):
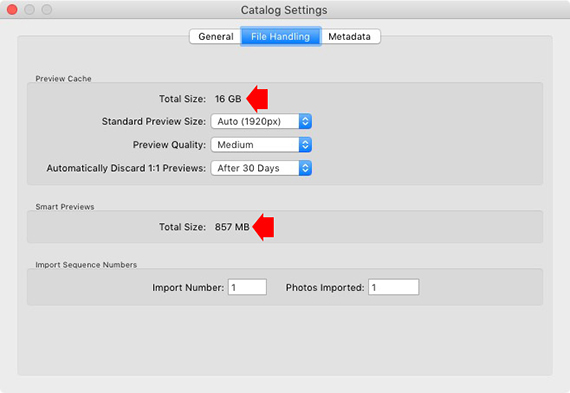
File Handling
- Preview cache. This is the size of your .lrdata file that contains the previews used in the Library module to view files.
- Smart Previews. The size of your .lrdata file that contains Smart Previews.
To keep the Preview cache to a reasonable size set Standard Preview Size to Auto and Preview Quality to Medium. The auto setting tells Lightroom to create previews that match your monitor resolution.
You should also set Automatically Discard 1:1 Previews to After 30 Days (or any setting other than Never). 1:1 Previews are the largest type of preview and take up the most hard drive space.
If your preview files get too big, you can reduce the size at any time in the Library module by following these steps:
- Go to the All Photographs Collection in the Catalog panel and select all the photos inside it (Edit > Select All).
- Go to Library > Previews > Discard 1:1 Previews or Library > Previews > Discard Smart Previews to delete the 1:1 or Smart Previews for those photos.
3. How to Search for Images
One of the benefits of using a Catalog, rather than a photo file browser, is that it’s easy to search your photos in Lightroom. You can make searches in the Filter Bar (marked below), which is found near the top of the screen in Grid View (press ‘\’ on the keyboard if you don’t see it).

Searching in Lightroom
There are three types of searches:
- Text: Search keywords, filenames, titles, captions, etc., for text sequences.
- Attribute: Filter by flag, star rating, color label or file kind (master photo, virtual copy, or video).
- Metadata: Search by date, camera, lens, camera setting (ISO, shutter speed, aperture, etc.), aspect ratio or any of the dozen or so search options listed there.
Experiment with the options to see how the Filter Bar works. The important thing you need to know is that Lightroom searches selected folders or Collections rather than your entire Catalog. If you want to search all your photos select the All Photographs Collection in the Catalog panel.
4. How to Use the Profile Setting in the Develop Module
The Profile is the most important setting in the Develop module. The Profile menu is found in the Camera Calibration panel, at the bottom of the right-hand panels in the Develop module.
Adobe Standard is the default setting and was created specifically for your camera by Adobe to give accurate color rendition.
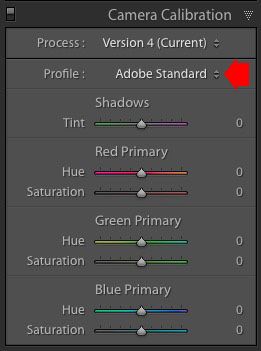
Camera Calibration
But you’ll also find the color profile settings specific to your camera (Landscape, Portrait, etc). You can pick one of these if you prefer it as a starting point for developing your photo.
The important thing to understand here is that profile affects color and contrast. That means you have to select the right one before you start adjusting contrast and color in the Basic panel.
For example, if you apply a profile intended for landscape photos to a portrait, then you are likely to end up with unnatural looking skin tones. Then you might try and fix that with the Basic panel or HSL sliders, only to find that this approach rarely works.
These two photos show the difference between the Portrait and Landscape profiles on a photo taken with a Canon EOS camera. The Portrait profile gives the best skin tones, while the Landscape profile makes skin look unnatural.
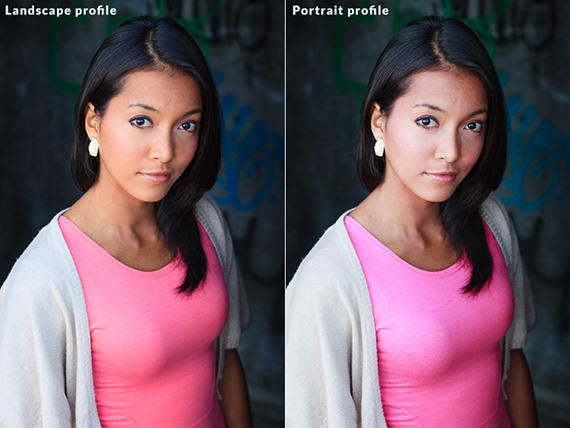
Portrait and Landscape Profiles
5. How to Use Lens Corrections
No lens is perfect. Most have at least some chromatic aberrations and distortion. You can eliminate these in Lightroom in the Lens Correction panel. Go to profile and tick the Remove Chromatic Aberration and Enable Profile Corrections boxes to do so. Lightroom applies the correct profile automatically.
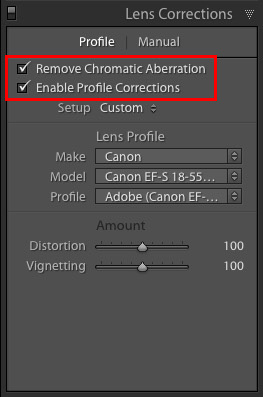
Lens Corrections
This comparison shows the result on a photo taken with a zoom lens producing barrel distortion. You can see the difference by looking at the edge of platform, which is curved in one photo and straight in the other.

Without Distortion Correction

With Distortion Correction
Note that many mirrorless cameras embed lens correction data in the Raw file. Lightroom recognizes it and applies it automatically, so you don’t have to. If this is the case with your camera, you’ll see the Built-in Lens Profile applied message at the bottom of the Lens Corrections panel.
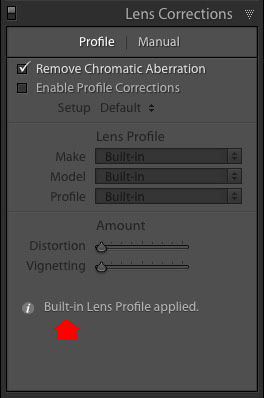
Lens Profile
6. How to Use Local Adjustments Wisely
Before Photoshop and digital photography came along professional photographers sent their negatives to master printers who used dodging, burning, and other darkroom techniques to create high quality prints. Today we do the same thing in Lightroom and refer to it as making local adjustments. That is, adjustments that you apply to part of the image rather than all of it.
Lightroom’s local adjustment tools are vital for bringing the best out of your Raw files. There are three – the Adjustment Brush, Radial Filter and Graduated Filter. They let you selectively adjust brightness, contrast, and other tone and color settings. Each tool has its own idiosyncrasies, so take the time to get to know each one in turn. Mastering local adjustments is the key to getting the most out of your Raw files in Lightroom.
The example below shows the difference that local adjustments make. I used a combination of all three of Lightroom’s tools to transform the top image into the bottom one.
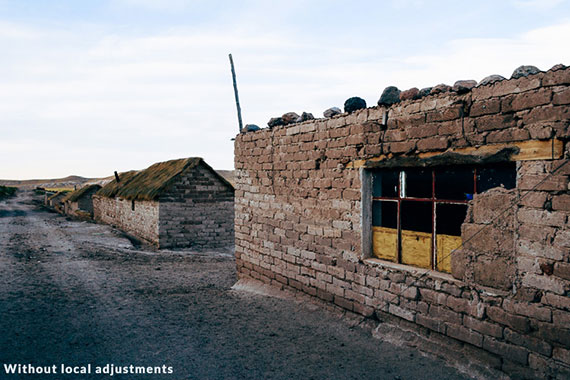
Without Local Adjustments
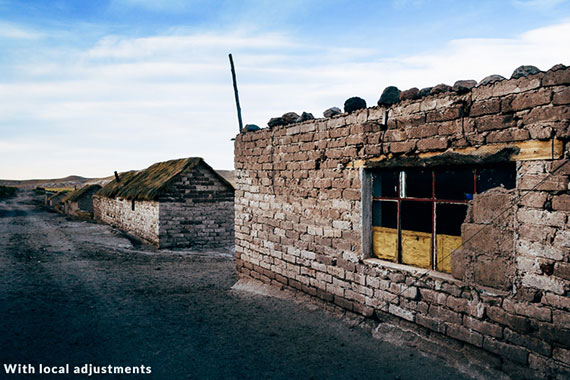
With Local Adjustments
For Further Training:
You can learn more tips, tricks and Lightroom secrets in Andrew’s brand new Mastering Lightroom Email Course. Enrollment is open until the end of February.
Go to full article: The 6 Most Important Things You Need to Know in Lightroom
What are your thoughts on this article? Join the discussion on Facebook
PictureCorrect subscribers can also learn more today with our #1 bestseller: The Photography Tutorial eBook
The post The 6 Most Important Things You Need to Know in Lightroom appeared first on PictureCorrect.