There is no doubt that in today’s world of digital photography it is even more imperative to be organized in your workflow, both to save you time in the long term, and also to protect your digital files. As every photographer, you will have your own way of working, and over time you will develop and modify your own workflow. But there are certain aspects, which I believe are essential, and every photographer should follow.
Here is my complete workflow from the moment I land at a destination.
On the Road

Get organized
A survival specialist, while on a hike, once gave me a piece of advice I shall never forget. He said if you ever find yourself lost in the wilderness, the first thing you should do is stop for a few minutes, sit down, get organized, and have a plan. Landing in a busy, new city is hardly the wilderness, but the first thing I do as soon as I get to my hotel room, is just sit down for a few minutes and get a plan together of what I need to do before heading out. Generally, the list looks something like this:
- Unpack camera equipment and lay everything out on a surface.
- Look at my shot list (prepared before I travel) and work out what I need that day or next day (if it is too late to head out).
- Pack my day bag with camera equipment and essentials like: water, sun cream, lunch, guide book, plasters (bandaids) and phone (for on the go information and emergencies)
- Plan my route and day for right after I leave the hotel for the first time, as the first few hours can be the toughest because I won’t know my surroundings.
- Lock valuables and important documents in the room safe and pack away the camera equipment I won’t need that day.
- Get my camera ready by putting in charged batteries and a formatted empty memory card, and having the lens cap off, ready to shoot as soon as I leave the room.
Have a routine in the evenings
Depending on where I am and the time of year, I may not finish my day until late evening as sunsets will be later in the day, but I still make sure I do certain things every night. As soon as I get back to my room I back up the memory cards from the day onto three separate passport size hard drives. I use Lightroom to copy the images onto each hard drive, and I have an Import Preset set up to also add copyright information automatically as it is saved. Once all the images of the day are backed up on all hard drives, I then pack them as follows:
- One drive in the room safe.
- One drive in my suitcase, ideally somewhere obscure, or if I have a car I leave it hidden in the car.
- One in my day bag that I carry with me during the day.
By doing this I can ensure I always have a backup of all of my photos from a trip in three different places. So if, for example, I have my camera bag stolen, I still have all my photos backed-up in my hotel room or the car.
Locations, descriptions and check photos
Before going to bed I use Lightroom to add location details and any descriptions that I might find useful to the photos while the information is still fresh in my mind. This is essential if you are planning on selling images to a publication or sending them to an image library (stocky agency). I have a flick through the photos I’ve taken that day to ensure I haven’t had a malfunction, but also to analyze if there are any shots that I could do better. For example, upon inspection I might find that a specific scene could benefit from having a point of interest in the foreground, or the light coming from a different direction. By reviewing and checking the photos, I can possibly go back and capture an even better image (if there is time).
Plan your day
Time is always at a premium when I’m on a shoot. There never seems to be enough of it, so it is essential to maximize my day. Each evening before going to bed I plan the next day’s shoot including:
- Setting my alarm for the next morning.
- Going through the shot list and making amends if necessary.
- Working out my itinerary for the day and saving addresses in the GPS unit if I’m driving.
- Packing my camera bag and ensuring I have fresh batteries and memory cards in the camera.
- Plugging in to charge any batteries I used that day.
- Lay out the clothes I’m going to wear.
The key is make sure I’m ready to leave as soon as possible after I get up, as I usually head out early in the morning to catch the sunrise and the early morning light. The last thing I want to do at 4am is to be looking for socks in my suitcase.
Get ready to head home
Having a practiced plan for the day I’m leaving as well, ensures that I don’t rush out and leave expensive camera equipment or hard drives behind. I try to have as much stuff packed up the night before, and pack my hard drives in three separate places (camera bag, suitcase and laptop bag).
At home

Transfer photos
Once I’m home it is all too easy to forget about the photos for a while and just leave them on my hard drives. However, it is important to remember that accidents, break-ins and even malfunctions do happen at home as well, so I try to transfer my photos onto my main storage space as quickly as possible. I use two external hard drives to save all my photos on (one being a back up) and I also subscribe to a cloud storage facility called Blackblaze as a third option. It’s a small price to pay for ensuring that my photographs are safe.
I simply plug one of my passport size hard drives into my iMac, then copy all the images using Lightroom onto my main hard drive. I save my images in a folder by individual specific destinations within a main folder of that country. I would then have sub-folders for more specific locations. So, for example, a shoot in Borough Market in London is saved in a folder for England, sub-folder London, sub-folder Borough Market.
Once all of my images have transferred I would then back up Lightroom on to my second main hard drive (I usually back up Lightroom once a month if I haven’t been on a trip – you may want to do it more often if you work on your images weekly or more frequently) and my cloud storage works in the background to automatically save any new files or anything that has changed on my machine.
Editing process
Once I’m ready to start editing photos I go through the same steps every time. I have found that this process works best for me, and over the years I have tweaked and amended it to arrive at the following. The important thing to remember is that this isn’t the “right way” to do it (it’s just my way of doing it), and everyone will have his or her own way of working, so find the that’s right for you.
1. First Edit – The first step is to go through and delete obvious mistakes such as blurred photos, accidental shots, etc.
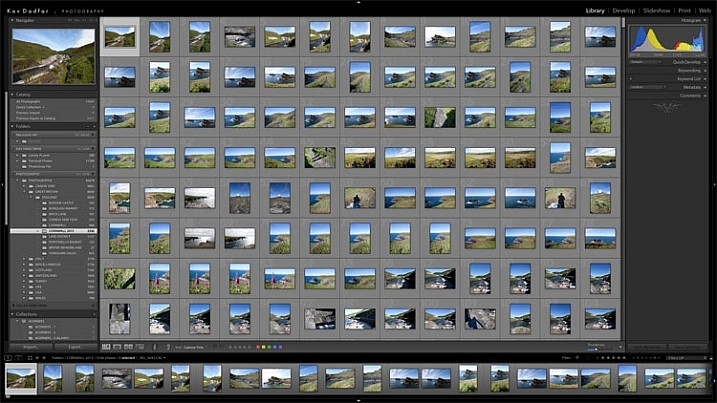
2. Second Edit – The next step is to begin marking photos that I would like to work on. I use the flag option in Lightroom to mark photos with composition or lighting that I prefer.
3. Check Selected Photos – Before I begin working on the photos, I want to make sure that I don’t waste time on ones that can’t be used because they are not sharp. So I review the photos at 100% (1:1 in LR) and deselect any that have camera shake.
4. Begin Post-Production – By this point I will have a handful of photos that I like, which I also know are sharp and correctly focused. As much as possibly I try to get my photos correct at the time of taking the picture, to keep post-production to a minimum, but these are generally the steps I go through using Lightroom on each photo:
- Check or adjust the White Balance
- Check or adjust Contrast and Exposure
- Check Highlights and Shadows
- Adjust Saturation
- Check and adjust angle (crop, rotate)
- If needed, adjust distortion (straightening vertical lines, etc. using the Lens Correction panel)
- Add any vignetting
- Correct Chromatic Aberration
- Reduce noise if needed
- Spot removal of dust or debris
- Final crop
If an image requires any additional post-production work, such as retouching, I would do that using Adobe Photoshop and once finished, import back into Lightroom (if you right click an image and choose “Edit in Photoshop” when you save, the new version will automatically be imported into LR). I generally don’t sharpen my images as the clients I work with do this themselves, however, if needed I use the High Pass sharpening filter option in Adobe Photoshop.
5. Selection Process – Once I have my images ready, I will use the star option (ratings) in Lightroom to go through and edit them down. I’ll begin by making them all one star and go through and mark the better ones two stars. I repeat the process until I have a selection of photos, which are marked as five stars.
6. Final Check – Before I export the photos, I will check each image over one last time at 100% to make sure I haven’t missed anything. It would be very un-professional to send images to clients or image editors, which are subsequently rejected because they are not in focus. I also check and add any specific details, which are needed such as captions, keywords, and metadata.
7. Export Photos – At this point the images are ready to be sent and I export them based in whatever format is required. Over time, I have set up specific presets in Lightroom for the various clients I work with, so I simply click on the relevant one, and all of the settings are automatically set up for me.
8. Final Admin – Once the images are live with the relevant client, I use the color tagging option in Lightroom to mark them accordingly. For example, I work with several image libraries (stock agencies), so I use a different color for each one. This way I know which images are with which library, at a glance.
Over time you will develop your own workflow, but some of these steps will be essential no matter what process you go through. Things like ensuring your images are backed-up while on the road and at home, or checking each image at the final stage before sending to clients or sharing online are a must for everyone.
Now it’s your turn. What is your workflow? Do you have any specific tips? Please share them in the comments below.
The post Travel Photographers Workflow – At Home and on the Road by Kav Dadfar appeared first on Digital Photography School.